Axis Anti-Riflemen Guide How to beat the Allies most diverse unit.
Introduction
This guide will explain the best ways to beat riflemen in CoH, including what units to use, how to use your units and what doctrine powers are the best to use against riflemen. Riflemen are the most basic yet one of the most powerful allies units in the game, with abilities like BAR's, grenades & sticky bombs they can be hell for an Axis player to stop early on, so don't underestimate a player that knows what they're doing with riflemen. Axis have special units designed just for fighting back massed riflemen including the dreaded MG42, Puma and the Ostwind Flakpanzer.
The history of the riflespam is a convoluted one. When Company of Heroes was in beta people did not believe the riflespam was a problem since it was then thought that mg42s garrisoned in buildings were much more powerful, indeed there were many of the opinion that garrisoning units such as the mg42 inside buildings was too powerful and negated units like the Allied rifle squad. However as usually happens with RTS games, the strategies and tactics of the players evolved to counter what was being done, and at the state in the game now a single heavy machine gun squad in a building presents almost no challenge for an experienced player to eliminate (within a few exceptions, we will go over how to make it very hard for a player to do this later). This gave rise to the riflespam, an allied tactic relying on the rifle companies advantage over its counterpart axis unit (volksgrenadiers) and superior numbers to take down mg42 nests in buildings. To date there has been a long period of time where people believed that the riflespam was too powerful and needed to be toned down, yet history has a habit of repeating itself. Players have again evolved their tactics to deal with the new threat, and the subsequent guides detail many ways for axis players to defeat the allied riflespam.
After reading you'll hopefully have a better idea of how to counter Riflemen in CoH.
Intro: Short descriptions on the main units & buildings you'll be using vs riflemen in CoH. There are other good units and weapons like the LMG upgrade for grenadiers and mortars from the Krieg Barracks, the Flammenwerfer upgrade for the halftrack and Knights Cross Holders are late game infantry. But all these units are less used and the the more commonly used units listed below are what you'll really want to work on perfecting.
Volksgrenadiers - 280 Manpower. Good vs infantry.
Info: Great unit for protecting HMG's, it's best to keep volksgrenadiers in groups since riflemen clearly outnumber them. Volks can dispose of a rifle squad that flanked your hmg pretty fast alongside the 2 mg gunners behind the main gun. Keep them at long range and in cover vs riflemen in 1v1 shootouts, close range when they're upgraded with mp40's.
MG42 Heavy Machine Gun - 260 Manpower. Good vs infantry.
Info: Fires bullets at a fierce rate, almost instantly suppresses riflemen on the first fire burst and pins them shortly after, don't let mg42's get flanked, always keep volksgrenadiers or another mg42 close by.
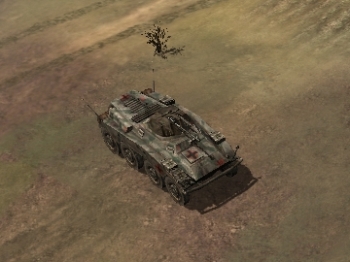
Sdkfz 234 Armored Car (Puma) - 280 Manpower & 35 Fuel. Good vs infantry & armor/vehicles when upgraded.
Info: The 'Puma' is built in tier3 from the Sturm Armory, armed with a rapid firing gun that can quickly lay waste to any amount of infantry, the more units this thing is firing at the better since less shots will miss. Make sure your puma doesn't get within sticky range and always retreat them when they're on low health. Can be upgraded with a 50mm AT gun for fighting armor/vehicles.
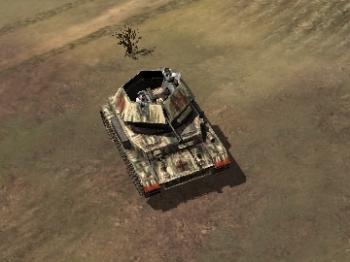
Ostwind Flakpanzer - 410 Manpower & 40 Fuel. Good vs infantry, light vehicles and aircraft.
Info: The Ostwind is the ultimate late game counter for massed infantry, they are built from the tier4 panzer command. Just like the puma, make sure you protect the ostwind by keeping out of sticky range and avoiding AT fire in general, the Ostwind can easilly take on light vehicles in combat and destroys them fast but against armor this unit is useless.
Buildings
Bunkers - 150 Manpower. Good vs infantry & protecting your units.
Info: The bunker's most important upgrade is the mg42 gunner inside for 50 munitions, with this gunner and an additional mg42 squad inside the bunker this unit not only covers 360' but can also shoot from 2 directions at once. Bunkers are best used to lock down important sections of the map and allies have a very limited arsenal to counter bunkers early on.
Barbed Wire - Free. Good for blocking off sections of the map.
Info: Use barbed wire for cutting off riflemen from a whole section of the map and to avoid them from flanking your HMG's.
Sand Bags - Free. Good for covering your units.
Info: Sand bags are good to build in places that are important such as high fuel points or strategic points connecting to fuel and munitions so that you can defend these locations easier.
Mines - 25 Munitions. Good for blowing up riflemen.
Info: If you can't afford to protect HMG's with units, you might want to lay down some mines in a place riflemen are likely to flank you from like right next to a building, good for protecting strategic points as well.
This post has been edited by Sepha: Nov 15 2006, 14:01 PM
Countering Superior Allied infantry with MG42s, Volksgrenadiers, and Bunkers
Countering the allied riflespam with only axis infantry is one of the hardest tasks an axis commander can face. In the absence of armor units we are forced to fight allied rifles with units that are, in general, weaker when matched up one on one. To win this fight axis players must first outplay the initial rifle units sent onto the field, but his end goal should be to force rifles into ‘Kill zones’, a fortified area covered by mg42’s that will suppress the rifles and force them to retire from the field. During the course of this guide I will go over how to defeat allied rifles in the very early stages of the game and where you should set up kill zones on the maps semis and angoville.
Bentguru’s 5–step Guide to Defeating Allied Rifle Companies in the Open.
*All the reference pictures are taken from the replay vs Nystrom in the silver replay forum. It’s highly suggested you watch that as well since it’s hard to convey tactics via screenshots.
1) Use Cover Extensively
Learning to use cover well is an essential part of improving your game. Units in light or heavy cover gain huge defensive bonuses that will minimize your casualties and allow you to win fights that you normally would have no chance at.
Cover is important not only for that, but also for the following reason; Rifles are much more effective in close then from far away. As such most allied players will tend to rush your volksgrenadier squads in an attempt to close the distance and gain the advantage. Placing your units in cover can make this a costly mistake. For example, take a look at the following screenshot;
By placing my volks in heavy cover I take no damage at all from the approaching rifle squad, but by the time he gets in close enough his rifle squad has lost a third of it’s health. Even then, his rifles are not in cover, while mine still are, so in the following firefight it’s highly unlikely that I will lose, even while his rifles are at their optimum firing range.
2) Use Bait
In situations where you have an mg42 but not enough units to reliably support it, using bait is the best way to deal with small amounts of rifle squads. Essentially you try and bait the rifle into running into your mg42’s field of fire to be suppressed. Bikes work especially nice for this. Again, take a look at the following screenshot;
The rifles in question followed the retreating bike right into the mg42’s field of fire, and got suppressed because of it. Once the rifles are suppressed the bike is able to kill them (whereas before the rifles would have destroyed it), usually forcing the rifles to retreat.
3) Establish a base of fire
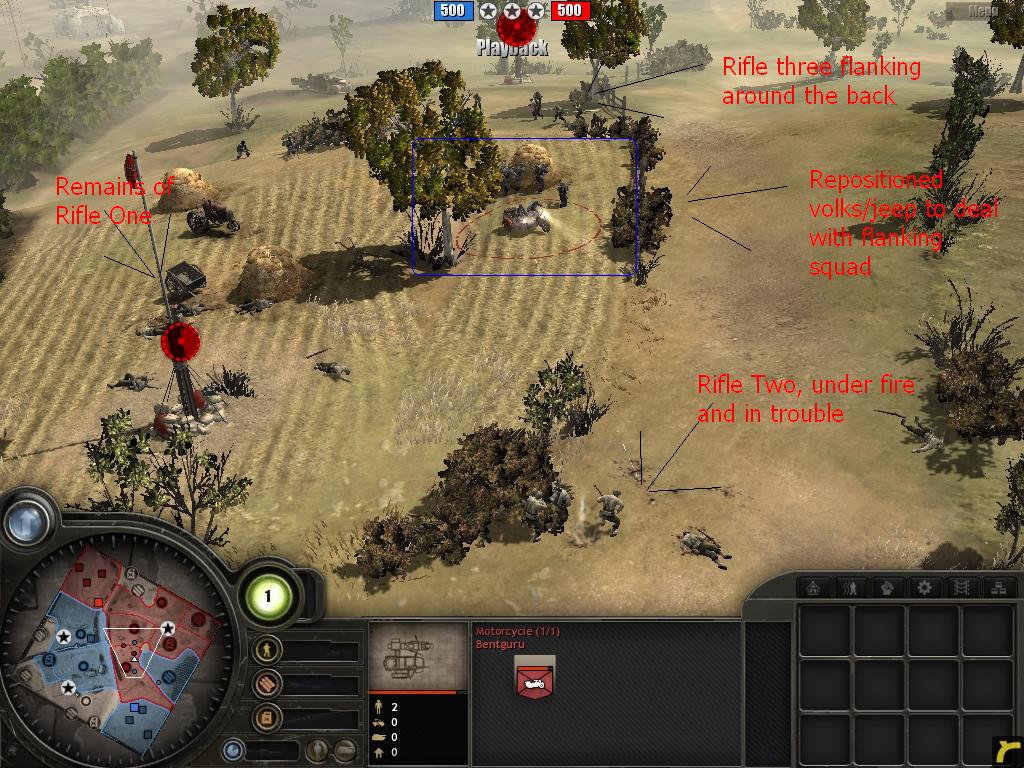
As previously mentioned, allied rifles are more effective than volksgrenadiers while in close. So allied players will try and close in with your volks to take them out. We can use this predictable behavior to our advantage by establishing bases of fire with mg42’s in the open. We will begin by taking a look at this firefight;
The firefight shown is 3 full strength rifles vs 1 pioneer squad, 1 bike, 1 volks squad, and 1 mg42. Notice how my mg42 is deployed behind the forward units, this allows it to open fire and suppress any rifles attempting to get close. It also delays revealing you have an mg42 in the area until the last possible second. The allied player is being clever here, his units are spread out and attacking from different angles to avoid being all suppressed by an mg42 (even though he doesn’t know it’s there for sure, the really good allies will attack from different angles anyway), but even still he loses the firefight. The 2 squads advancing from the front end up being suppressed by the mg42 and torn up by the volks/jeep. A second screenshot of the battle;
Shows the third rifle squad flanking the mg42, yet because the mg42 itself is in cover (Aside: the individual mg42 crewmembers have more hit points then individual volks or rifles, so putting them into any sort of cover makes it much more difficult for rifles to take them out) the combined firepower of the volks, jeep, and 2 mg42 crewmembers take down the rifle squad before it is able to do any damage. In the end, the allied force is driven off with heavy causalities while the axis doesn’t lose a single man.
4) Fight where you want to, not where you don’t
A central concept in winning the infantry war in Company of Heroes is to learn when and where to fight. The advanced version of this is to force your opponent to fight you where you want to.
To do this you have to learn the maps and generally be able to predict your opponent’s responses to your actions, like an advanced form of baiting. The strategic point where the hay bales are on ango is a perfect example. Taking this point will almost always illicit an allied attack on that position. So by taking that point and setting up your forces in the heavy cover surrounding it, you put yourself in the position to deal a lot of damage to the allied player without risking a lot yourself. By damaging, or even better killing off, allied rifle squads you buy yourself the time to set up kill zones that will box the rifles in and allow you to tech to armor units that will win the game.
As a corollary, you have to be able to distinguish the fights you can win vs the fights you can't. Sacrificing troops in a battle you can't win is a big mistake, especially since you're probably using mg42's in the open alot. Giving a riflespammer a mg42 squad can have very serious reprecussions and easily cost you the game.
5) Make early usage of barb wire
Even if you get into the ideal position, early on in the game you will simply not have enough units to avoid being flanked. It’s inevitable, a single mg42 and volk squad with a few supporting pions or bikes simply cannot cover a wide enough area to prevent themselves from being flanked. It will happen.
However, there are several things an axis player can do to minimize this risk. Some have already been covered, such as setting mg42 squads up in cover, but the most important tool to preventing flanking attacks is barbed wire. By barb wiring possible approaches to your position, such as the hole in the hedgerows near the hay bale strat point on ango, can prevent a rifle squad from coming from that angle and taking your position from behind. Even better, sometimes allied players will send their rifle to that particular area, relying on the assumption that it’s open. Since it’s not, that rifle squad will be unable to participate in the firefight, giving you yet another advantage.
How and Where to set up kill zones.
Your end goal for the first 6-8 minutes of the game should be to set up killzones and completely box your opponent in. This must be accomplished before the riflespam reaches “critical mass”, a point at which there are simply too many rifles for your ground infantry to handle and you get over-run. Several strategies already revolve around this concept, and there are multiple ways to do this. We will look at the common “killzones” on semois and angoville.
Angoville:
On Angoville your objective is to completely box the allied player into his base, leaving him with no resource areas outside of it. There are two main areas we must control to do this, points 1 and 2.
Key for Angoville Reference: Black Boxes= Bunkers Green lines= Bunker mg42 upgrade field of fire Red Circles= Fields of fire for garrisoned mg42 squads Blue line= Barbed wire
There are differing philosophies on how to accomplish this, personally I tend to hit the left side first and attempt to provoke a large fight near the hay stacks in order to buy myself time to set up the bunkers. Set up the bunker and the barbed wire on the left first, the right can be held for a small amount of time by simply garrisoning the northern building with an mg42 (although that will not usually hold off a determined attack). Be sure to place the barb wire at an angle so that infantry leaving the allied base via the break in the fence come into fire from the bunker’s garrisoned mg42 team, like so; Without the barbed wire it is possible for allied infantry to sneak past the bunker and into the backfield. Once out of the kill zone it becomes much harder to deal with them. By placing your bunkers inbuilt mg42 toward the other entrance to the left you give yourself some protection against allied infantry from that direction if your push on the right fails. Position 2 can be held without a bunker by placing 2 mg42’s near the building there and covering the base exit. However building a bunker is strongly encouraged since grenades tend to have devastating effects on units in the building (frequently wiping out an entire mg42 squad with 1 grenade). An example;
Semois
To people who have heard of/use the ‘Semois Pin’, this is going to look very familiar because it’s essentially the same thing. We are going to use copious amounts of barb wire to force allied players into fighting in a specific section of the map. To do this we lay barbed wire down on every access point from the allied side of the river but one, and then set up a heavily fortified and mined position to hold them off until tier 3 is reached. The area bounded by the pink lines is the area of the map where we are going to contain the allied rifles in while slowly pushing them back into the ‘meatginder’ area represented by the green box. The Red dots represent buildings or area’s that are suggested place to put your mg42 squads (you should only need two). Your goal is to move mg42s supported by volksgrenadiers through the town (or down from the +16 munitions) to the two red positions also bounded by yellow lines/circles (fields of fire for your final two mg emplacements). Once there it becomes nearly impossible for an allied player using infantry only to break through, the barbed wire prevents him from flanking to the north and two mg42 squads will easily tear up any frontal assault. It is also suggested once you have the munitions to lay mines on the 3 chokepoints (mines designated by the teal dots). The usual response to a pin move like this one is to use motor pool units to break through the barbed wire on the eastern approaches. Mine the shit out of the area and he’ll lose a ton of units just to break through, allowing you to respond and mop up what’s left.
This post has been edited by Sepha: Nov 17 2006, 10:02 AM
Intro: These units are infantry killing machines, they are designed to work best against massed riflemen and take hardly any damage in return because of their armor and mobility. This'll show you how to micro ostwinds and pumas so they'll never get hurt by stickies, bazookas or AT guns ever again. Micro is everything for using these units on the battlefield effectively so make sure you keep an eye on them and bind them to hotkeys (CTRL+number) at all times.
Puma & Ostwind deployment
The Puma is made in T3 from the sturm armory, Ostwind in T4 from the panzer command so you're going to be making a lot of pumas in many games and ostwind's not so often since there's a large 130 fuel gap between T3 and T4. Pumas are the backbone of the Axis war machine in 1v1 and are the best multipurpose unit axis have available, cheap and strong, in addition to slaughtering mass riflemen they can help in armor vs armor battles too when upgraded. Ostwind's won't see the battlefield too often but the firepower they possess is much better than a puma. Use Ostwind's in games that you're overflowing with fuel and pumas just aren't getting the job done anymore with all that armor around, team games suit the ostwind well. Also note ostwinds do some decent damage to light vehicles but almost zero damage to armor.
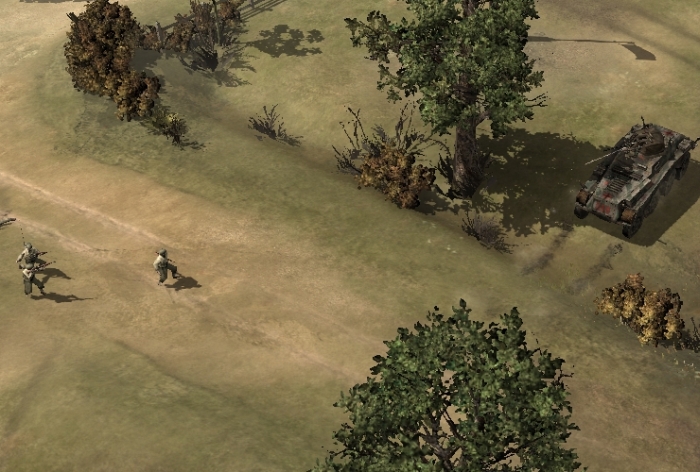
Puma & Ostwind Micro
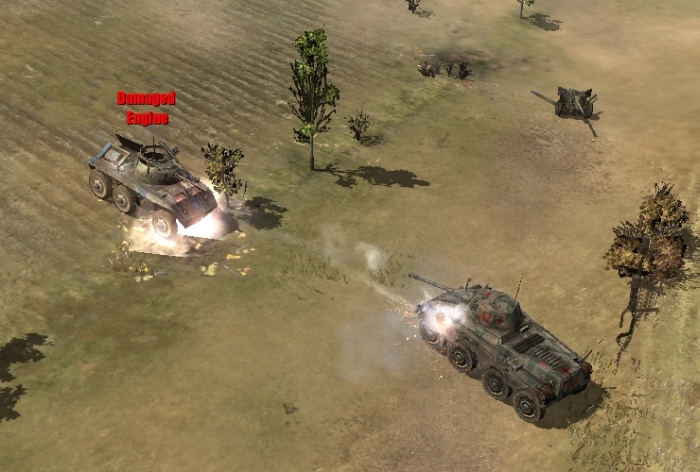
After deploying your units to the battlefield, the most important thing is to simply keep them alive and you can do this with some good micro, from avoiding stickies to flanking AT guns. When you want a puma or ostwind to keep moving backwards instead of doing a 180 turn and getting caught up in sticky bombs, you'll have to click near to the unit and not far away, click a long enough distance and they'll turn all the way around. Use this tactic to keep moving backwards away from harm as riflemen or rangers etc. pursue your vehicle.
Here's a good example, once the riflemen get within sticky range 1 guy moves forward to plant a sticky and this allows your puma to move back out of sticky range. Now the riflemen won't finish the throw sticky animation and will have to start all over again the next time he gets within range. Keep moving your puma around the map and you can effectively 'kite' any amount of riflemen squads to their death while taking no damage at all in return.
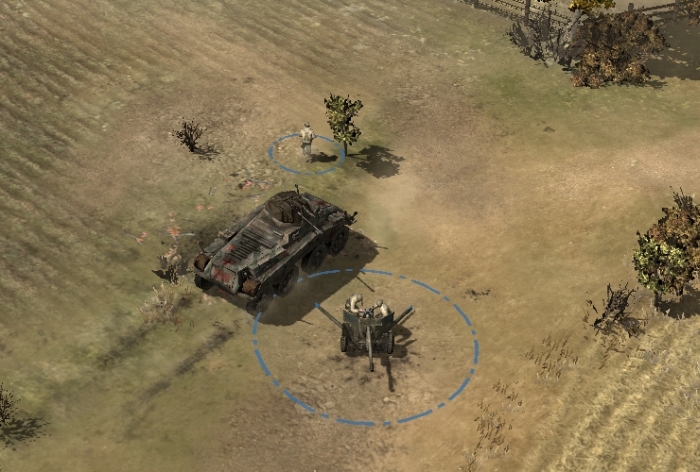
As for AT guns they have a large amount of protection vs armor but since pumas and ostwinds are infantry killers, the AT gun crew when flanked will die within seconds. Make sure you approach an AT gun from the side or rear so that they don't shoot your puma. Keep moving around the AT gun as it redeploys to face your puma and you won't take any damage at all.
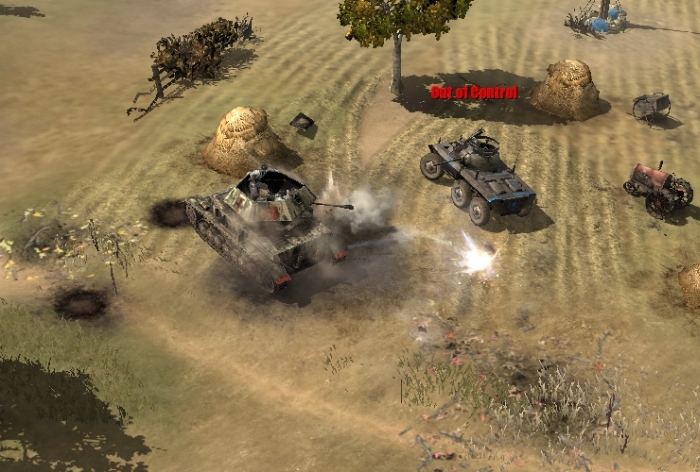
Not only can pumas destroy AT guns and any allied infantry with ease, they can also help in vehicle fights as well once they're upgraded for 75 munitions. This gun does tons of damage to M8's and pretty good damage to other allies armor. Use your pumas to cut off shermans circling around your stugs and to win the mid-game battle against M8's.
The same goes for the Ostwind, every one of these tricks works just as good with Ostwinds and you won't even need to upgrade one for it to destroy light vehicles. Note that pumas and ostwinds are both anti-air units and will automatically try to shoot down nearby aircraft.
This post has been edited by Sepha: Nov 14 2006, 20:51 PM
Intro: Doctrine powers will be extremely useful in the fight against Riflemen, abilities like zeal will help you passively or there's registered artillery that can single handedly win a game for you. We'll focus on the Defensive and Terror trees since almost everything from Blitz is pretty bad vs riflemen, arguably assault grenades and the Stuh'42 are good but other alternatives work much better.
Terror
Zeal - 1 Command Point, Passive.
Zeal will make your units fight more fiercely as soldiers in their squad are killed, this ability works on units like grenadiers and volkgrenadiers but not on Vehicles or HMG's. If you usually play as Terror with zeal first you'll notice the big difference it makes compared to other tree's abilities, the most important part is this power is passive. What zeal does is make your squad better in combat with the more casualties they take, adding health regeneration, faster reload times and extra firepower to the soldiers left in your squad. It essentially allows you to have 2 volksgrenadiers fighting as powerful as 5, excellent for protecting HMG's and beating riflemen in shootouts.
Firestorm - 2 Command Points, 200 Munitions.
Firestorm has quite possibly the largest area of effect for an artillery strike in the whole game and the rockets that come down will do large amounts of damage to riflemen if they make a direct hit. Excellent artillery strike for killing massed amounts of infantry and AT guns together but not good against tanks or buildings. Use this ability wisely and aim well since it costs 200 munitions per use.
Inspired Assault - 1 Command Point, 50 Munitions.
Inspired assault increases damage your units do while also increasing their vulnerability, this is a good ability to use when riflemen are supressed by a HMG or are trying to flank a hmg and your volks are there for protection. The volks will kill riflemen MUCH faster and won't be getting shot much in return. Just make sure you don't use this ability when you're outnumbered and taking heavy fire since it increases the damage your units take.
Propaganda - 3 Command Points, 100 Munitions.
The less used ability in the terror tree, propaganda will almost instantly retreat ANY number of infantry units within its area of effect. If you're losing an important mid-game battle, just retreat most of the rifle squads and kill whatever is left over then reinforce yourself while the riflemen retreat all the way back to HQ and have to run all the way back, extremely useful on large maps because of this.
Defensive
For the Fatherland! - 1 Command Point, 45 Munitions.
This ability increases your infantry's defense by a large amount, allowing you to win battles you'd otherwise lose early on in the game. Although you have to use For the Fatherland! inside your own connected territory on the map, this ability is just great in early battles for the infantry-heavy defensive tree player. Don't use this ability in a losing battle or in enemy territory, it's for strengthening your defenses and making sure that flanked HMG is 10x harder to take down.
Fortify the Perimeter - 1 Command Point, Passive.
Fortify the Perimeter allows you to reinforce units at your bunker and deploys HMG's on the top of your base buildings. Reinforcing troops at bunkers is great early on since you can win fights you'd usually lose from having too many units killed in combat... Just reinforce them out of your bunker and you'll be able to win even when against the odds. The HMG on top of base buildings can be useful on a map like south of angoville, place one of your buildings to the north and watch the HMG fire on riflemen squads trying to sneak round the hedges to the east side of the map.
For just 125 munitions, this artillery strike is brutal for what it does. Registered artillery will almost instantly rain down 81mm mortars on anything within it's area of effect and any amount of infantry will be destroyed, the more infantry you catch with this the better. If someone has bunched up 3-4 riflemen squads and you use this ability over them, game over. Note that registered artillery can ONLY be used by one of your base buildings/bunkers or strategic points, so the artillery will only cover the area around them.
This post has been edited by Sepha: Nov 17 2006, 12:27 PM


How to beat the Allies most diverse unit.
Introduction
This guide will explain the best ways to beat riflemen in CoH, including what units to use, how to use your units and what doctrine powers are the best to use against riflemen. Riflemen are the most basic yet one of the most powerful allies units in the game, with abilities like BAR's, grenades & sticky bombs they can be hell for an Axis player to stop early on, so don't underestimate a player that knows what they're doing with riflemen. Axis have special units designed just for fighting back massed riflemen including the dreaded MG42, Puma and the Ostwind Flakpanzer.
The history of the riflespam is a convoluted one. When Company of Heroes was in beta people did not believe the riflespam was a problem since it was then thought that mg42s garrisoned in buildings were much more powerful, indeed there were many of the opinion that garrisoning units such as the mg42 inside buildings was too powerful and negated units like the Allied rifle squad. However as usually happens with RTS games, the strategies and tactics of the players evolved to counter what was being done, and at the state in the game now a single heavy machine gun squad in a building presents almost no challenge for an experienced player to eliminate (within a few exceptions, we will go over how to make it very hard for a player to do this later). This gave rise to the riflespam, an allied tactic relying on the rifle companies advantage over its counterpart axis unit (volksgrenadiers) and superior numbers to take down mg42 nests in buildings. To date there has been a long period of time where people believed that the riflespam was too powerful and needed to be toned down, yet history has a habit of repeating itself. Players have again evolved their tactics to deal with the new threat, and the subsequent guides detail many ways for axis players to defeat the allied riflespam.
After reading you'll hopefully have a better idea of how to counter Riflemen in CoH.
Contents
1. Units
2. MG42's/Volksgrenadiers & Bunkers
3. Pumas & Ostwinds
4. Doctrine Powers
5. Replays
This post has been edited by Sturmtruppen: Jan 24 2007, 18:18 PM
Posts: 7,219
Clan: Insane
Game: