Tiberium is the lifeblood of all the units and structures that inhabit the many battlefields of Kane's Wrath. They are a magnet for not only Harvesters and Refineries, but also, many of the major battles of a match will revolve around a Tiberium Field. To make matters worse, they will also be a primary target for any kind of early game rush, where your enemy will try and gain an economical advantage. Therefore, it is not only practical, but necessary, to defend these fields at all costs.
Think about it, when you expand, where do you expand to? You certainly don't expand to an area that would put you at a disadvantage, and expanding itself costs money. So what is the only practical option? A Tiberium Field or Spike.
Before anything specific is said about funky counters, and rock-paper-scissor implementations, the most critical aspect of Tiberium Field defense is to scout. All of the following counters will be based on the assumption that you know what is coming at you. I will not mention this again throughout the entire guide, so I say again, it is important to scout at all times.
Now, for those who are unaware, Tiberium is the only resource that you will be required to collect, whether in the stated field form, or in Spikes or Silos or crates, you need this recourse to build units. Therefore, your Harvesters, and sometimes even the field itself will be a prime target for your opponent. Now there are four main ways to defend a Tiberium Field, but more on that later. Lets discuss the two main types of Tiberium, and two different versions of the field.
First off, Tiberium comes in two different colors, green and blue. Blue Tiberium is worth exactly twice as much as green Tiberium. Therefore, it is practical to assume, and count on, that blue Tiberium will be more of a target than the green Tiberium, so anticipate the blue Tiberium area to receive heavy traffic.
There are also two different versions of a Tiberium field. There are (what will be further referred to as) home field(s), and the expansion fields. Now a critical aspect of your home field is that it is normally behind your base. Or, in other words, your base is normally between your home field and the enemy. Some examples of maps with this setup are Tournament Arena, Tournament Rift, Pipeline Problems and Tournament Tower. What this means, is that, as opposed to all 360 degrees of the field being exposed to attack, only the rear 180 degrees will be open (approximately). Therefore, it is much easier to defend, but because it is the first field that you'll start out with, it is also the most susceptible to attack.
The expansion field is quite different from the home field. First off, before you even expand to it, if your Harvesters start harvesting that field, they will be prone to attack from all 360 degrees. This means that it much harder to defend than your home field. Therefore, it is critical to have some units to defend the lone Harvesters. To help in the defense of an expansion field, take an extra ten seconds to place your MCV between your enemy and the field, providing protection like that of a home field.
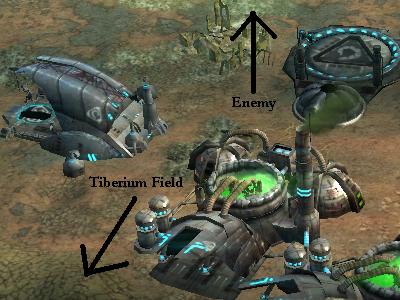 Try placing your base between the enemy and your field for added protection
Additionally, lets will leave out Epic Units from this guide. As they are obviously not the most effective defense, as five or so EMP units can permanently disable it, so they well be excluded from this guide. One last important issue to discuss is the fact that your defenses may not always be 100% successful. Although the most prudent move at first is to immediately reverse move your harvesters out of there, you may lose some. However, it is always best to micro your Harvesters around buildings and the like while moving around your main forces to avoid losing too many.