If you've ever played GDI mirrors, Steel Talons mirrors or Steel Talons versus GDI, you probably know that in the late-game there is usually one dominant strategy on anything remotely close to a closed map. Chances are that massive artillery spam has been used either by you or on you in the form of Juggernauts or Behemoths.
Date: October 7, 2010
Game: Kane's Wrath 1.02
Author: Eph2.8-9
Now, if you find yourself horribly losing Juggernaut/Behemoth duels, learn to recognize these important tips instead of going to the forums and making
over 9,000 threads on how Juggs are OP. Deal with it, the current damage beasts that are the Juggernaut and the Behemoth are necessary to counter certain likewise-OP epic units of other factions. But I digress. On to the good stuff. For the purposes of this tip, assume that when I say "Juggernaut," the word "Behemoth" can be read interchangeably. There are simply more GDI players than Steel Talons players. For the present purposes, these units are treated much the same.
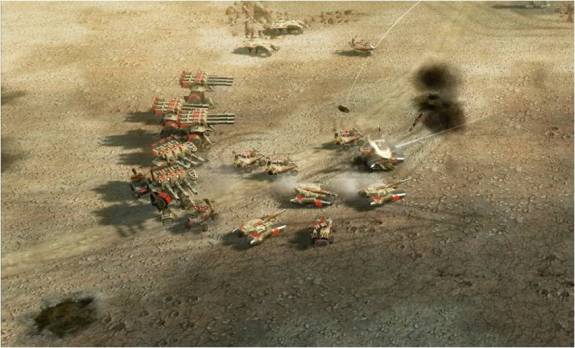
I: Thou Shalt Build Artillery And Lots Of It
Late-game on any kind of closed map, you should be building primarily Pitbulls, AP APCs and Juggernauts in terms of ground units. Maybe a MARV if you like it. Mix in some Missile Squads for added anti-armor, Snipers or Rifles for anti-infantry, or EMP Grenadiers for serious pwnage if you want. Predators? If you have some already, don't build more. If you don't have any already, don't bother once both sides start churning out artillery. The only reason you need tanks is to support your Juggernaut army. Your War Factories should be pumping the 3 units above and very little else. I'll make an exception for Slingshots versus Hammerheads and maybe a Rig, but really, having a numerical advantage in a Juggernaut duel is quite nice. You generally don't need Railguns if you're planning on a big Juggernaut clump backed up by anti-tank infantry. Get two more Juggernauts instead. Sorry, Talons fans, but Titans die so fast to mass Jugg fire, it's not funny, and you can't crush Juggernauts with anything but an epic unit either.
There's one unnamed
Kane's Wrath player who only plays on
Tournament Arena and only has one strategy: two War Factory Railgun Predator spam with Pitbull support. He'll spit out twenty or so upgraded Predators and charge heroically into the teeth of . . . Missile Squad and Juggernaut fire, backed up by EMP Grenadiers and a few regular Predators if you're smart. Moral of the story is, tanks don't have anything on Juggernauts that are properly supported.
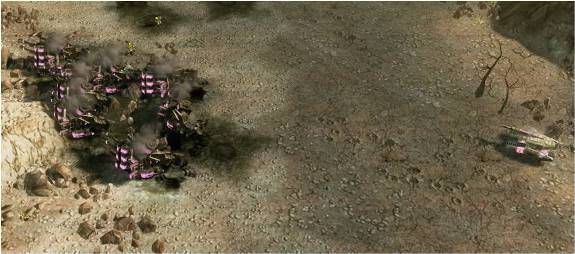
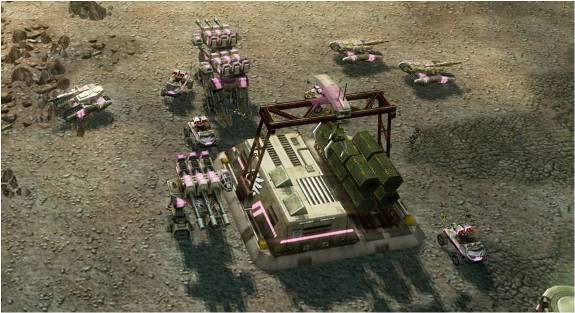
 Too much cash invested into useless Mammoth Tanks and Railguns.
II: Thou Shalt Use Air Support When Possible
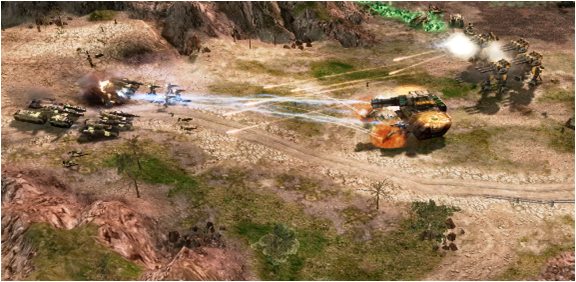
Orcas and Hammerheads (properly garrisoned) are excellent counters to Juggernauts and Behemoths without protection. Why? Because almost everything in the GDI and Steel Talons arsenals with the firepower to take down Juggernauts and Behemoths swiftly gets shredded by Juggs effectively long before they can kill said artillery. Except, of course, other Juggernauts and Behemoths, and though you could make a case for mass Pitbulls and mass upgraded Missile Squads, AP APCs are far too easy a counter for those. If your opponent will let you snipe away at his artillery with aircraft, do it. That said, if he has four fully upgraded Firehawks lurking in the background, be prepared to eat a lot of losses. Furthermore, sometimes it's better to pick off the units covering the artillery. Especially if you've been de-teched and he doesn't have a lot of protection for his artillery.
 Two Pitbulls will not deter your Orcas from blasting two pricey Juggernauts. Just do it.
III: Thou Shalt Protect Thine Artillery
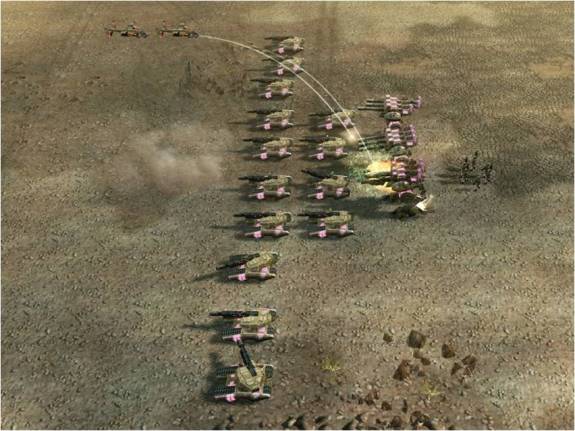
See that commandment above? That's why you protect your artillery with Pitbulls and/or Slingshots. Remember that useless Commando GDI has? It's not useless when it jumps over a cliff into your army and you have no APCs, Snipers, or Hammerheads nearby. C4ing even two Juggernauts can make a huge difference, and it's instantly cost-effective. In particular, you want AP Ammo on your APCs because it will help fend off aircraft, but more importantly it helps deal with threats such as EMP Grenadiers, Composite Armor Missile Squads and Zone Troopers, which can all be problematic for Juggernauts.
In particular, there's nothing so irritating as having your un-supported artillery systematically chewed to pieces by flanking Pitbulls or Zone Troopers (or Attack Bikes if you're fighting Nod). I don't even need to mention Cultists, right? Juggs can't rotate their turrets fast enough to hit well-micro'd Pitbulls effectively, and against Zone Troopers you pretty much have to crush them if you have no support because they're one of the few ground units that laugh off Juggernaut shots. Note that AP APCs clean up both threats swiftly. Do try and keep your covering units alive, though. Especially the Slingshots if you're relying on them to fend off Zone Hammerheads or AP APCs versus infantry.
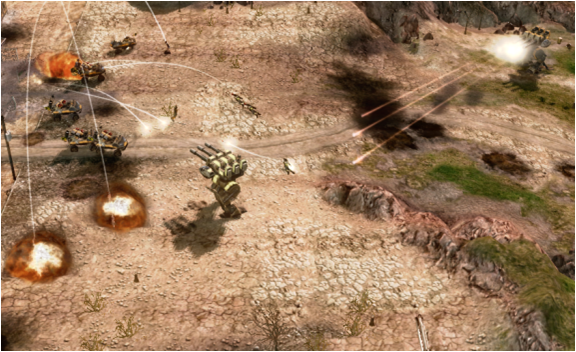
 Now this is just embarrassing.
Now for some humorous anecdotes. One time in the distant noobish past of a certain writer for the GameReplays.org
Kane's Wrath section, he built a giant army composed of Mortar Pitbulls, a few Predator Tanks, and Juggernauts and waltzed over to his enemy's base on
Tournament Rift to attack the natural expansion. What said player didn't realize was that enemy player had scouted this army composition and jump-jetted a Commando up from across the rift to wreak havoc on the massed Juggs before they could fire. Mortar Pitbulls, while serviceable versus massed Missile Squads and most types of infantry, do nothing to Commandos.
In another incident, said noobish writer had just his entire Jugg army wiped out for not following his own commandments. His opponent pushed into his main base on
Decision, but had taken losses of his own, leading to a single Pitbull being the only covering force for his remaining four Juggernauts. Cash-strapped, this desperate writer sold off his Space Command Uplink and demolished three of the enemy walkers with the single Zone Trooper squad, delaying them from killing his base until he could get Orcas.
 This is a much better protective formation against an opponent who is not extensively using infantry or Hammerheads.
IV: Thou Shalt Kill All Husks That Thou Canst Not Steal
Would you like to get Juggernauts for only $500? The answer is, "Yes please, very much, sir. Can I have another?" Your opponent is thinking the same thing. If the Jugg fight does not go your way or if it's close to his base and you're not sure of his impending doom in the next three minutes, please kill the Husks. Those two remaining Juggs he survived with could very easily be turned into six or eight, and that means you lose. Remember, Orca Strike insta-kills Husks and almost any light, fast unit (Orcas, Pitbulls, etc.) can easily knock off Husks while dodging fire. Of course, grab every Husk you can get. See Commandment I.
 You have just given your enemy at least three Juggernauts by not killing those Husks with your Predator. You have also just given your enemy the game.
V: Thou Shalt Not Clump Thine Artillery
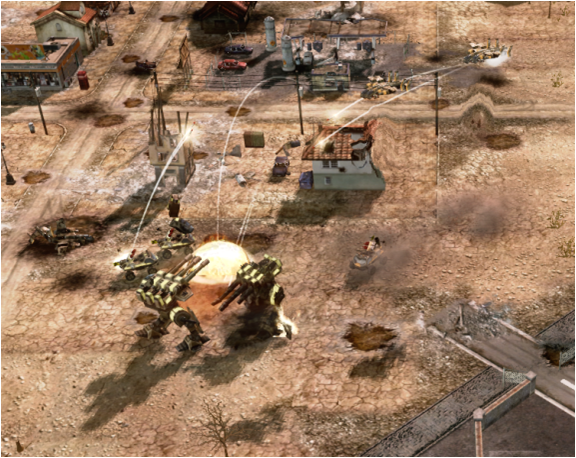
Remember that Juggernauts and Behemoths do splash damage. And they naturally clump up. If you have three Juggernauts spread out firing on three Juggernauts clumped together, the spread-out ones will win. Formation move will help mitigate this danger, but it's surprisingly easy to lose Juggernauts and Behemoths when the enemy is knocking them down two or three at a time.
 Maybe don't spread out this much, but still, you want to maintain some spacing between your artillery units.
VI: Thou Shalt Focus Fire
Priority targets are clumps of enemy artillery, damaged artillery, artillery not protected by other artillery, and anything you can get. In about that order. If you can get a good kill shot on that one Behemoth at the edge of the formation, take it. If you can kill multiple artillery walkers in one salvo, please do. Don't aim for the one Juggernaut that fired first that's standing off to the side as bait while the other five shred you. Don't neglect killing that one Juggernaut on a sliver of health while it pounds you. Damaged units can kill you just as easily as healthy ones, and Juggs/Behemoths are DPS (damage per second) machines. In general, three Juggernaut salvos can instantly kill another Juggernaut/Behemoth, because usually only two of the shells hit. If you force-fire, a pair of Juggernauts will kill another Juggernaut in one shot, but you lose a lot of splash damage potential, so don't force-fire on clumps.
VII: Thou Shalt Use Support Powers
Admittedly, Orca Strike is not often going to turn the tide of an artillery duel. I've seen some clutch Orca Strikes that have, but the support powers I'm talking about are Shockwave Artillery and Orbital Strike. These are often combined into a one-two punch. Drop Shockwave on a clump of artillery, pound them with Orbital Strike, and finish with your own Juggernauts or Behemoths. If you have numerical parity, Shockwave alone can turn the tide of the battle. The Juggs that aren't EMP'd will be running for their lives while you get to shoot. Of course, your opponent can easily do the same thing to
you, which lends credence to the idea of spreading your artillery.
Not really a support power
per se, but EMP can make or break you. Composite Armor EMP Grenadiers do horrible things to Juggernaut duels if they're not countered. The area-of-effect EMP can shut down clumped Juggernauts (Commandment IV), and Grenadiers are hard to kill with artillery before they launch the EMP. Get some Snipers, Wolverines, or AP APCs to deal with those pests and feel free to use EMP Grenadiers or the EMP Control Center yourself. If your opponent has a MARV, you'll probably want them anyway.
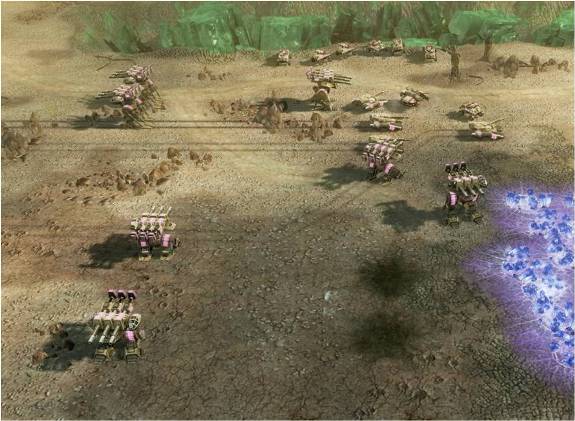
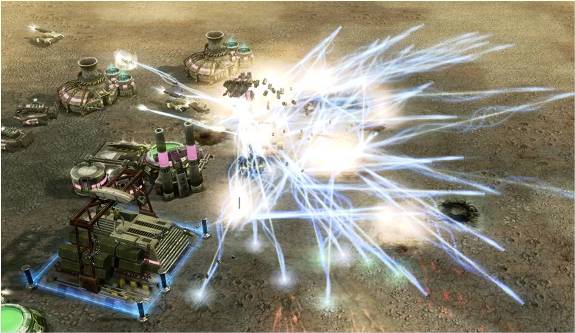
 The numerically superior Juggernauts are helpless in the face of flanking fire and Shockwave Artillery.
VIII: Thou Shalt Not Shoot The Distraction
Those two Pitbulls that got sent in first to draw the first barrage from your Juggernauts? They're
bait. If they're micro-managed well, you'll never hit them, they'll pick away at your artillery and force them to swivel their turrets away from the primary target: the enemy artillery. That one Jugg firing from over the cliff on
Decision's southern expansion at you? Probably bait. Check the flanks to make sure there's not a larger force waiting to pound you. Sure, using artillery as bait is expensive. Consider this. You have nine Juggernauts. The enemy has nine Juggernauts. He sends one up. You see this is a great opportunity and have all nine of your artillery blast it. His walkers suddenly emerge and use focused fire to instantly kill three of your Juggs while you're on cooldown. If your Juggernauts are properly screened by support vehicles and infantry anyway, you don't worry about two Pitbulls. They'll be dead without your Juggs needing to lift a finger or a cannon barrel to do anything about it. Conversely, feel free to send in bait of your own to trigger the opponent to jump the gun and blast away ineffectually while your walkers lumber forward for the kill.
 Why would you shoot Pitbulls rather than the enemy Juggernaut when you have Missile Squads to deal with those?
IX: Thou Shalt Advance Judiciously And With Knowledge Of The Enemy
Why is this Commandment Nine and not Commandment One? Well, you should be scouting anyway and this tip is for Juggernaut/Behemoth duels, not
Kane's Wrath in general. Checking for little surprises like, say, ten flanking Pitbulls, a Commando, or a Space Command Uplink, is important. You should scout your enemy constantly. Knowing his Juggernaut numbers and formation is invaluable. Knowing what he's screening his artillery with is likewise amazing. Particularly if
you're the one with the ten flanking Pitbulls, popping off those three Predators at the front of his formation and retreating can let you sneak in your Pitbulls and run circles around the Juggernauts to finish them. If you're GDI, Sniper Teams make good scouts if you have them because they're stealthed and can pick off irritating infantry, such as those EMP Grenadiers or Zone Troopers. A personal favorite of mine is an
empty V-35 Ox Transport because it's cheap, fast, and not killed by artillery. Scout. Always.
Also, use the terrain to your advantage. Let the opponent walk into a choke and clump up, then dispatch him. Hide behind a cliff and take potshots at his Harvesters when his Radar Scan is on cooldown. Use the long central rift on
Tournament Rift to screen your Juggs and protect them from being flanked as easily by Pitbulls. Conversely, jump your Zone Troopers or Commando across that rift and punish your opponent for neglecting them. (Note: Zone Troopers and Commandos die like flies to anything with AP Ammo as well as Sniper Teams.)
Patience and smart play wins games, not mindless charges. Chasing after the fleeing enemy when he's retreating with three Juggs is a formula for disaster. Your covering units will move ahead and risk exposing your artillery to sneaky Orcas. He may have reinforcements on the way. If you leave certain buildings alive and move past them, a Sonic Emitter might pop up in the middle of your Juggernaut formation (obviously not a threat versus Steel Talons, nyah!).
X: Thou Shalt Keep A Steady Flow Of Reinforcements
War is hell, casualties happen. While there's some shred of remorse for the families of those slain Juggernaut pilots, you will need more of them to fuel the incessant meat grinder of a GDI artillery duel. You'll also need more support units to screen them, as these are often lightly armored. (Look at the list of units I recommend for support. They die quickly, but they're cheap and essential.) You can't build these if your War Factories are rubble. You can't use them if your War Factory is being camped by enemy artillery. You can't pump Juggernauts if your Tech Center has been pounded by Firehawks. You can't build
anything without economy, particularly pricey Juggernauts and Behemoths. Fence all your War Factories and your Tech Center. It's cheap and makes them much harder to kill via Firehawk. Economy is covered in other guides and tips, but you'll need a steady cash flow and expansions to keep up production of artillery and their support units.
 Yes, I have over 9000 Juggernauts queued up at that War Factory.
Replays
While not the highest-level of skill, there are a number of lessons to be learned from this replay. Proper escorting of Juggernauts by anti-infantry units is essential, as the one use of Zone Troopers outside of garrisons is to take down Juggernauts that aren't protected by dedicated anti-infantry units. Another point to note is the effectiveness of anti-air and Husk management. Losing Juggernauts to Orcas can seriously dilute your attack force. In the final push, note the instrumental use of air power and Shockwave Artillery by the attacker to win a battle against a larger force of Juggernauts.
The points of interest in this game occur late in the game, where pumping Juggernauts gives orange an advantage. Protecting them with Pitbulls and repairing them with a Rig allows orange's push to continue up through the main. Later, using the MARV as a meatshield allows the orange player to handily win a 1-vs.-1 Juggernaut duel without taking damage on his artillery. Unfortunately, an ambush group of Missile Squads overcome that artillery piece as a reminder to players to keep their Juggernauts well-screened by anti-infantry.
Again, in the late-game, the difference is between covering your artillery with escorts and letting them get picked off. Xelink sloppily sends three Juggernauts unescorted and they get pounded. A few un-upgraded Slingshots are horrifically ineffective, while Lamech protects his Behemoths better. Though he loses some, he manages to keep them alive longer to do more damage, and more importantly, puts out more and continues to escort them with Mammoths and Hammerheads.
 OBEY THESE COMMANDS OR FACE THE POWER OF BLUE LIGHTNING!
Hope you enjoyed this tip and can implement it in your games. Whatever your reaction,
discuss it in the
main discussion forum.