Tournament Rift is one of the most popular 1-vs.-1 maps in
Kane's Wrath and indeed in
Tiberium Wars. The map is fairly flat and very open, with lots of space and many expansions.
Date: May 16, 2010
Game: Kane's Wrath 1.02
Author: David.CNC
Both players start at either side of the map with a small Green Tiberium field behind them, which is relatively easy to defend against harassment. Each player has one easily accessible Tiberium Spike just south of the players' starting positions, and a further two Tiberium Spikes are located at the very bottom of the map under a small cliff. Each Tiberium Spike is covered by a garrisonable structure, which becomes very prominent in the battle for control of the southern Spikes.
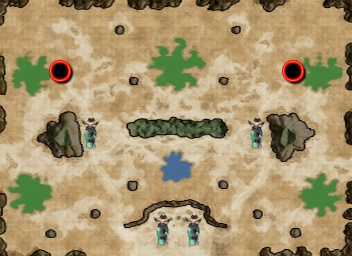
South of each player's base is the natural expansion and a "safe" option for expanding, as it is the most easily defensible among the possible expansions. Between both players is a large Green Tiberium field; this is for any player wanting to perform an "aggressive expansion" and to take map control quickly. If not taken by either player, this Tiberium field will be fought over during the late-game, as it will likely be the last remaining full Tiberium field. South of this large Green Tiberium field, and separated by the name-giving rift, is a Blue Tiberium field. The field starts empty but grows gradually, and as the game progresses it becomes ever more important, since Blue Tiberium provides double the credit value of normal Green Tiberium.
Most players tend to go for the lower expansions, but if you scout this you should take the middle one, if you think you can defend it, as this will give you a huge map control advantage. You will also still have your lower expansion for when the middle field dries up. The Blue Tiberium field is also an option, but it has a rather limited amount of Tiberium, so it is better to expand there only later on.
Scouting
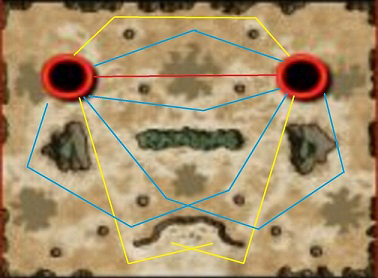
Scouting on this map is rather varied as with any open map, as there are any number of possible routes to take. Instead, I will describe the standard routes. Most GDI players usually send a Rifleman Squad along the top of the map and down into the opponent's base and one to the bottom two Tiberium Spikes to garrison. This also goes for Nod factions, but Nod scouting is a lot more varied. Players may also send units straight to the opponent's base just underneath the middle Tiberium field. This is more of a Nod faction specific route, as GDI players tend to Foxhole around the middle area. Scrin players usually send Buzzers straight through the Tiberium Field and possibly past the Blue Tiberium or to the lower Tiberium Spikes, but again scouting is very varied.
Yellow Lines : Standard scouting routes for most factions.
Blue Lines: Extra scouting routes.
Red Lines : Buzzer and vehicle scouting route.
During the late-game scouting, the lower area of the map and the middle Green Tiberium field become ever more prominent. These will be the main areas of battle, and your opponent will probably have expanded to the lower part of the map, so keeping an eye on their production is necessary. Scouting will also become ever more difficult with a greater amount of chokepoints in the lower part of the map and ever increasing forces.
Strategies
Being such an open map,
Tournament Rift has huge opportunities for economic harassment which may be a form of victory or defeat for a player. The apparently protected starting Tiberium field can be harassed from the north or the south via fast harassment forces sneaking along the edges of the map. These harassment forces will likely include Bikes, Pitbulls, Orcas, Stormriders, upgraded Disintegrators, or Shock Troopers. Further into the late-game, harassment shifts to the bottom of the map, and units such as Stealth Tanks, Vertigoes and Mechapedes along with lower-tier harassment units attempt to destroy your economy.
The main area of battle in the mid-game will be the central Green Tiberium field, as it is a possible expansion for both players and lies directly on the main route between each opponent. Armies will likely clash here. so it is best to keep it scouted for expansions or incoming armies. The main force in this map will be tanks, as in most maps, as infantry have barely any useful garrisons, and the map has no cliffs for air forces to be a dominant force. Infantry and air will mainly play a supporting role helping to turn the tide of the battle, although certain factions like the Black Hand, Nod and ZOCOM can pull off a pure infantry build in the early mid-game.
During the late-game most of the action will revolve around the Blue Tiberium field, as this will likely be the last major Tiberium source left on the map. Blue Tiberium is worth double credits and gives a huge economical advantage.
Blue Lines - Light harrasment prone areas in the early and mid game.
Red Area and lines - Early and mid game main battle area.
Black Area - Late game main battle area.
Artillery will have limited use in the late-game, as strong units that can fire on the move will be the most useful, like Predator Tanks and Annihilator Tripods. The map with its large amounts of Tiberium usually provides large, micro-intensive battles, so be prepared for it as the turtle style of play is not very effective on this map.
Faction Match-ups
GDI Factions
GDI tends to excel on this map as the open terrain reduces the effectiveness of a Nod turtle, GDI's biggest threat. The best scouting route is probably the standard one. If you are sending an Engineer to capture one of the bottom Tiberium Spikes, the southern scouting route should also be used. If you fail to get a scout to your opponent's base, then a Pitbull through the vehicle scouting route should be used.
General Tactics. Predators work very well on this map in combination with Orca harassment. After the standard start, build a second War Factory as it can become very useful before expanding. Against GDI and Nod factions, the dual War Factory and Airfield all-in strategy is very good. GDI's strong early-mid game means that GDI factions can usually expand "aggressively" towards the middle Green Tiberium field, giving large amounts of map control. If you are a safer player, then expanding towards the lower Green Tiberium field is your best bet, and either expand to the middle later or tech up and use a MARV to "MARVest" it.
Pitbulls will be a very useful flanking and harassment unit along with Hammerheads or Orcas, but make sure you use the very edges of the map to stay hidden, giving your harassment a better chance of success. In GDI mirrors a large infantry spam can work when facing slow armored forces, but the map's lengthy travel time means it is best to expand before spamming infantry. In the late-game, Railguns are of great use with either Mammoth Tanks or Predators, or possibly Titans with Juggernauts/Behemoths. Firehawks are useful to de-tech your opponent and give you the upper hand, although it is advised to avoid spamming Firehawks due to the lack of cliffs and escape routes.
So overall for GDI on this map it is best to steamroll in the early to mid-game with heavily armored forces and in the late-game use combinations of the MARV, Orcas/Hammerheads with Juggernaut and infantry support. Map control is very important and GDI players should be able to take it with ease in the early to mid-game.
Nod Factions
Two of the three Nod factions, vNod and the Marked of Kane, tend to struggle on this map, while the Black Hand excels greatly. The Black Hand relies on a combination of Bikes, Scorpion Tanks and large amounts of manspam. Vanilla-Nod and the Marked of Kane have to fast-tech and turtle until they have either a Redeemer or large amounts of Avatars, while harassing with smaller groups of Bikes or Stealth Tanks. Nod factions should avoid the bottom Spikes and use the central extra scouting route in combination with the standard scouting routes.
General Tactics. In Nod mirror situations the game comes down to Attack Bikes and Scorpions, while teching above tier 2 is barely an option. A three- or even five-Bike rush can be very useful and cost-effective in this match-up, followed by an economy boom and then dual War Factory Bikes. After this, players have a choice: they can either build an Operations Center and go all-in, or they can play it safe and try to expand to whichever expansion can be defended effectively. After your choice is made, a quick switch of tactic to Scorpion Tanks with Dozer Blades is the best course of action while constantly harassing with Bikes.
 All-in Scorpion Tanks works well in mirrors.
Against GDI factions for vNod and Marked of Kane, it is best to fast-tech and then expand to the southern expansion while building a few Stealth Tanks for harassment and then Avatars. After expanding, a Redeemer should be produced with a spam of upgraded Rocket Militants and Avatars. An attempt to expand to the Blue Tiberium is necessary. If you are playing as the Black Hand, then a dual War Factory Bike push after the standard build is a good option while expanding to the center, then building up a manspam and selling off your War Factories to keep up the harassment. Attack when you have a large enough force of upgraded Rocket Militants and Confessor Cabals.
Against Scrin factions, large amounts of Bikes and Buggies/Scorpions tend to work well, while in the late-game upgrading Dozer Blades and Tiberium Core Missiles increases their effectiveness. The Redeemer is fairly useful, and Purifiers/Avatars work well unless there are Cultists. Be prepared for air attacks from Stormriders, though Stealth Tanks and Bikes will be effective in this situation. To fend off Tripods and the Eradicator Hexapod, a combination of EMP Buggies and manspam works well.
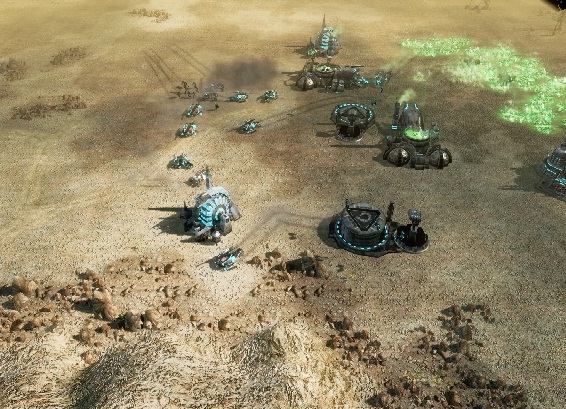
Scrin Factions
Scrin factions do fairly well on this open map. Traveler-59 has many early game options with Tiberium Spike rushes combined with Disintegrator rushes. Dual Devourer Tank spam works well with kiting in the mid-game, combined with anti-air support from either Shard or Gun Walkers. For Traveler-59, Shock Troopers work wonders with support, or you could opt for the dreaded Gun Walker and Cultist combo. It's best for Traveler-59 and Scrin to expand southward while Reaper-17 has the firepower to expand aggressively if needed.
General Tactics. For Scrin, all three Tiberium Spikes can be captured quickly, although it will cost a lot in protection and will be very risky, so this is best avoided. Double War Factory Devourer spam works reasonably well if supported, and late-game Mechapedes work wonders for harassment while using Tripods for a main force. Stormriders can take your opponent by surprise if you anti-scout well, but this is rather risky against Nod factions. If going for dual Warp Sphere Devourers, then an aggressive expansion is probably best, with the second Warp Sphere on the expansion. Teching up or building Stormriders generally works better with a southern expansion.
 Not ideal positions for Gravity Stabilizers, keep them hidden behind the rest of the base.
Reaper-17 works much in the same way, except their Devourer push is much stronger due to Shard Walker support. Again I would recommend the aggressive expansion as it can be used to pump out Reaper Tripods in the late-game. Mechapedes are the best start at tier 3, then moving on to Reaper Tripods. If you feel like playing safe, then an expansion to the south while teching and building dual Gravity Stabilizer Stormriders can work as Scrin. When you are at tier 3, the usual Reaper Tripod and Mechapede aggression with Hexapod and Corrupter support is very powerful.
Traveler-59 does fairly well on this map, being the best of all factions at getting the bottom two Tiberium Spikes with this start:
- Reactor
- Portal (2 Buzzers, 3 Assimilators, 6 Disintegrators)
- Stasis Chamber (Advanced Articulators)
- Extractor
Send the two Buzzers southward with two Assimilators and then follow them up with three Disintegrators. Send the other three Disintegrators to the top of the map and creep along to harass. When the bottom Tiberium Spikes are captured send the three Disintegrators to help the harassment.
A strategy submitted to GameReplays.org for the
Best Strategy Contest is also useful on this map (look for "Cultist and Ravager rush"). It involves a rush of two Cultists followed up by Ravagers. I suggest a safe southward expansion for Traveler-59 as they cannot build Devourer Tanks and therefore lack any firepower to sustain the middle expansion. Teching up fast works well for Traveler-59, allowing them to spam Annihilator Tripods, Mechapedes, Prodigy and Eradicator Hexapod, although a mid-game push of Shock Troopers can be very effective, especially against Nod factions, unless they are heavily focused on anti-infantry.
Discuss this guide.