Ladies Gentlemen and Czone; here it is part 3 of 7 of my "How I play" guide. Enjoy!
Each one of the 7 guides will consist of the replay in question, a detailed description into my methods,why I do what I do, what forces me to do so, what my other options were, my mistakes, and corrections for my own play. Along with lots of pretty colours and pictures.
I realise that you cannot read the explanations and watch the replay at the same time, but I hope that you can keep them in mind whilst watching the replay, and hopefully you'll see what I am talking about.
This map in my opinion is a map that doesn't support the Allies faction very well, in fact it doesn't take a lot on this map for Allies to just get wiped out.
This guide, part 3 of 7 is focused on the map:
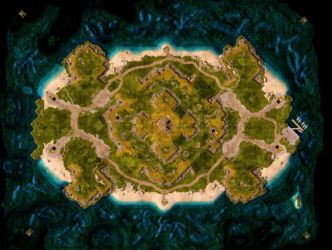
Temple Prime
Temple Prime: Allies versus Allies
Allies versus Allies on this map is tricky business, there are so many variables and the map is a short but long map with different heights and layers of terrain giving advantages and disadvantages to certain methods, due to the physical properties of this map and the shear scale of it. Most things that are done initially will be countered effectively because the maps size allows for the time needed to effectively pull off a counter, this goes for all match ups.
The game begins.
The following explanation refers to the replay provided above. It's important to remember that at the start of the game my enemy was playing the random faction choice therefore I had no idea what was coming, however my method at the start would have been the same for any faction I would encounter.
I start with a standard build order, consisting of a Barracks and from that Barracks the build order of Dog, Engineer and Peacekeepers. As stated in previous guides, the Dog is for scouting purposes as well as anti scouting purposes, the Engineer immediately afterwards to get the additional income as soon as possible and Peacekeepers for early pressure as well as anti scouting.
Scouting
When scouting on this map I recommend sending your Dog(s) onto the second highest layer of the centre of the map which gives a multitude of advantages, firstly you are able to see your enemy on the layer below your Dog, you are also able to quickly scout the other side of the map (as my Dog was on the lower half of the map, I could easily scout the higher half) and be able to react accordingly.
Quite recently I've taken to placing Power Plants next to refineries outside of the walls. This is just because it is easier than walling it in or worrying about placing it in the water, it's quicker and I am able to place walls faster.
Scouting a dual Barracks start from my enemy shows that I am 10 seconds in front of him/her in regards to build speed but I am out numbered in infantry units and because of this I inevitably lose my oil which gives him the advantage of having both oils and almost a third Refinery. However I have expanded and gained the middle position with a third Refinery.
There was a little random movement with me not really knowing whether to defend my oil or take the middle, and in the end it was my choice to take the middle as it would probably give me more of an advantage than the oil Derek would anyway.
Also, there have been a lot of comments recently on replays and in my mentoring topic about MCV placement on this map, if you notice where I have placed my MCV it allows me to get a small amount of build space near his possible third Refinery or the entrance to the Temple at the height of the map.
With Peacekeepers in the Temple at the centre of this map I have scouted his third refinery, MCV placement and a Barracks. I could have and probably should have used an Armour Facility at this point to gain the early advantage and I could have probably stream rolled him/her right there and then but for some reason I chose to build a Barracks and spam some more infantry.
An Armour Facility may have been the better choice but the choice I made allowed me to get Javelins onto the highest point of this map and the positioning of my enemies buildings will let me pick them off one by one with the lock-on secondary ability of the Javelin.
Does anyone else find it scary that we both built an Armour Facility and both gained Tier 2 within a few seconds of each other? Of course that was ended rather quickly by the lock-on second ability of the Javelin.
I had the infantry advantage and the positioning advantage so I decided it was time to get an Armour Facility and some Guardian Tanks.
My enemy chose to build yet another Armour Facility and get some Guardian Tanks the same as me, however my Javelins kill it again thus landing me with a fairly hefty advantage.
Squashing Peacekeepers with Guardian Tanks is a very effective way of getting rid of them as it involves little effort and is fun to watch.
The game ultimately ends when I push with several Guardian Tanks down the bottom side of the map towards his main base and almost kill his MCV thus forcing my enemy to quit.
Game ends.
Significant Build Order
Barracks
From the Barracks my build order was
Power Plant
Refinery
Refinery
Power Plant
Expand to the Ore Node west of my starting position on the ridge one layer above.
Refinery
Barracks
Power Plant
Armour Facility
Tier 2
It is usually a good idea to get the production structure before the Tier level as to be able to produce something while waiting for your Tier 2 or Tier 3 units
Allies versus Soviet
This match up can either be very good, or very bad for the Allies player therefore I must scout well and attempt to get both oils if possible, however man spam usually prevents this. I also have to look out for Twin-Blade and MiG combos on my first 2 refineries later in the game. Because of the maps size and layers it is my advise to go standard on this map as Allies, as cheesing or starting with something unorthodox will be easily countered.
Game begins.
The following explanation refers to the replay provided above. Starting with a Barracks allows me to scout effectively and quickly, the reason I put my Barracks at the top entrance to the center of the map is because I see most players go for the bottom first, I don't know why but they do, allowing me to gain the top easily (sometimes).
As its a large map 1 dog is all that's necessary until I scout an excessive amount of Bears then I will have to get some more Dogs.
Sending a Dog along the second layer of the center of the map allows you to get an advantage over your enemies scouting forces.
Engineer after my Dog to get the oil as fast as possible.
Peacekeepers afterwards just because I can. They play an important role on this map especially versus soviet, keeping them occupied while other forces are built and they are also used for early map control.
This point in the game I feel a LOT of people mess up and I do often as well. Soviet easily gain the map control and the middle due to their infantry being half as pricey as Allies, however most players don't realise this and have an Airfield pumping out Vindicators to counter the enemy War Factory units and Barracks pumping out Peacekeepers to counter the enemy man spam and to gain middle. All of this ends up in a serious cash drain and more often than not a loss.
Calculate you cash flow, keep an eye on your stored cash and only build what is necessary - stop producing units when you are trying to build a Refinery.
Seeing that a Soviet player expands to the middle at almost the same time as you, means that he has the same economy as you so you are at an advantage. If something like this happens and you see them expanding you have two options: attack with everything and hope for the best or slowly knock off their economy and gain the advantage the choice is yours.
My enemy started building a third Refinery and attacked at the same time which is extremely good, as it keeps me busy and then allows him to gain the advantage.
As he attacked with Tier-1 units I could get some Javelins to counter the Sickles and Bullfrogs.
I sold my Airfield because 3 Bullfrogs causes my Vindicators to be grounded and therefore renders them useless, selling the Airfield and building it somewhere else where it will be protected was a good move in my opinion.
The loss of a Refinery especially on this map is seriously bad news, mostly because Allies have to move the MCV and their Tier level to get it back which is very disappointing and very costly.
However knowing that he had everything in my base was good to know, because it means everything I can see is what he has, he isn't hiding anything.
Javelins counter all of the units he was throwing into my base therefore they were my counteraction to his attacks.
It is important to note that even though you are being attacked you must keep up pressure on your enemy, bombing his buildings is a very good way of doing so.
Once he starts to pull back his tanks and Bullfrogs I know I've got the advantage, otherwise he wouldn't be pulling his forces away.
Seeing the Tier-3 worried me, I am not going to lie, but 1 Apocalypse Tank will not do that much damage on its own when I have 4 Vindicators and Javelins. I was more worried about Kirovs.
Then Natasha popped her little head out of that Temple in the center of the map and I was very frustrated and thus killing her is a main priority.
Again I didn't want Kirov's in my base so taking out the Airfield was the only option.
Expanding to a fourth Refinery to me was logical as I had defended most attacks and lost very little plus the fact that he was expanding to a fourth as well.
After I capture the middle its all fairly self explanatory.
Game Ends.
Significant Build Order
Barracks
Power plant
Refinery
Refinery
Airfield
Power plant
Expand to the land ore node
Temple Prime: Allies versus Empire
Playing against Empire on this map is hard. As of yet I have found no specific type of game play that works and is suitable for any type of attacks. There are many openings on this map, many different strategies, however non of them are 100% full proof.
I'll not be following the same lay out as the rest of the guide has been so far, as this map is amazingly under powering for Allies I will just talk about what possibilities there are, and give you some openings that may work. I will also attach a few replays to give you some idea how to play.
Dual Barracks opening can be very good, this will allow you to gain both oils fairly quickly, chances are that the Empire player will not fight you for the oils, and if they do they will only fight for one of them allowing you to get the second and concentrate your full force on that other oil. If you're going to use a Dual Barracks I suggest that you mix in a fair amount of Javelins and have additional Javelins in the buildings near the Refinery spots as Tengu are highly likely to follow the Imperial Warriors. Following this type of game play, you have to be aggressive with the infantry as you'll more than likely have a large amount to secure the middle therefore you should expand to the middle to gain your third Refinery.
Another option on this map is to just cheese your way through it. Being at a significant disadvantage throughout any game play on this map, sometimes offence is the best defence. There are two kinds of cheeses that I have seen work on many occasion and a couple of others that I've seen work rarely.
Cryo rushes are generally a good idea but base pushes are necessary if this method is used. Three Vindicator base push is bad in my opinion because the time taken for the Vindicators to reload is just too long.
Pulling off the Cryo Rush:
Failing the Cryo Rush:
Zokker obviously cant spell SoulSplitter

End of Guide Part 3 of 7
Thanks to everyone for reading this guide, I hope it helped. If anyone has any questions don't hesitate to ask I will do my best to answer.
Discuss, ask questions and comment here!!Special thanks to all the GR staff, Sinister^Hooker, IamFromSiberia, Eminence and Novacento.