Maps
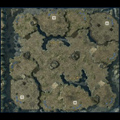
Arid WastesArid Wastes has individual ramps and the largest distances between friendly bases. It resembles a four player version of Desert Oasis, and is hated by many as much as Desert Oasis is hated by some 1v1 players who dont like the unique layout. Early aggression is nearly unstoppable on this map and is the safest way to play it. More often than not one player will be taken out early making the game a 2v1. Longer games see drop play and air harass become incredibly powerful due to the long winding route surrounded by cliffs from the players mains to the frontline. Mobility and map vision are essential at this point.
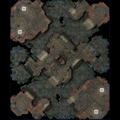
Discord IVThis map features a very small base that is easily defended from any early aggression and air harass. The most important feature of this map is the difficulty in taking expansions. There is only one true natural expansion between two players, the rest are all hard to hold thus making this a very bad map for Zerg. The corner base is very far away from the main and liable to harassment; the gold in the centre is easier to defend but encourages aggression from the opposing team. If your team takes the gold it is better to defend at the ramp at the oppositions end of the central raised area than at the gold base itself due to the height and choke advantage this gives you, or even to camp the area outside their single natural. Expansion denial and mobility is the key to this map, a team that successfully expands and stops their opponents from expanding comfortably can overwhelm their opponents in the mid or late game.
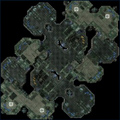
High OrbitHigh Orbit has a pretty unique layout that leads to some interesting games. The mains have a shared ramp on one players' side and rocks on his partners side. There are several choices for expansion, most notably a gold expansion straight out of the front of the main with destructible rocks covering it. If you're not getting attacked early game then you should take these out as soon as possible. The corner with two mineral patches is fairly close, but be sure to take control of the XelNaga in front of it if you expand there to see any harassment coming in. Its vital to have visibility of the route leading to the back door destructible rocks in your main so you can move to defend it quickly as the distance from the gold base to the rocks is quite long. Some teams like to take the rocks down themselves in the midgame and have a player expand to that position, but again the route from the gold base (where your army is likely to be idling if you are playing passively) to that area means going all the way back through your main and makes it a more risky option than taking the far corner.
The individual ramps and large distance between allies make this a superb map for early pressure. It's also the best map for the Pylon and Overlord warping in trick I'll discuss later. Holding both XelNagas will give you warning of any army coming through the middle. There are good escape routes for harassing air units and the tendency for teams to join their armies high up the map means that anti-air reinforcements may be slow to come back to the mineral line. Definitely a great map for aggressive play, but be wary of the thin ramps when Terran has Siege.