Strategies/Counters/Screenshots
Early Game
Your early game strategy is very important. You should keep your Mills up at all costs, but also do not spend too many Uruks defending. You should creep or delay his Rohirrim by harassing Farms as well.
Delaying his Rohirrim can be done in one of two ways: either he keeps spamming Peasants to fight your Uruks, which will cost him resources or taking down at least one of his Farms. It is crucial for Isengard to adapt to the enemy. Isengard is built so that it only needs one building to produce many different types of units (Pikes, Swords and Crossbows).
With few exceptions, Rohan will start the game with one of the following pathways:
- Merry gets farms, 2 peasants through middle
- Merry gets farms, 2 peasants through top/bottom (depends weather you're top or bottom)
- 1 peasant get farms, 1 peasant + Merry through middle
- 1 peasant get farms, 1 peasant + Merry through top/bottom
- Merry + 2 peasants through top/bottom
- Merry through top/bottom, 2 peasants through middle
The best thing to do is get five Uruks out as soon as possible so you can get Pikes.
Exception: Against very fast Rohirrim (no extra Peasants) you should get three Uruks and a Crossbow. In that case, creep a Warg Lair to get a rank two Uruk and make an early Uruk/Crossbow Combo which can counter his Peasants and Rohirrim very well early on.
Here's how my strategy looks:
I keep my fingers on the "Q" and "U" keys as the game is loading up. When the game begins press "Q" and click on the mini-map in the direction of the Mill. Then click on the right building plot and press "U" to start the Uruk Pit building at that spot.
Go back to the Uruks and send them to the Mill more accurately. If you start at the left of the map your Pit will be done before the Uruks arrive at the first Mill so keep your finger on "U" again and when it's done you press it to make one Uruk battalion. If you start at the right of the map your Uruks will arrive at the Mill before the Pit is done so you keep your finger on "L" to build it and right after that click on the Uruk Pit to make your second Uruk battalion.
When your Uruk arrives at the second Mill, build it right away and move along the river (top/bottom depending on your starting point) into your enemy's territory.
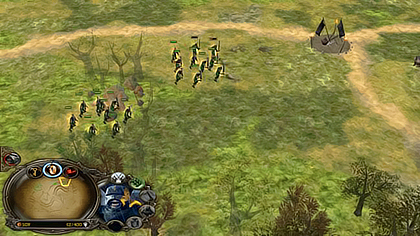
Here's a Screenshot of what that should look like:
Your second Uruk battalion should make a diagonal line between your Mill and his camp to intercept any incoming Peasants from the middle, like this:
If you encounter anything more than one Peasant battalion, use War-chant and kill it. Don't be afraid to use War-chant since it has a relatively low cool-down. Any proper Rohan will split up his units after you use War-chant. Once this happens, kill the battalion which is closest to a Lumber Mill and kill it with your War-chanted Uruks. Use your other battalion of Uruks to kill the other Peasants which were split up.
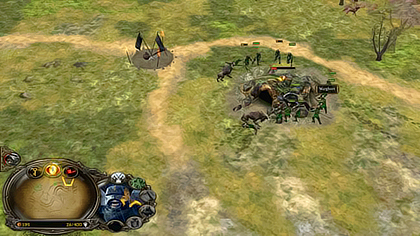
More Peasants should be on the way to your Mills, so it is best to send your Uruks to scout where you think Rohans units will be coming from. A bad thing would be to keep your Uruks at the Mills for defense. Whilst you were fighting the first wave of units, you should have reached 200 resources again. Build a third Uruk battalion and only after that do you start making Laborers at the Mills to boost your economy. Make three to five extra Laborers at each Mill and use a few of those Laborers to scout for incoming units. Place them far enough for reinforcements to arrive in time so you will not lose any Mills by the time they arrive, like this:
After that, it should be pretty simple using the 5-Uruk strategy. After your third Uruk battalion, it depends on your enemy what to do next. If Rohan spams a lot of Peasants, you should keep buying Uruks until you get a level two Uruk Pit. If he doesn't spam that many Peasants (or you at least cant see any incoming at that time), you need to make a Furnace and start making Uruks after it is built. Make two more Furnaces in between the spamming to get a better economy. Only build Furnaces when you have enough Uruks on the battlefield to keep your Mills up.
Such as here (watch mini-map to see Uruks taking over map):
Kill all additional Peasants that are on your side of the map with Uruks. When you have spare Uruks that are not needed, you can send two of them together to one of Rohans Farms. Sending only one battalion is useless as he can defend his farm by just producing Peasants from there. You can also spend your second War-chant to kill both his Farms, but you will often need it on your side to counter Peasants. It is also possible to creep with them. Two Uruks, without War-chant, can destroy the Lair and take the resources even. If you do use War-chant on the Uruks, they will also kill the Wargs and you buy the Mill. It is safer to creep instead of harassing, but if you take the risk, it can work out very well.
After having creeped a lair with War-chant, two nearly-full health Uruks head for the next one to kill it without War-chant.
By the time your Pit is on rank two, you should have two Lumber Mills and about three Furnaces. Once this is the case, you can start the Pike spam.
Here's how a decent Pike spam should look:
- Always keeps one Pike battalion building.
- When you have the money, build a Furnace.
- Defend the furthest Mill first with one Pike battalion and send your second Pike to your closest Mill (put them both in formation and use the guard area option).
- Send one Pike battalion and one Berserker to Rohans Farms.
- Start creeping with Pikes (Use War-chant on them or send a Berserker in after the Pikes have engaged and use their formation).
Make sure you keep track of all of your units and do not feed too many Power Points. It is crucial that you deny Rohan from getting Elves Summon for as long as possible. Try to get at least three neutral Warg Lairs and while losing a minimum amount of Uruks to Rohirrim. By creeping with your Uruks, you can solve both of these problems at once. Once your base is filled with Furnaces you will have enough resources for the Warg Pit. One possibility is to construct a Warg Pit after three or four Furnaces and spam Wargs and Pikes. Industry and some map control allow you to fill your base while making Pikes and Wargs.
Middle Game
The Pike spam is very important for an Isengard to stay in the game because it allows you to maintain map-control. Be sure to have a Pike battalion at every Mill you have and use other Pikes for creeping or taking enemy Farms. Wargs will help against Peasants and keep Rohirrim from running around your side of the map. Once you have two or three Wargs, build an Armory and purchase the upgrades. The goal of Isengard during Middle Game is to ensure map-control and keep Rohan off your base. Keep rebuilding any destroyed Mills as soon as possible. Dont forget to buy laborers; it will improve your economy greatly.
Tip: Whenever Rohan attacks one of your Mills, you must sell it before its hit-point bar turns red. Clicking a Mill and pressing "D" on your keyboard will destroy the Mill, hopefully, before Rohan receives experience.
At this point in the game, your opponent should have three or four fully-upgraded Rohirrim that will try to melee your un-upgraded Pikes. You can counter this by moving Pikes, in formation, away from Rohirrim until upgrades have been purchased for them (if you want to spend the resources for it). It is impossible for Rohirrim to attack Pikes that are moving away in the opposite direction while in formation. Keep in mind where his Rohirrim are at all times and be sure to check your mini-map for any activity. Make good use of your Wargs by attacking any fleeing Rohirrim with the use of Palantir. Another important point is to use War-chant wisely. It is one of Isengards most important Power Points and its always good to have it ready when Rohan uses their Elf Summon. Rohan will most likely start to make Theoden and Rohirrim Archers. Theoden's leadership gives the same attributes to surrounding units as War-chant, so keep in mind Rohan can melee Pike battalions with upgrades with Rohirrim. Rohirrim Archers can place you into a very bad position as they are a great counter to upgraded Pikes. Wargs are a good counter to Rohirrim Archers and Pikes counter any Rohirrim, so be sure to keep these two units close to each other around the map. You should not engage Rohans units when Theoden is around unless you have War-chant and Lurtz or War-chant and Palantir.
Isengard should try to get a solid advantage before Rohirrim Archers are out because the game will start to favor Rohan at this point. Gaining map-control early on will cause Rohan to not have the resources for fire, Theoden and Rohirrim Archers, until you have the units to counter them. When you are in a good position after upgrades, you can then go for Rams and Combos quickly. If not, you can get more Wargs out and then Saruman or Combos.
Late Game
Once the game comes to this point, most Rohan opponents will have Rohirrim Archers. This means you must rely on Wargs to keep map-control because Pikes will only feed Rohan Power Points. You should not attack his castle when he has an army consisting of Theoden, Rohirrim Archers and Rohirrim with shields. Keep your Heroes and Combos close to your base to protect against any attacks by Rohan. At this point, you should be fighting for Power Points for the Balrog. Whoever wins the race for the Army of the Dead or the Balrog is likely to win the game. Isengard should have an army consisting of Lurtz, Saruman, Combos (Uruk/crossbow unless he has a Theoden on rank 4) and some Pikes. Be sure to have about five Wargs harassing his Farms. Rohan is likely to take the outposts, so try to take them down every time Rohan doesn't have any units near them. You also need to use Freezing Rain wisely. It is best to have it whenever your opponent uses Cloudbreak or summons Ents, but using it to attack when you know you can do damage is fine also. Once you have enough units, then start to make Ballistas to counter Rohirrim Archers and, eventually, break open the wall of Rohans base. If Rohan loses a good portion of its army or key Heroes, you can begin the siege of its castle.
Some players prefer mass Elves against Isengard. If you encounter an army consisting of mainly Elves, use Freezing Rain and War-chant on your Wargs. Mass Wargs under rain will destroy any of Rohan's ground troops. Uruk/Pike Combos are also very strong in combat against Elves. Only attack when you have Freezing Rain, though. Elves under full leadership (Theoden, Aragorn and statues) should not be attacked. If your opponent is camping in their base, you should have enough resources for mass Ballistas. Spam Ballistas from three Siegeworks until you have Freezing Rain and then you can storm their base with your army.
Here is a screenshot of sjosty, a famous Isengard player, starting to siege a Rohan. As you can see, his Ballista is well protected.
Here you can see how to enter your opponents base; Wargs go in first and then Combos behind them.