Dwarves versus Isengard is considered one of the hardest match ups of
The Battle for Middle-Earth II. Isengard's units are fast and strong, making them great harassers. This makes it very difficult to apply pressure on their base, since you are forced to defend your economy and often are unable to keep forward mines. Then, when Isengard starts spamming Berserkers, it becomes even harder. It is extremely important that you do everything right during early game to put Isengard on the defensive and at a disadvantage. Then, you have to keep playing well and applying pressure or Isengard could easily find its way back into the game. There is very little room for error in this match up; even the slightest mistake could cost you the game.
Starting Build Orders
Build Order 1: Two Mine Guardian Rush
This build order is a good way to apply pressure on your opponent early, while still getting a strong economy.
Mine - Mine - Hall of Warriors - Forward Mine - Guardians - Guardians - Forward Mine


 Standard Strategy:
With this build order, you should start by building two mines around the Fortress. Build a Hall of Warriors next to the mine that finishes building first and then send your other builder to wherever you plan to build your next mine. You can build the forward mine almost anywhere on the map; just try to keep it away from areas where your opponent is likely to find it. Always try to make it close to the opponent's base, so your units reach his base as soon as possible. You can also decide to build the third mine in your base. This way, you will get more resources because it will be built sooner, but your rush will be delayed and you will have to wait and send the first two Guardians together, out of the fourth mine. It is normally best to hide the third mine somewhere near the middle of the map or to build it on one of the sides of the map, between the troll lair and the warg lair.
Key
White Dot - Your Fortress
Orange Dot - The First Forward Mine
Red Dot - The Second Forward Mine This is an example of how you can place your forward mines, when you are on the north of Fords of Isen II. Do not always use the same hiding places for your forward mines, the last thing you want to be is predictable.
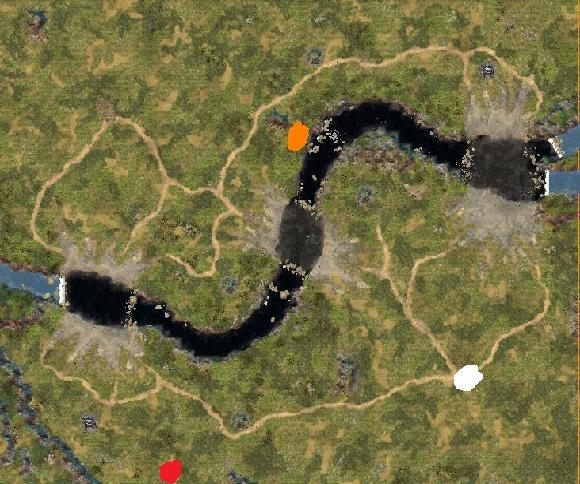 This is an example of how you can place your forward mines, when you are on the south of Fords of Isen II. Do not always use the same hiding places for your forward mines, the last thing you want to be is predictable.
As soon as the forward mine is ready with a battalion of Guardians in it, take it out of the mine and send your Guardians toward the opponent's base. Always destroy as many Furnaces as you can with your Guardians; do not bother attacking the Uruk Pit or fighting Uruk Warriors, unless they attack you first. Build a second battalion of Guardians right away and then a second forward mine. Your second forward mine should be somewhere far away from your first forward mine and usually a little closer to the opponent's base. After the second forward mine is completed, take your second Guardian battalion out of it and send it towards the enemy. Like the first battalion, the second battalion of Guardians should mainly attack the Furnaces. The best way to start against Isengard is to keep their command point limit low and to keep their economy weak.
Description:This is probably the best build order to use against Isengard. When you rush Isengard, they have to choose between going for the forward mine and defending. If they choose to attack the forward mine, they will probably lose one or two furnaces because of it, which will put them behind economically. If they choose to defend, you will be free to expand and creep. This build order is also the least risky build order for Dwarves, because you do not have to worry about being creep stolen and you still have a good economy, so that you can easily rebuild after losing a mine or two. If your rush is successful and you are able to destroy at least a couple of furnaces, you should be able to get a nice advantage going into middle game. If you continue to play the game well and force the opponent into a defensive style of play, they should never be able to really get back into the game.
Build Order 2: Creep Start
This strategy gets you both map control and an excellent economy.
Mine - Hall of Warriors - Phalanx - Forward Mine - Guardians - Forward Mine - Guardians
 Standard Strategy:
With this build order, you should start by building a mine and a Hall of Warriors facing each other, by the Fortress. When the mine is finished building, move the builder towards a creep. It should usually go to one of the warg creeps closer to your base. As soon as the Hall of Warriors is completed, build a Phalanx and the forward mine. As soon as the Phalanx battalion is finished building, put it in the mine system and then send it out of the forward mine, to creep the lair. After building the first forward mine, you should make a Guardian as your second battalion.
Next, you will want to build a second forward mine. This forward mine can either be used to rush the opponent or to creep a new area of the map. You can also use the forward mine to both rush the opponent and creep another area of the map. When you do this, send your Guardians toward the opponent's base and, while the opponent is distracted with your Guardians, have your Phalanx creep. If you plan on using the mine to attack, it should be hidden somewhere close to the opponent's base. When you plan to attack, you can either send your Phalanx battalion with the Guardians or send your Guardians in alone. If you use the second forward mine for creeping, the mine should be built on one of the sides of the map, far from your first forward mine. When you do this, keep your Guardians in the mine system and use them for defense. It helps to buy banners on them, but it's usually better to wait to see if you will need them.
Description:This is considered the standard build order for Dwarves. Instead of relying on rushing to destroy the opponent's economy right away, this build order focuses on creeping to boost your own economy. This build order is generally riskier, because you risk being creep stolen and you won't have any way of preventing Isengard from harassing right away. This build order is better for defense though, because you should be able to get a Forge Works sooner to make Battlewagons, which are your best unit for defense. Quick Battlewagons also forces the opponent to mix pikes with his army, which makes it much harder to stop your Guardians and Phalanx.
Build Order 3: One Mine Guardian Rush
This build order is the quickest way to rush your opponent.
Key
Fwd. = ForwardMine - Hall of Warriors - Fwd. Mine - Guardians - Fwd. Mine - Guardians - Guardians
Standard Strategy:When you use this build order, start by building a mine and a Hall of Warriors next to each other. Once your mine is finished building, send your builder down the middle of the map to build a forward mine near the opponent's base. After your Hall of Warriors is completed, make a Guardian battalion and send the second builder along one of the sides of the map. Send the Guardians through the first forward mine and rush the opponent. Build the second forward mine on a side of the map, away from your first forward mine.
Key
White Dot - Your Fortress
Orange Dot - The First Forward Mine
Red Dot - The Second Forward MineThis is an example of how you can place your forward mines, when you are on the north of Fords of Isen II. Do not always use the same hiding places for your forward mines, the last thing you want to be is predictable.This is an example of how you can place your forward mines, when you are on the south of Fords of Isen II. Do not always use the same hiding places for your forward mines, the last thing you want to be is predictable.After starting construction of the second forward mine, make two more Guardian battalions. Send one Guardian battalion through each of your forward mines. In most cases, the second battalion of Guardians should go through the mine in the middle and the third battalion should go through the mine on the side of the map. Like with the Two Mine Guardian Rush build order, the Guardians should always be used to target the furnaces and weaken the opponent's economy as much as possible. By starting with only one mine, your rush should be able to destroy at least one furnace and hopefully, at least a couple, more.
Description:This build order is a direct counter to Isengard's greatest weakness: a strong rush. Compared to other factions, Isengard's units build slow and are very expensive. This makes them inefficient during early game and especially bad for defense. In other words, you want Isengard defending as much as possible. The Dwarves' One Mine Guardian Rush is the fastest rush in the entire game, taking only forty-five seconds to have a Guardian battalion, while it takes Isengard sixty-five seconds to make their first Uruk Warrior battalion, if they start with one furnace and a Uruk Pit. This means that your Guardian will have at least a good five to ten seconds of free reign to destroy the opponent's economy. You can often even win games off the rush, if the opponent uses a slow build order. Another benefit to using this build order is that you don't have to worry about losing a forward mine during early game. This is because the opponent will need all of his units defending or he will lose a great deal of his economy.
Initial Powerpoint: Rallying Call 
Dwarves should always get rallying call as their first power. Their other options (heal and rebuild) are utterly worthless during early game. Rallying call is also a very good starting power for Dwarves, making their rush even more effective. Another reason rallying call is good is that the tier two powers that come after rallying call (summon hobbit allies and summon men of dale allies) are some of the best tier two powers in the game. Rallying call should always be used on the first unit Dwarves build. This is because of the fact that the sooner it is used, the sooner it recharges. Waiting for a few units to use it on is simply not as good as using it right away.