Hello Generals!
Probably, you ask yourself why talking about hotkeys again. There are already nice guides on how to change hotkeys in CCG. For example a nice one of rarely:
"How To Edit Your CCG Hotkey!"If you prefer video guides, here's one of xezon:
"How to change your Zero Hour hotkeys"In case you need ideas on how to configure the hotkeys, there are even guides that help you out:
A nice guide by ReLaX.
But today we want to change more advanced hotkeys as well. Just to give you an idea what I'm talking about:
- Key for forced fire,
- Key for waypoint,
- Key for creating teams
- [...]
First of all I have to warn you. Please make back-ups from the old files and don't do too many changes at a time. Doing so will ensure that in case of a serious error you will know what exactly caused trouble. Furthermore, don't modify other files than the ones discussed. Else, you might change your gameversion and will not be able to join other standard online games with these settings. However, don't be frightened. The procedure is not more complicated than the hotkey-guides before.
First of all you need to download and install XCC-Mixer from
http://xccu.sourceforge.net/ This is the same tool you needed in order to change the basic hotkeys. (Check the other guides if you have problems finding it)
After done that do the following:
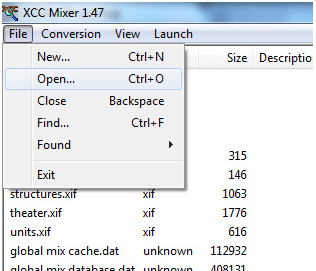
Step 1: File - Open...
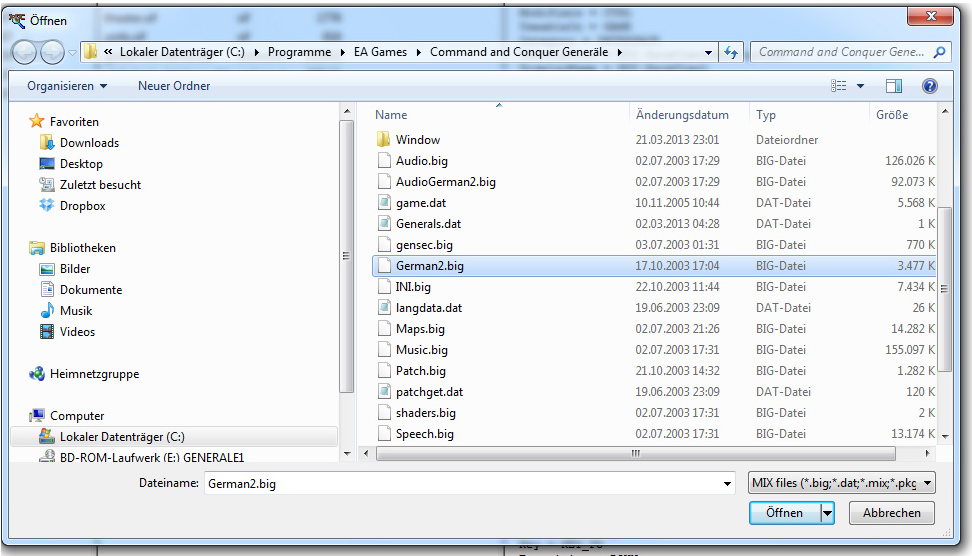
Step 2: Opendialog - Choose the file
"C:\Program Files\EA Games\Command and Conquer Generals\Data\english.big"
In case of the german version:
"C:\Program Files\EA Games\Command and Conquer Generals\Data\german2.big"
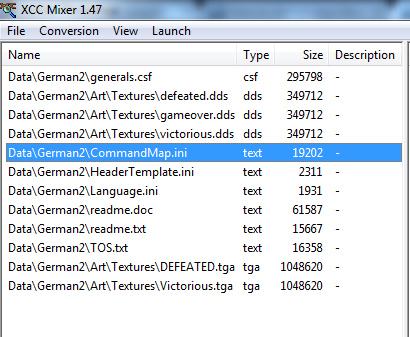
Step 3: Extract the CommandMap.ini file by performing a right-click and choose "Extract ..." .
Step 4: Take care the file is stored correctly in your [Gamedirecty]\Data\German2\Commandmap.ini and open it with a normal text editor.
Step 5: Changing the hotkeys is quite intuitive.
Let's have a look at this example:
CODE
CommandMap CREATE_TEAM1
Key = KEY_1
Transition = DOWN
Modifiers = CTRL
UseableIn = GAME
Category = TEAM
Description = GUI:CreateTeam1Description
DisplayName = GUI:CreateTeam1
End
This command will generate team 1. The corresponding Key is 1, as you know. Furthermore, you have to press "Ctrl". This value is called the modifier. Instead of "CTRL" use "NONE" in case there's no modifier. Changing team settings only makes sense, if you change the storing (usually with modifier CTRL) the viewing (usually with modifier ALT) and the selecting (usually no modifier) accordingly.
Feel free to browse through the whole file. This file will allow you to change every possible command hotkey.
The following examples are my recommendations.
Changing the hotkey for hiding the controlbar easily from "F9"to "Esc":
CODE
CommandMap TOGGLE_CONTROL_BAR
Key = KEY_ESC
Transition = DOWN
Modifiers = NONE
UseableIn = GAME
Category = INTERFACE
Description = GUI:ToggleControlBarDescription
DisplayName = GUI:ToggleControlBar
End
Of course, you need to change the Options Menu, as the "ESC" button is now occupied. I solved this by adding a modifier "SHIFT"
CODE
CommandMap OPTIONS
Key = KEY_ESC
Transition = DOWN
Modifiers = SHIFT
UseableIn = GAME
Category = INTERFACE
Description = GUI:OptionsDescription
DisplayName = GUI:Options
End
Quitting the game is more difficult, while toggling the controlbar gets more easy.
Changing the select-next-worker command into f.e. CTRL+R is also a good idea in my opinion.
But don't forget: Never do too many changes at a time, else you might get an error and you will not know what exactly caused it. Usually, to give a key multiple meanings is the mistake. So, think about your changes first.
In case you are not happy with the changes, simply delete or rename the CommandMap.ini file and everything should be as it was before.
I hope this guide helps you. Now, you are able to customize every hotkey for maximum performance gaming.
Share your thought about this guide by adding a reply!
See you on the battlefield!