Targets of Interest
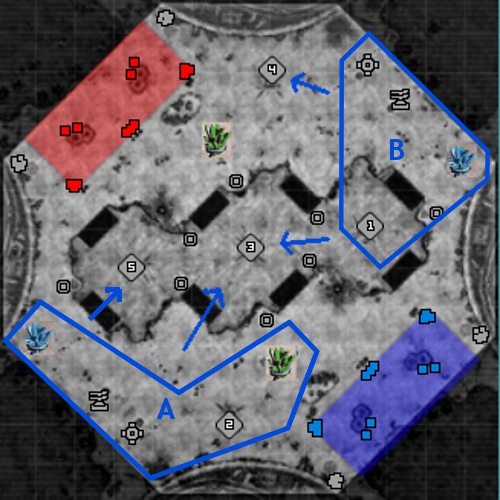
So, you manage to gain control of zones A and B, but this only gives us two nodes, where do we go from here? This will depend a lot on how the opposing team has displaced themselves on the map, but the following diagram shows the targets of interest and suggested routes to them from each zone.
From
Zone A you can easily strike out for either nodes 5 or 3, depending upon how well defended they are. Node 5 would be the preferred target, as control of this provides better protection for the western Blue Tiberium, and when going for node 3, the possibility exists that you get flanked by opponents coming from node 5.
From
Zone B you can target either nodes 4 or 3. 4 is an easy push from the Artillery Turret (you can try hit and run tactics to lure your opponent into chasing you back to the turret - wiping out his units), and 3 is a short hop from node 1.
If node 3 is heavily defended, you should attempt a coordinated push from both zones A and B, getting them caught in a pincer movement, which should result in either wiping your opponents out, or sending them scurrying back towards their spawn zone.
The Disputed Depot
The 'Disputed Depot' from where this map gets its name, is the raised section of the map that encompasses nodes 1, 3, and 5. As in a typical game control of more Tiberium nodes than your opponent grants victory points, its likely you will want to capture and hold the depot at some point during the battle.
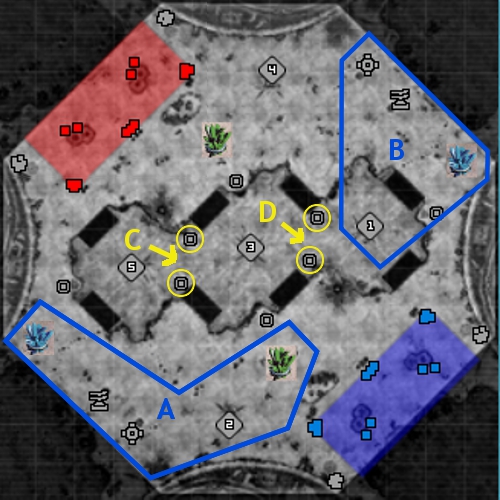
One very useful map feature to take advantage of when both capturing the depot and defending it from your opponent is the presence of the garrisonable buildings located between nodes 1 and 3, and 3 and 5. Refer to the below diagram.
The yellow circles on this diagram indicate garrisonable buildings, which given their location are ideal for loading with engineers to defend your army.
The idea is that you position your crawler (or crawlers) at locations C and/or D, and load up the garrison buildings with engineers. From location C, you are able to attack/defend both nodes 5 and 3, and from location D you are able to attack/defend both nodes 3 and 1. With well protected engineers healing your units and your crawler you gain a significant advantage over your opponent.
Retreat
If your advances from zone A or zone B are not successful, you should look to fall back to the zone you came from to ensure that control of it is not lost. From here you should look to rally your forces ready for another push. If your forces have been depleted from the failed attack, remember the Artillery Turrets in each zone. They not only can provide a defense boost to a depleted army, if they are not protected well at this point you could easily lose control of the entire zone in any opposition counterattack.