Explore GameReplays...

Company of Heroes

The American Field Manual.

Reply to this topic Start new topic
# 1SayNoToStim May 21 2010, 00:38 AM
This was a guide I wrote last year. While a few small chunks have been released, it has sat in the editing room for six months and at this rate, Rocky 11 would be out before this hit the portal so I'm posting it here so people can actually read it. I apologize for any grammar or formatting mistakes - its unedited. The content, however, is still relevant, so I hope you enjoy.


IPB Image


Introduction

This manual will cover anything and everything related to the Company of Heroes American army in 1v1 USA vs Wehr matchups. From flanking to advanced techniques, you'll be able to find it here. This guide assumes you know the basics of Company of Heroes (the cover system, controls, etc) and will focus more on tactics and play style than anything.


The US Philosophy

The US plays very differently against both opponents, the Wehrmacht and the Panzer Elite. While some areas overlap, the whole game plan behind the actions are different and both match ups play out completely separately. What applies to one fight may not apply to another, so make sure you're confident you're applying the right tactics against the right army. All of this information will be related to the American vs Wehrmacht match up, so don't try to use these tactics against a PE opponent.

The American Army vs the Wehrmacht is one of the best match ups in any RTS game ever made. It has a flow about it that few games can match, and while there are a few 'bumps' in the balance, games are generally decided by skill and not by glaring imbalances. Most successful strategies against the Wehrmacht involve creating chaos and confusion, preventing them from locking an area down, and using superior early game units to create a large enough advantage to last you for the rest of the game, or using an early impact unit to clear the field of opposition before your opponent can get sufficient counters up.

[break]


IPB Image


Fighting the Wehrmacht is all about pressing your early advantages and building momentum. Harassment, causing chaos, and denying resources are the keys to victory. First, we're going to take a look at the standard opening build order.

The Standard: 2 Engies, 4 Rifles

I call this the standard build order because its generally the opening on which most strategies are built upon. Your first Engineer immediately builds a barracks, and your HQ starts building an engineer squad. The engineer squad you start with should start capping points immediately after finishing the barracks, and your second engineer squad should start capping points immediately after it is constructed. You do not need two engineer squads building your barracks as its generally a waste of a few precious seconds. You should generally hit 270 manpower when your barracks finishes, and immediately start producing a rifleman squad ASAP. You should also look to build your barracks as 'close to the battle' as possible.

For example, on Angoville (South Position), you want to build your barracks as north as you can.
IPB Image


Placing your barracks at the furthest point possible allows any new troops to get onto the field slightly faster. While it may be only one or two seconds, those one or two seconds may mean a world of difference and can win you the game. This generally isn't debated - its just the best option. Building your barracks in the middle of your base or in the back only hinders you and I can't name a top player who DOESN'T build his barracks in a forward position.

Now, as for the standard opening, Two Engies, 4 Rifles is generally agreed upon as the most balanced opening. It gives enough capping power and fighting power to not only cap the map, but exploit any weaknesses the Wehrmacht player shows you. While there are variations, generally 2 engies, 4 rifles won't ever be a 'wrong' choice.

The Single Engie Debate

Some players insist on a single engineer squad, thus giving them 140 additional manpower to spend on rifles. The single engie squad is a small gambit that can often pay off, but can also backfire, forcing you to build another engie squad later on. The whole idea of a single engie start is as follows. A vast vast majority of wehrmacht players use a 2 pio, 1 volks opening. This generally leads to an early game where a double engie American player will have equal amount of squads on the field. When the American player has 2 rifles on the field, the wehrmacht player has 2 combat squads on the field. A single engie start throws a wrench into that idea and uses a very small window of opportunity to ensure a victory in the first skirmish. The American player simply waits until his second rifle squad has just been created and uses both rifle squads to go after an important part of the map where he predicts the Wehrmacht player will send his Volksgrenadier squad. A Volks squad simply cannot fend off two charging rifle squads and has to retreat, giving the American player the opportunity to cap whatever he wants for the time being. Now, there are a few ways this can backfire. First, if you fail to capitalize on your window of opportunity, where you have two combat squads to his one, you've wasted your upper hand. You have roughly 15 seconds of opportunity and if you squander it you'd have been much better off with two engineers. Second, if the Wehrmacht player opens with an MG and catches both of your squads in a burst, you have to retreat and you're miles behind your opponent because you now only have 1 unit available to cap. Third, you can often 'draw' with the wehrmacht player. If he makes a volks squad and a bike, he will have both of them available to fight off both rifle squads and that battle is won by better micro, not by numbers.

Some of you might be thinking that even if you lose the first battle, you're still saving on manpower by not buying a second engineer squad. Unfortunately, engineer squads are key to your early game by providing flamethrowers and the occasional mine. If you rely on a single engie start that doesn't pay off, you only have 1 available flamethrower unit. Unless you build another squad, you'll have a hard time repairing vehicles later on, as well as being limited to the amount of mines you can lay. The general consensus seems to be that a single engie opening is a low-risk, low payoff gambit that CAN work, but the 2 engie, 4 rifle opening is a relied upon, dependable start.

Why you need 2 engineers


Engineers are handy to have around, both in combat and out of combat. While one Engineer squad can't fight off a volks squad, adding an Engie squad to a rifle squad will allow the rifles to beat a volks squad in almost any situation. While using engineers to tip the scales of early battles is nice, their best use comes when you get munitions. Generally, flamethrowers are your best bet. As soon as you get 50 munitions in the bank you should be giving your highest health engie squad a flamethrower. They then cease to be cappers and now become combat units.

Engineers are slightly stronger than pios, and an Engineer vs Pioneer battle usually is decided by who is in cover first. If everything else is equal, the engineers should win. However, the world of CoH is run by random numbers, and you could lose all three engineers before killing 1 pioneer, so be wary of your units and retreat them if their health gets low. Flanking, flamethrower use, and mine placement will all be covered later.

Four Rifles

4 riflemen squads, built one right after the other, is generally the most basic build order against the Wehrmacht. 4 riflemen squads allow you to flank entrenched positions but don't over-drain your economy. Riflemen have a few distinct perks and disadvantages you should know about.

Pros:
  • 1.5 capping speed. They are the fastest capping unit in the game. Engineers have a capping speed of 1, so if you ever need to cap a point quickly, rifles will do it faster. You can use this to cap more points than your opponent, contain him, and harass him all through the game.
  • Riflemen vet is great. Every level increases their damage output, with level 1 and 2 reducing the amount of damage they take. Vet 3, if you're lucky enough to get it, is a major increase in damage. Vet 2 also increases their stickybomb range (will be discussed later), which is the handiest thing in the game when dealing with armor.
  • 6 man squads means they very rarely get 'oneshotted' by artillery or abilities.
  • Rifles remain effective through the entire game if they're vetted up. Compared to things like Volks, which generally lose some of their effectiveness around mid game, rifles are your bread and butter unit for the entire game.
Cons:
  • Reinforcement. If you recklessly lose individual soldiers you're going to spend a ton on reinforcement which can really delay your teching or cripple your economy completely. Every one of your squads need to have a 'job' and you can't fight losing battles.
  • Losing a riflemen squad can often lose you the game. While you should generally rebuild rifle squads in the early/mid game if you lose the squad, you're not only a step behind in manpower, but you've lost all the veterency you've accumulated on that particular squad.
  • Stripes get paid for in blood. You can't buy rifle vet so if you're not killing anything with your rifles you're bound to end up with vet 0/1 rifles for the entire game. Vet 0 rifles in the end game are one of the most useless squads on the field, and the longer the game goes on, the harder it is for rifles to kill anything, so striking early and often can be key.
The Jeep

The jeep costs 220 manpower and is one of the best reconnaissance units in the game. Building it has its strengths and drawbacks, however. While its great at killing units like pioneers, and gives you a huge sight bonus, it delays your rifle squad 220 manpower. Jeeps cannot survive into the later game because things like fausts and Paks can literally oneshot them. Generally, opening with a jeep means you'll be going after their pioneer squads capping remote points and chasing them off. If you have the micro, you can often 'push' units off of points with jeeps. You essentially use jeep push to keep pushing a capping unit away from the point, which means that the unit will be unable to cap and the little white line will actually start going down. Generally its only effective for so long, because the more units on the field, the easier it is for the wehrmacht player to chase your jeep away. Keep in mind that jeeps repair for free and although they may not have the damage output of a rifleman squad they can jump from hotspot to hotspot on the map.

Should I build a Jeep?
Some players build a jeep to replace their first rifleman squad, thus ending with 1 jeep and 3 rifle squads, while some players build a jeep in addition to their rifle squads, thus ending with 4 rifles. Some players build no jeeps at all. Its all up to your play style. I would personally recommend skipping over the jeep and just building 4 rifles, but you should play a few games with each and determine which build order you prefer.

There are a few things to keep in mind when dealing with jeeps:
  • Always build your jeep first. Your build order should look like: Jeep, rifle, rifle, etc. Building a jeep as your 3rd unit really hampers it's usefulness as one of the core elements of the jeep is VERY early harassment of capping pioneers.
  • Your jeep is going to die. If you use it, its going to die. Fausts, paks, pumas, something is going to kill it no matter how hard you try to keep it alive. Just get some use out of it before it dies.
  • A jeep has a reverse gear. Always always always try to get your jeep to reverse away from incoming fire instead of turning its back and driving away. You take far less damage that way and you get out much quicker.
  • A jeep cannot bypass wooden fences or barbed wire, but it can push units out of cover or push units away from capping points.
Early Game


The early game in an Americans vs Wehrmacht match up is a unique match up that rivals other great match up such as Terran vs Zerg in flow and balance. It has an art form that needs to be understood in able to be mastered.

First off, unless one of you does something out of the ordinary (like a 1 engie start), you generally see your combat units come out at the same time. While rifles cost 270 manpower, volks 280, and MG42 teams 260, for the sake of simplicity you have to assume that for every rifle squad on the field you have, your opponent has a counterpart out there somewhere. That means if you have three rifle squads, you assume he has 3 combat units out. While this can all change pretty quickly, you can use this schematic in your head to size up early engagements and give yourself a rough understanding of the forces you'll be fighting.

The first 'shake up' you might see of that system is the bike. I count the bike as 'half,' a unit. It costs 180 manpower and generally has the fighting capability of one half unit. Two rifle squads generally beat a volk + bike combo, but will lose in almost any situation up against two volks and one bike. I'll go into more in-depth about matchups in a bit.


The M1 Garand

Riflemen carry M1 Garands. It is a semi-automatic rifle with a quick reload time. Volksgrenadiers carry k98 rifles, which are bolt action and reload much more frequently. A single Rifleman has 55 hitpoints, a Volksgrenadier has 60. Rifles come 6 to a squad, Volks 5 to a squad. All that technical mumbo jumbo means one thing: Rifles beat Volks up close, and lose to them at range. Assuming equal cover, both sides starting off at full health, and both squads are stationary, a rifle squad will win at close range in a 1 on 1 fight with volksgrenadiers. It will lose at long range. Comapny of Heroes is a game of random numbers and chances, so a rifle squad still has a small chance of losing at close range (and winning at long range!), but for the most part, rifles do better than volks at close range and worse than volks at long range. Obviously, this only applies to completely unupgraded, unvetted units.

Now, this is not an open invitation to charge headlong right up next to a volks squad. If a volks squad remains stationary, in cover, and a riflemen squad charges them, 9 times out of 10, the rifle squad takes too many casualties on the charge in and will lose the battle. However, if you can catch the volks squads capping a point, moving, or doing something else, like building barbed wire, you can charge right up to them and take them out. Keep in mind that if a volks squad 'backpedals,' or runs away from your rifles, they only fire half the time. So if they start running away from your rifle squad, they're not going to be doing full damage. If you pursue them, you'll be doing more damage to them than they are to you. Keep in mind that they might be running back into the cover of a machine gun. Thats something you learn with game experience, however.

IPB Image
IPB Image
IPB Image


Now, the M1 garand is better at close range than k98s, but not every German carries a k98. Volksgrenadiers and Grenadiers both carry K98s, as well as unupgraded stormtroopers, but upgrades can drastically change the way the M1 garand should be used. Volksgrenadiers can be upgraded with Mp40s, Stormtroopers can be upgraded with Mp44s, Knight Cross Holders come equipped with mp44s, and Grenadiers can be given MG42 LMGs. Mp40s and Mp44s are fought the same way. You stand stationary behind cover and let them come to you. Most of it just comes with experience, but know that you almost never want to charge an automatic gun. BARs do well at medium range, and m1 Garands do ok at all ranges, so mid range is generally the ideal range to fight automatic weapons with. But in a k98 vs M1 Garand battle, the closer they are to each other, the better the Garand works.

Now, this is not an excuse to be retarded. Better cover trumps almost anything. If you're behind green cover in a close volks vs rifleman battle, there is no reason to get out of cover to charge volks. You're going to get chewed up along the way and you're giving up your cover.

Cap Orders


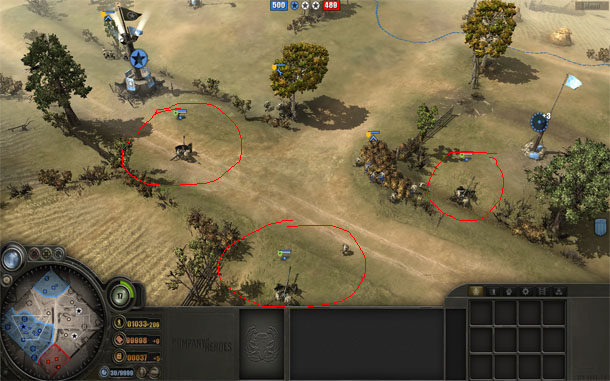
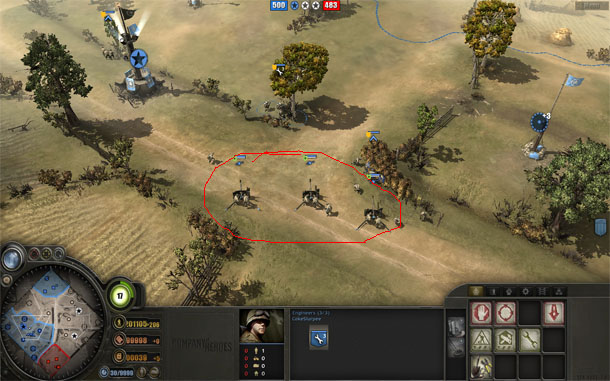
Cap orders are the order you send your first units out to take points. These are the cap orders I use with my first 4 units. The black line represents the engineer I start with. As soon as he finishes building the barracks, he follows the black line capping. The white line represents the first engineer I build, he immediately starts capping points. The Red line is the first rifle squad I build, and the blue line is the second squad I build. Keep in mind these aren't carved in stone, and you can change them up on the fly if your opponent interferes or you wish to change things up. Just remember that your rifles cap at a 1.5 speed, and you want as many resources as you can grab. Fuel takes a slight priority over munitions but neither resource should be ignored regardless of your strategy. Generally, its best to try to cap points towards the middle of the field, as by capping aggressively you can deny your opponent a free point, and points right outside of your base can be picked up by the first retreated unit.

IPB ImageIPB ImageIPB ImageIPB ImageIPB ImageIPB Image

Flanking

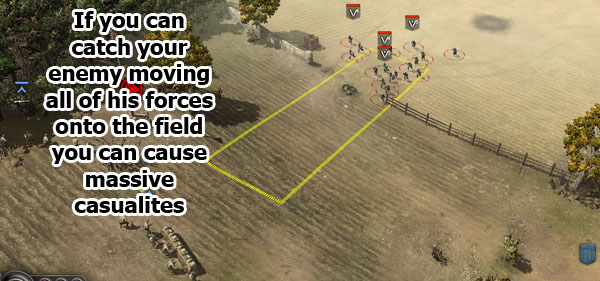
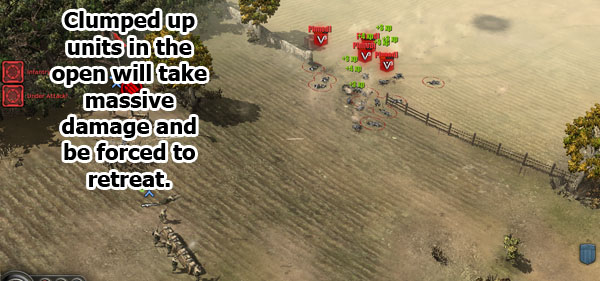
Flanking is the heart and sole of the American early game. If you group all of your rifles up together and just move them across the map in one big clump, one MG42 is going to suppress your entire army and you'll be forced to retreat. That is why the American player lives and dies by his early game flanks.


Now, that was an example of a very simple flank executed without any problems. Real games are not that easy. The more you play, the more you learn. The main focus of your early game should revolve around using riflemen separately to make a joint attack. They should all be coming in from different angles and using different paths to combat the Wehrmacht forces from all sides. You can use engineers to cut wire. Keeping your opponent in a constant state of chaos is going to win you a lot of games. If he's able to lock down an area you may not be able to flank him. If every approach is covered, you'll have to fall back to a weapons support center, artillery, or vehicles to break his lines. This means get behind his lines whenever you can. Draw forces away from his main defenses by capping a point slightly out of his comfort zone, and when he sends 2 squads over there to deal with the rifle squad, use the rest of your forces to flank his defenses.


Advanced Tactic BAR/Flamer KO Advanced Tactic

Once you get a grip on flanking you may want to start experimenting with this tactic. Its won me a lot of games and doesn't require you to take any huge risks. This tactic is a one shot opportunity flank that can wipe your opponent completely off the map. After you've got your 4 rifles, begin putting them in position for a 4rifle, 2 flamethrower engie flank, and begin upgrading BARs. You want to time your attack so that your BAR upgrade comes through moments after you've begun the attack. When the defender first sizes up the situation, he sees vanilla riflemen and judges if he can fight off the attack or not. As the BAR upgrade comes in, the balance generally shifts greatly in your favor. Now, if your entire army gets suppressed or if you charge haphazardly into oncoming focus fire, you can still get your ass kicked, but if you can pull off the timing on a 4 rifle/2 flamer flank and have and upgrade come in at the same time, it can win you the game outright. Another variation on this a grenade surprise. If you've got a hefty fuel advantage over your opponent in the early game, you can upgrade to grenades after your 4th rifle, but refrain from using grenades. Then, as you pull off the BAR upgrade flank, you also have access to grenades. What your opponent first thought were vanilla riflemen suddenly turn into BAR'd squads with access to grenades.


Harassment

Harassment is using your units on the outskirts of the map to decap points and chase away pioneer squads. While harassment may deny your opponent resources, its main advantage is drawing combat units away from the front lines. Rifles cap at a 1.5 speed, while volks/pios cap at a 1.0 speed, giving you a pretty hefty advantage when it comes to harassment. The best way to show how this works is through an example;


Divide and Conquer

A smart Wehrmacht player will use all of his forces together to hold half of the map in the early game. This is because the free flowing nature of riflemen allows the American player to stop and fight at any time, while a Wehrmacht player generally requires a bit of preparation before going into battle. Because of this advantage, if your opponent start splitting up his forces and trying to take both sides of the map, you can generally end up with the entire map without too many problems. For example, if your opponent has two volks squads on one side of angoville, you can use three riflemen squads to chase them away, and immediately move them over to the other side to chase anything he has on the left.

Cut off points are very important. If you can decap a point that will cut off your opponent's HQ from his resources that point can and should be harassed as often as possible. Angoville is a perfect example of map that has cut off points and you should use your mobility and capping speed to its fullest to deny your opponent's flow of resources.

Bunker Busting

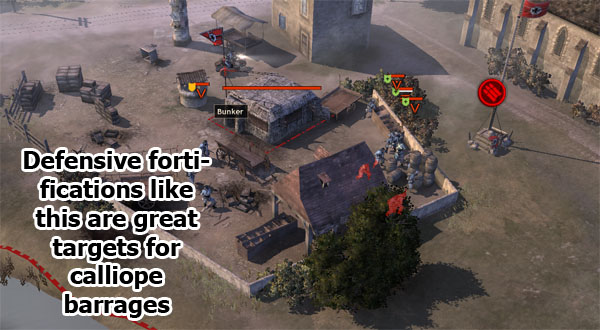
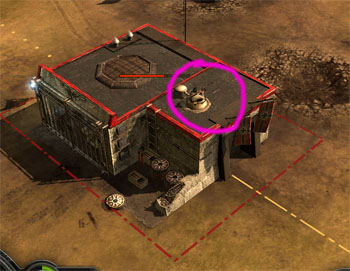
The Wehrmacht bunker is probably the biggest headache you'll face in the entirety of the game. It doesn't take damage from small arms fire and it takes a flamethrower engineer a while to burn a bunker down. Your best bet is actually being aggressive enough to prevent a bunker from going up, but if the Wehrmacht player is able to get a bunker up, the only way you'll be able to kill the units inside (this early) is with a flamethrower engineer. Usually one or two bursts will kill anything inside, but you can flank using the techniques described above to get a flamethrower close enough to kill anything inside (usually a machine gun). Its important to remember that rifles alone generally can't kill anything inside a bunker unless its extremely low on life, and I mean 2-3% or lower.

Generally, you wont be able to kill a bunker until after your first tech, but if you can force a mass retreat, you can kill a bunker with flamethrowers. The important part is to put your riflemen in a position to delay or prevent a counterattack while the flamethrowers burn down the bunker. Generally, placing them in green cover somewhere between the bunker and your opponents base will be your best bet.

Bunkers by themselves aren't dangerous, but medic bunkers are one of the backbones of many Wehrmacht strategies, so removing them should be a high priority. However, if your opponent has a well defended bunker that you can't kill, you should use harassment techniques and try to draw out his army, forcing him to fight away from the medic bunker. If you see a medic, manually target it with your combat forces and kill it. A medic bunker, left unchecked, can churn out free squads of grenadiers for a Wehrmacht player, and if there are too many squads on the field you'll eventually be fighting a never-ending horde of infantry. Bunker Busting will be covered in detail later.


Teching


The standard teching order generally starts after your first 4 rifles are built. There are generally two major options given to you at that point and you have to make a solid decision to pursue one and delay the other. Your two major options are: BARs or a Motor Pool. Your two lesser options are: Grenades and the WSC.

BARs

For 200 manpower and 60 fuel you can upgrade all of your rifle squads with BARs, or Browning Automatic Rifles. Each squad gets 2 BARs. These BARs are technically Light Machine Guns, but they do fire on the move, albeit very inaccurately, and don't function at all like the German mg42 light machine gun. BARs will chew up volksgrenadiers pretty handily, and will mow down any infantry unit at close range. Stationary BAR'd Riflemen behind green cover will kill just about anything in the early game.

Now, like everything else, there are some major advantages and disadvantages. First off, for 200 manpower and 60 fuel, you instantly upgrade every one of your combat squads on the field with the best weapons available at the time. You've given all of your squads a step up while the wehrmacht player can't globally upgrade any of his units. It gives you a window of opportunity to really do some damage. Once he has units like grenadiers or pumas on the field, your window is gone, but from the moment you get the upgrade until he regains his footing with stronger infantry or light vehicles, your infantry is superior to his.

However, upgrading to BARs early on does not change the dynamic of the game. You're still flanking, you're still harassing, you're still creating mismatches and pushing your advantage. You cannot just run right up and claim victory. MGs still pin your units, volksgrenadiers still do damage. You haven't changed the game at all, you've just made it a lot easier. Also, keep in mind that if you do choose to go with early BARs and then you don't capitalize on your investment, you've dug a hole that you may not climb out of. You've given up the option for the early light vehicle and you may be spending too much manpower on reinforcing to be able to afford a weapons support center.

Now, both of those aside, generally at some point, you will be getting BARs. Some time during the game you will want to upgrade to BARs, as your riflemen are fairly worthless late game without some sort of upgrade. The difference between early BARs and mid game BARs is that early BARs is a race to get BARs out with the intention of using your big advantage for a small period of time. Mid game BARs is just to keep your rifles from becoming 'out of date.'

The Motor Pool

The motor pool is more expensive, both in fuel and manpower, than BARs, but it drastically changes the dynamic of the game. When I refer to a motor pool, I am referring to making a motor pool as quick as possible, and producing either an m8 or a t17 as soon as possible. The M8 and T17 are both light armor, and take almost no damage from small arms fire. While volksgrenadiers can use panzerfausts, its generally agreed upon that a Wehrmacht player must tech to his second tier to effectively counter an M8 or T17.

If you have Tales of Valor, you'll be able to pick which light armored car you want to be able to produce (before the game starts, in your army customization option). The M8 costs slightly more, but has the ability to purchase armor skirts. It also can purchase a gunner on top. It fires once every 7 seconds and can penetrate puma armor, as well as deal small amounts of damage to units like Panzer 4s and Ostwinds. T17s fire much faster, once every 1-2 seconds, but can barely scratch the paint on a puma. T17s also cannot purchase armor skits, but they earn a sandbags addition at their first level of veterency, which doubles their hitpoints. M8s can lay mines which do tremendous damage, while T17s can use white phosphorus grenades to stun vehicles. The general consensus is that M8s are more durable and do alright vs both infantry and vehicles, while T17s mow down infantry, but cannot touch any of the Wehrmacht vehicles. Given the choice, I would prefer an M8 against the Wehrmacht. Just for the sake of simplicity, I will use the M8 as an example for the rest of this section. If there is anything drastically different between the M8 and the T17, I will mention it.

If you've gotten your m8 out quick enough, your opponent often will not have any direct counters up to it. Volksgrenadiers will be your only threat early on, using panzerfausts if you get into range. You can keep your M8 at a range just outside of their faust range. It'll look something like this:
IPB Image
If they move out of cover and come closer with the intent on fausting you, you can just back your M8 up slightly by clicking directly behind it. If you right click behind your vehicle a small distance away, they put it in reverse and back up (exactly what you want). If you click too far away, they'll try to turn around and drive to that location, which is bad because it not only keeps your vehicle in firing range for a longer period of time, but it presents your backside to the enemy.

Generally, it takes 3 panzerfausts to kill an M8 (only takes two to kill a vet0 T17). Its ok if you get hit by 1 or 2, but you generally want to pull your M8 back and repair it before sending it in to do more damage. Now, your first big threat to your M8 is the Pak 38 50mm Anti Tank gun. The thing can camo, which means you wont be able to see it. It plays a distinct sound when firing, so you may be able to pick up on that. You'll also be able to see the shell flying at your M8. Pak 38 50mm Anti Tank guns, henceforth refered to as Paks, can kill an M8 in 2 to 3 shots (t17 in 2). This makes the Pak one of the deadliest things in the game when it comes to killing M8s. You have to be on a constant alert for these when using your M8 in a combat situation.

Advanced Tactic Sometimes the Pak gets you... Advanced Tactic


If you get your M8 out quick enough, and you think you can pull it off, you can drive your M8 directly to his base and an attempt to kill his pak before it can get set up. Generally, a Wehrmacht player will build a pak ASAP as soon as he sees an M8 (or predicts one is coming). If you can get into his base before its produced you can deal a deathblow that he probably won't be able to recover from. Get into his base and lay a mine at the bottom-left side of his Krieg's Barracks.

IPB Image
IPB Image
IPB Image


What about the M3?
Truth be told, the M3 is generally more hassle than its worth. While there are a few strategies that can make use of it, its generally not as strong of an option as the M8. The M8 has significantly more hitpoints and can generally move about the field without fear of death around ever corner. The M3 hitpoints are so low it becomes a liability in almost every situation it faces. The M3 also deals damage a bit slower, and although its more consistent, it lacks the burst damage of the M8. Burst damage is generally considered superior because it can 'snipe' units and kill retreating squads. The m3 is also worthless against any armored cars the Wehrmacht can produce. While the M3 allows nearby squads to reinforce, rifle squads generally need to be retreated time to time because of suppression, plus you give up the advantage of free healing if you've built a triage center. Overall, the M3 with the Quad upgrade can be used effectively, but requires an immense amount of babysitting and is rarely considered an equal to the M8.

Avoiding Paks
Generally, once you know there is a pak on the field, direct assaults with your M8 end up in your M8 dying before doing any damage. You need to keep your M8 back after this point, using it to fend off any 'expansion' forces the Wehrmacht might send out. Units that try to push out from their defensive lines can be met with the M8. Because mobile units rarely can combat M8s with any efficiency, you can use your M8 to chase away capping units or any units moving up for an attack. Keep in mind that you should always be on the lookout for paks when this is going on, because a smart player may move up his pak in anticipation.


Grenades

I mention upgrading to grenades as a 'lesser' option because generally they're not as effective as BARs or a Motor pool can be. While later on, they're generally a great addition to your riflemen, choosing grenades first sets you back 40 fuel for the upgrade and 25 munitions for each grenade. While that may not sound like much, it prevents you from getting quicker BARs (60 fuel) or a motor pool, and the early munitions use may delay the arrival of your flamethrower engineers. You can, however, still make grenades work if you use them to cause enough casualties on the Wehrmacht end.

Riflemen pineapple grenades do 60 damage. A single volksgrenadier has 60 health, which means a grenade in the middle of a volks squad is going to kill quite a few squad members and cause massive damage. It can also kill an entire machine gun team if they've already taken damage. They work great for clearing buildings and they're effective against squads in cover. That being said, the more skilled your opponent, the less likely he is to be hit by grenades. A good player will be able to move his troops out of the way of incoming grenades. And while this generally gets his infantry squad out of cover momentarily, it means he takes little to no damage from the grenade itself. Because of this, its very hard to hit volks squads if they're being controlled by an experienced player. A very experienced player will also be able to avoid grenades with machine guns.

On the other hand, grenades also change the dynamic of the game. Every rifle squad, no matter the size, has lethal potential when you have grenades. If you're able to get a 2 man rifle squad in behind an MG squad, they wouldn't be able to kill it because they only have 2 squad members left and thus deal almost no damage. However, if you're able to get in behind a machine gun with that same 2 man squad and you have upgraded grenades, that rifle squad can quickly kill the MG squad, or at least wound it very severely, and then run. Grenades also work well for getting troops out of cover. If you throw a grenade at a volks squad and they step backwards to dodge the nade, they're out of cover and your other troops will be doing more damage.

In my opinion, grenades are the weakest opening tech and should be upgrade sometime in the mid game instead of ASAP. Your first 40 fuel can be spent on something different. That being said, you can sometimes get away with early grenades if you can use your first grenades to catch your opponent off guard and cause casualties.


The Weapons Support Center

The Weapons Support Center costs 185 manpower and 15 fuel, which doesn't sound like a lot, but if you build one too early it severely hampers your flow of combat troops. If you build one after your second rifle squad, by the time you get your first unit out of it, your opponent will most likely have 4 units on the field, leaving you with a disadvantage. At the earliest, you want to build this after your first three rifle squads are on the field. You do have a larger selection of units though. If your opponent is playing very defensively or camping a small section of the map, a WSC may actually be your best option.

The .30 cal
The .30 cal machine gun team isn't nearly as effective as the MG42 team the Wehrmacht has to offer. For one, it suppresses slower. It often takes two full bursts to suppress a volks squad, which means they can often get out of its firing arc/range before becoming suppressed. It has slightly better accuracy than the MG42 which mean it generally kills stuff slightly faster at medium/long range. The one saving grace it has doesn't rely in its own strengths but in the Wehrmacht's weaknesses. Very few of the Wehrmacht units were built for flanking. A .30 cal in a building early on is a pain in the ass for the Wehrmacht to deal with if they're not prepared. Flamers CAN flank the building, but generally your two main concerns are Snipers and the Blitzkrieg ability to Assault (which will be covered later).

Unfortunately, the .30 cal isn't a very effective killer when compared to its two WSC cousins. The sniper and the mortar generally can cause more casualties or kill specific targets while the .30 cal is generally just used as support to your sniper or mortar.

The American Mortar
The American mortar is weaker than its Wehrmacht counterpart in both damage and range. Like the 30cal, most of its strengths come from the Wehrmacht's weaknesses. Riflemen squads are generally moving, either to flank, to charge, to cap, or to do something, but volksgrenadiers, grenadiers, and machine guns are generally best when stationary. This means your targets aren't running around as much, which means more direct hits. You can also use the mortar to destroy bunkers and use smoke, both of which will be explained later.

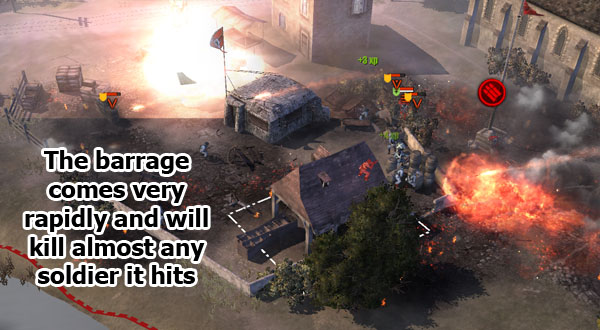
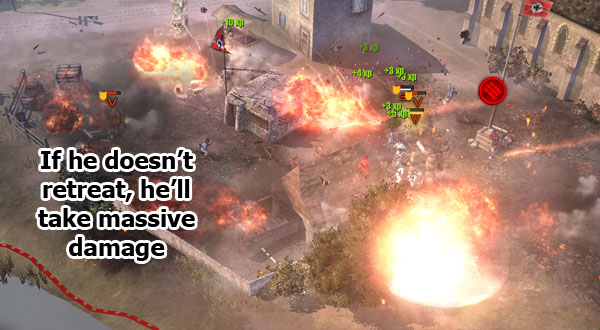
Try to always use the Barrage option. If you give your mortar the command to manually attack a squad, they will fire slower and they will stop firing if your lose line of sight on that particular unit.

The Sniper
Generally, the sniper is the superstar that comes out of your WSC. The American sniper, if left unchecked, can drain a Wehrmacht player of his manpower and be a constant thorn in the side of your enemy. While it costs 340 manpower and is somewhat frail, a well micromanaged sniper is going to pay for itself and then some.

The sniper is frail, though. If you let him run around on his own he's going to get hunted down easily by a bike, and if you let him shoot without micromanaging him, he's going to get countersniped. If you're using a sniper, you absolutely need to assign a hotkey to it. Use the same key every time you use your sniper, so after you've accustomed yourself to microing your sniper, you'll be able to instantly select him whenever you need to. For example, every time I make a sniper, I immediately assign hotkey #3 to him. You can use whatever number you want but I suggest you make it something within easy reach of your fingers.

Using your sniper
Your sniper can one-shot-one-kill any infantry soldier the wehrmacht has with the exception of a Knights Cross Holder. This means its generally better to shoot at higher-value targets when you have the opportunity. If you ever see a Wehrmacht sniper uncamo'd, that is your first priority. Other than that, you want to aim at weapons crews if you have the option. Grenadiers are also valuable targets. Only shoot at volksgrenadiers if you have nothing else to shoot at. If you ever have the chance to eliminate a squad completely (there is only one member left), its generally your best option to shoot that man, regardless of other juicy targets surrounding hm (however, easy shots on other snipers take priority to anything!).

The more you use snipers, the more you'll be able to get a grasp on when you should camo your sniper and when you can run him around without any camo. Because he walks much slower when camo'd, you generally want him uncamo'd whenever he is in almost no danger because he is behind enemy the front lines. Also, when your sniper fires, he uncamos for a brief period of time. The more times he fires in a short period of time, the longer those individual period become. On the first shot, he generally remains uncamod for under a second. On the 4th or 5th shot he remains uncamo'd for 3 to 4 seconds, which is a perfect opportunity for your opponent to strike.

There are four things that can kill your sniper. The first is a bike. This little bastard can chase down your sniper and kill him in a matter of seconds. You can prevent this by supporting your sniper with other units. Riflemen work best, especially later in the game. BARs can chew up a bike very quickly, and sticky bombs will kill a full health bike. MGs can offer some support, as well as any elite infantry with anti-tank weapons. AT guns also can support your sniper but a sniper/AT gun combo can be overrun by an infantry blob fairly easily, while any of your infantry support can generally chew up anything running directly at them.

The second is random bullshit. I can't list them all, but its generally some form of artillery, a mine, a random AT gun shot, a random tank shell, or something thats very hard to prepare for. The only way to avoid things like this is to pay constant attention to your sniper and retreat him if things get hairy.

The third is an infantry blob. If you leave your sniper unsupported, or just undersupported, your opponent can just charge your sniper and sometimes just run him down and focus fire him when he uncamo's. This can be avoided by retreating your sniper early enough or by just supporting your firing sniper well enough. there is the occasional axis flank you have to worry about, and its important to not put your sniper in a vulnerable position if you're unable to defend off a flank.

The fourth is generally the deadliest. Counter-sniping is generally the only thing that can kill a well microd sniper. This is unfortunately a good option for the Wehrmacht player because one shot can eliminate your sniper, regardless of what vet he's achieved. While you can play down the factors of getting countersniped and essentially 'play the odds,' every time you shoot or uncamo you're taking the risk of losing your sniper. However, countersniping is one of the most frustrating things in the CoH world to do, so if you do it right your sniper can generally live a long and healthy life.

There are a few things you should be doing when controlling your sniper. The first is to move him after EVERY shot. Immediately get him moving after every shot. This isn't to 'hide,' your sniper, your opponent gets an indicator to tell you exactly where your sniper is, you can't avoid that, but moving him is key to reducing the chance of getting countersniped. Your sniper can't rapid fire, and his weapon has a fairly significant cooldown period, which means moving him slightly won't affect his total rate of fire. Moving him, however, does give him a reducing incoming accuracy. An axis sniper shooting at him while he's moving is far more likely to miss.

The second thing you should do is not shoot too much. I know it sounds weird, but if you shoot 5 or 6 times as fast as you can, your sniper will remain uncamo'd for a period of a few seconds, which gives your opponent a perfect countersnipe opportunity. If you're confident that your opponent does NOT have a sniper on the field you can shoot all you want, but its generally a better idea to shoot three to four times and then move your sniper back for 5 or 6 seconds. This will generally drive your opponent crazy if he's attempting to counter your sniper at all, and generally he's putting so much concentration into his sniper-removing-efforts that he may not manage the rest of his army at 100%.

Mid Game

Your first tech generally dictates the way your mid game evolves. An aggressive BAR strategy generally revolves around constant pressure and never letting your opponent completely set up, while a Motor Pool strategy revolves around creating a mismatch and using your units where he can't kill them. WSC strategies are generally centered around textbook play that removes dangerous units from the field through methodological play and take-and-hold maneuvers. However, as the mid game approaches, your opponent has access to most of his counters and you generally need to vary your gameplay in order to keep (or take) the advantage. The first step is figuring out what your opponent is doing.

Intelligence (Oh God I hope I spelled that right)

There are three broad Wehrmacht strategies that each have their own unique play style. They're generally referred to as T2, T3, and T1-T4. Its the American player's job to react and adapt to what the Wehrmacht player is doing. Trying to put a square peg in a round hole is not going to work. You have to go with the flow of the game and you're not going to be able to use the same strategy every time. Going 'Tier X' is a simple way of saying what building they've created. While almost everyone makes a Wehrmacht Quarters (T1), further Wehrmacht strategies rely another tier. It can be the Kriegs Barracks (T2), the Sturm Armory (T3), or the Panzer Command (T4), and generally most player's strategies are centered around units that come from one of those buildings.

Tier 2

Wehrmacht T2 strategies revolve around using the medic bunker and superior infantry to win battles. There are a couple signs that your opponent is pursuing a T2 strategy.
  • You see a mortar, a pak38, or a halftrack on the field. The only way to get any of these units is to build a Kreigs barracks, which means they've gone T2.
  • You see a grenadier squad on the field that you know has not come from a medic bunker (Will be explained later.)
  • You see a completed kreigs barracks in their base.
  • Seeing infantry veterency on the Wehrmacht side is a decent indication that they will be pursuing a T2 strategy. It is important to remember not to fully commit until you see one of the above 3.
T2 is probably the most common strategy seen. I probably have some blame in that. The T2 mid game relies on producing grenadiers to overpower riflemen and support units to hold off allied blobs and vehicles. A medic bunker is almost always built and relied on, which means killing these things key.

Your first tech should generally come before you see any signs of your opponents teching, but if a motor pool is NOT your first tech, once you've seen the transition from T1 to T2 you should think twice about building a motor pool for the sole intention of an armored car. Later, you may need to build one to produce AT guns, but a T2 wehrmacht player is in a perfect position to kill your M8. Paks can literally kill an M8 before you can react if they have the time to set up a kill zone. While the M8 is a great impact unit, its also a lot of resources and if your M8 dies to the hands of T2 without killing anything you've set yourself back quite a bit. Instead, your mid game plan should be slightly more infantry-centered. If you've already established that your opponent is using a T2 strategy, you should get BARs and preferably grenades as well. A weapons support center is also highly desirable. While .30 cals aren't a huge impact, a well micro'd sniper can win the game for you. Mortars, although vulnerable to counter-mortar fire, are handy in destroying bunkers and lobbing shells onto clusters of infantry. Given a choice, I would almost always prefer the sniper to a mortar squad.

Fighting T2 generally comes down to killing your opponent through superior use of cover, flanking, grenade use, and technical play. Grenadiers are a significant upgrade from volksgrenadiers, just as BAR riflemen are a significant upgrade from vanilla riflemen. For the most part, you can continue to use the same strategies you used in the early game. Your riflemen should still be doing the bulk of your fighting, flanking, capping, and harassing.

Bunker Busting (part 2)

A medic will pick up any wounded bodies lying around and return them to the medic bunker, and after it collects 4 bodies, a free squad will appear for the Wehrmacht player. This means that if you don't deal with them, you're going to lose. Not only do they provide free squads, or zombie squads, but they're also generally a central point of defense for the Wehrmacht player. A machine gun in a bunker is a tough nut to crack. There are a few ways to kill these, most of them involving doctrinal abilities. The mid game is generally when you select a doctrine, and bunker-killing often plays a big role in deciding on a doctrine. The first thing you need to do is determine if your opponent is using the defensive doctrine or not. Why? Because the defensive doctrine makes killing bunkers a major pain in the ass.

There are a few definitive signs that your opponent is using the defensive doctrine.
  • You see use of "For The Fatherland." You'll see this icon above all of his units that are currently territory he controls. They get massive defensive bonuses for a short period of time.
    IPB Image
  • You notice a drastic increase in the health of his bunkers. Fortify the perimeter, a 2 command point ability, increases the hitpoints of a bunker significantly. One offmap artillery stike, centered on a bunker, will kill the bunker or drop it to <15%. If the player is playing defensive, generally an offmap artillery strike will only reduce the bunker to 50%. Satchels, thrown by Airborne Infantry, will drop a bunker to 10%, unless he is playing defensive, where it will drop it to roughly 50%. The more you play the game, the more you'll be able to judge if he's using regular bunkers or defensive bunkers.
  • You see machine guns on top of his buildings located in his HQ sector. Bunkers and his HQ will not have any machine guns on top, but the wehrmacht quarters, kriegs barracks, sturm armory, and panzer command will have gunners with mg42s on top of all of their buildings.
    IPB Image
Alright, once you've determined if he's going defensive or not, you need to make some decisions on how you're going to kill his bunkers.
  • Offmap artillery. Available from the infantry doctrine at 3 command points, you can often use these early enough to make a big impact. They are expensive, costing 150 munitions, so you have to make good use of the ones you can afford, but these have a chance at killing a normal bunker in one use. They'll do about 50% of the damage needed to kill a defensive bunker. If you do decide on using the infantry doctrine, 105mm Howitzers are also a great way to bombard bunkers from afar, and they're not too far down the road, but they're also expensive and vulnerable.
  • Airborne troops. Airborne infantry can toss satchels that will do able the same amount of damage as an offmap artillery strike, but they by themselves are incapable of killing a normal bunker. They will drop it to 10% (roughly) and you must use engineers or a recoiless rifle to finish the job. Generally, when the Airborne squad is going in to toss a satchel, they're able to get off enough shots (2 shots, generally) to damage the bunker enough to where the satchel will kill it, but just keep in mind that if you're not able to do that extra 10% of damage the bunker can be repaired for free. Defensive bunkers pose a bit more of a problem. One satchel will only drop the bunker to 50-60%, which generally isn't even close to killing it. Unless you're able to force your opponent into mass retreating, you generally can't keep one airborne squad around long enough to throw two satchels. Using two airborne squads is extremely expensive and you might not be able to afford the reinforcement costs through out the game.
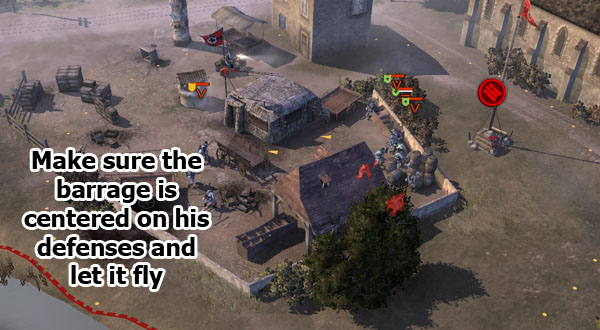
  • The Mortar. A mortar squad can knock out a normal bunker if its allowed to barrage uninterrupted, but if your opponent has a counter mortar or some other way of dispatching your mortar, this may not be a good choice. The best thing about a mortar is that you're not forced into a doctrine choice and it doesn't cost any munitions. It does, however, require a weapons support center. They do take all goddamn day to kill if they're using a defensive bunker, so keep that in mind. Keep in mind that you always want to use the barrage option, and do not tell the mortar just to attack the bunker. Also, make good uses of hedgerows, buildings, and any other impassable terrain features as shielding from the troops on the other side.
  • Demo Charges. For 100 manpower and 30 fuel, you can give your engineers the ability to lay demo charges on buildings. One of these will kill a bunker regardless of health, regardless of defensiveness or not, and regardless of how many pioneers are clustered around trying to repair it. They're fairly cheap to lay, costing only 50 munitions, but the problem is trying to get your engineers anywhere near the bunker. Dousing yourself in gasoline and wrestling with the human torch generally goes better than trying to run a squad of engineers up to a medic bunker in the middle of a fight. If you can get them in close to lay them, jackpot, you win that battle, but that requires a lot of preparation or just pure luck. If you are able to chase him off the field and cause a mass retreat, you can use these to detonate bunkers, but generally these cannot be used in a combat situation.
  • Flamethrowers. If no one else is around, you can use a flamethrower to burn down a bunker. This situation is fairly rare, but if your opponent mass retreats or you just overpower him with more troops you can do it.
  • Keep in mind that you can use a combination of any of the above (except those that are mutually exclusive due to doctrine selection). Common practices of killing bunkers is using a mortar to drop its health and then using an offmap or a satchel to finish it off. Generally, if you can kill a bunker, you're in great shape and the momentum has just swung in your favor, so you should make a great effor to kill these things.
Keep in mind that later in the game, things like tank blasts, calliopes, 105mm howitzers, and AT guns can also help you clear out bunkers. These options listed above are generally considered 'mid game' solutions to bunkers.

The T2 split: Vet and T4

Generally, T2 strategies 'split.' Some people prefer veterency for their infantry, some people prefer to tech up to T4 for panzers, ostwinds, or panthers. The only way to really recognize which direction your opponent is heading is to look and see if his infantry squads have any veterency. Keep in mind that infantry veterency and support veterency are different, so if you see a machine gun with veterency he's pursuing a different strategy. Volksgrenadiers, Grenadiers, Stormtroopers, and Knights Cross Holders all share infantry veterency, so if you see your opponent buying veterency for his infantry, he's generally pursuing a T2 vet strategy. If you don't see any veterency for a period of time, he's more likely teching, preparing a T4 strategy that will roll out vehicles.

T2 with veterency
Generally, T2 with veterency produces a large number of grenadiers with veterency to overpower riflemen. A grenadier squad with level 2 veterency will beat a riflemen squad upgraded with BARs at any range, assuming all other things are equal. Of course, this changes when the riflemen squad gets veterency, but for the most part, vet 2 grenadiers are tough to take out with just riflemen alone.

Posts: 5,540

Game: Company of Heroes


+
# 2SayNoToStim May 21 2010, 00:38 AM
I'm going to quickly run down how the vet system works for infantry.
IPB Image

Vet 1: Vet 1 gives all of their infantry a slow, constant healing effect. While it doesn't do much in combat, over time it can return squads to full health.
IPB Image

Vet 2: Vet 2 is great for stormtroopers and grenadiers, giving them a completely new armor. This means rifles and BARs do significantly less damage. Things like sniper rifles, artillery, and grenades still works, however, so keep that in mind when choosing your form of attack. Volksgrenadiers and Knight's Cross Holders don't get that many worthwhile bonuses when it comes to vet 2. They're more resistant to suppression and they take 5% less damage, neither of which is absolutely game changing.
IPB Image

Vet 3: Vet 3 gives their infantry a 20% life boost across the board. This means every infantry squad you fight is now officially a pain in the ass. If your rifles aren't already vet 2 or 3 themselves, you're going to have to rely on artillery, snipers, or something other than regular old BARs.

Now we're going to have to take a glance at how to fight it off. If they've only purchased Vet 1, you can continue fighting like normal. Flanking, harassing, using your riflemen like riflemen. However, when they step up to Vet 2, you need to change your strategy slightly.

The T2 vet system is a staple of the Wehrmacht strategy book because of one simple reason: it works. If you're able to start causing chaos early in the game and never let up, you don't really give T2 the time to set up, but generally the Wehrmacht player can get his defenses up and hold at least a small portion of the map. You have quite a few options, and although none of them are 'magic bullets,' they all can work.

T2 with Vet is a 'campy,' strategy. Wehr players generally try to take half (or slightly more than half) of the map and let you come to him. One of the best ways to counteract this lies in the infantry doctrine. At 5 command points, you can build a 105mm howitzers. This thing can bombard from afar without risk, and it generally kills any soldiers it hits. You can use this to fire into areas that you can't see, but using it blindly is generally a bad idea. You may want to scout out the area, or use it in combat, but every time you fire it, you should be aiming at something. You can, however, fire it into the fog of war if you're aiming at a spot you know is populated by the enemy. Nearby bunkers, or in his base as soldiers are retreating are generally good spots to barrage.

The second option is picking airborne, and using the strafe to combat the horde. Generally, airborne works best when you already have a slight edge on your opponent. You can use airborne infantry to destroy bunkers, and use the strafing run to hit any large clumps of Wehrmacht infantry. Airborne also has the advantage of being a slightly stronger late-game doctrine, as supply drops can routinely give you 100 more ammo for your strafes, and Recoiless Rifles are superior to the Bazookas that come with Rangers. However, its highly dependent on munitions, so if you're controlling less than half of the munitions points you generally can't make as much use out of the airborne doctrine as you need.
IPB Image
IPB Image
IPB Image
IPB Image
IPB Image
IPB Image


The third option is the calliope. The Right Hand Side of the Armor tree allows you to call in a calliope at 7 command points. This thing can barrage an area, laying waste to anything dumb enough to stand still in it. Generally it only picks off a few men before your opponent retreats, but it absolutely rapes anything with a set up time, like a mortar or a machine gun. A calliope barrage is better than a strafe or a howitzer barrage by far, but the problem lies in the calliope's time of arrival. Generally at 7 command points the game has progressed a considerable amount. The calliopes are also expensive, costing 650 manpower to call in. Granted, they're more durable than the 105mm Howitzer (and they're mobile), but sometimes they're just too little too late. I would only pursue a calliope if I know I can keep the game competitive until I got a chance to get a calliope on the field.
IPB Image
IPB Image
IPB Image
IPB Image


Now, doctrinal choices aren't the only things that can fight off T2 vet. The WSC is generally a great choice when it comes to killing grenadiers. Snipers are the most valuable things that come out of the WSC, by far. Shooting grenadiers forces him to spend manpower on reinforcement costs. If you can keep a sniper alive for a long period of time, you can bleed your opponent pretty badly of manpower. Use the sniper tips described previously, and you can make a T2 Vet player cry.

Vehicles are generally at a disadvantage when fighting T2 Vet. Invisible AT guns tend to do that. I'm not saying you shouldn't make any sort of vehicle, but anything you produce will have its effectiveness neutered as long as he has a Pak 38 on the field. You can use your light vehicles to hold remote locations and scare off any forces he has capping on the other side of the map, but a direct assault with vehicles is a bad idea. Later in the game, you should be able to clear out AT guns with things like howitzers, calliopes, or just plain flanking. If removing his AT guns is possible, a tank depot may be a decent choice, but generally M8s, M3s, and T17s don't do very well against a T2 player who's had the ability to set up.


T2 to T4
T2 to T4 is a fairly common strategy where the Wehrmacht player will skip veterency altogether and just jump to T4. This leaves him fairly vulnerable in the mid game, but he can often catch American players unprepared by rolling out an early Ostwind and clearing the field of infantry altogether. Generally, you can fight this off using the same tactics as described above. Your riflemen are more potent killers now, as the enemy troops don't have their vet 2 armor. The only difference is, you either have to kill him before he gets this tanks up, or prepare for them.

Generally, wiping him completely off the map is generally not an option. If he's bunkered down on a certain area, he's determined to keep his fuel and unless you seriously outplay him you're not going to prevent him from rolling a tank out. What you can do, however, is use the advantage he gives you to set up your anti-tank measures. You can read more about it in the 'late game' section.

Fighting T2 in a nutshell

You want to utilize things like artillery/strafes, the weapons support center, and BARs to fight an infantry-on-infantry battle that you win with superior tactics. Killing the medic bunker is high priority, and using indirect fire units (mortars, artillery, strafes) can give you a big boost. Vehicles are generally of limited use, because pak 38s are currently so good they can twoshot any of your light vehicles.

Good:
  • Killing medic bunkers
  • Flanking, harassing, and fighting battles you know you can win with your riflemen
  • Using snipers to drain his manpower
  • Artillery, strafes, or any other indirect fire where you kill his men without putting your own in danger
  • Veterency. The more your rifles vet up, the better you'll be able to fight.
  • Pressure. Don't fight battles for the sake of fighting battles, but if you're able to keep him in a constant state of chaos so that he can't fortify the area you're generally winning the game.
Bad:
  • Feeding the medic bunker.
  • Fighting battles you can't win.
  • Sloppy use of your units. Letting a sniper or a rifle squad die can cost you the game.
  • Losing the resource war. Generally you want to hold at least half the map, and harass/decap his other points to deny him resources.
  • Letting your opponent fortify to the point where you're unable to attack him. If your opponent has mines, machine guns covering every entrance, and anti-tank weapons set up you'll have to rely solely on artillery to break his lines.
Tier 3


Fighting T3 is a lot different than fighting T2. The Wehrmacht player skips over the kriegs barracks and instead techs to t3, giving him access to the Sturm Armory. The good news is that its generally a lot easier to fight T3 than T2, but the bad part is that if you're unprepared you're in a very bad situation. T3 can be 'spotted' by a few telltale signs:
  • You see a Sturm Armory being constructed.
  • You notice an absence of T2 units on the field. Keep in mind that they may get a few squads of grenadiers from a medic bunker if you've allowed it.
  • You spot stormtroopers. This is generally a good sign that they're pursuing a T3 strategy, but is obviously not proof of T3.
Essentially, you have to expect T3 if you don't see them go T2. This means going an entirely different route than you would if you were fighting a T3 strategy.

Preparing for T3

Your first and foremost priority is to prepare for the puma. The best choice is generally the motor pool. The M8 is worth its weight in gold against T3. I'll go over this in a bit, but right now I'm going to cover a fairly common situation.

So, you've spent your fuel on BARs, nades, and a triage center. Unfortunately for you, you haven't killed your opponent, and you sense that the puma is coming. You can't afford a supply yard and a motor pool, so what do you do? You have to delay the pumas as long as you can, until you can get a real source of anti-tank up.

The first thing you should do is lay mines at some key points. On roads, in pathways, anywhere that you think the puma might travel. These mines aren't going to kill it, but destroy/damage the engine, and delay it a little longer. If the puma doesn't hit them, they stick around all game, and generally if you lay them in the right spots, something hits them. Here's a quick video showing some of the better spots to lay mines. Clearly, these aren't the only good places to lay mines, but these are good starting spots:


The second thing you should do is consider elite infantry. Rangers or Airborne Infantry both have the ability to hold off pumas until you get better counters on the field. Keep in mind that Rangers or Airborne Infantry should not be your only counter to T3, but units that support and work well with all of your other troops. Rangers are available at the 3 command point mark, Airborne Infantry are available at the 2 command point mark. If your opponent is close to T3, you should have the appropriate number of command points stockpiled. Its very rare that a Wehrmacht player can construct a Sturm Armory without the American player at least getting 2 command points.

IPB Image


When you make a decision on airborne or rangers, you're not only picking your elite infantry but you're picking a doctrine. If you go with airborne, you're missing out on access to artillery, but if you pick rangers you're missing out on all the perks the airborne tree has to offer, like supply drops and emergency AT-guns. Lets take a quick look at JUST Rangers and Airborne.

Rangers
Rangers cost 400 manpower to call in and come equipped with 2 bazookas and 4 M1 Garands. For 100 munitions they can be upgraded to Thompson sub-machine guns (replacing the Garands), which greatly increases their anti-infantry power. Bazookas work well against pumas but are inaccurate at range. If you spend too much time running pumas down you generally will get chewed up and have to retreat. In close quarters combat, if they have upgraded to Thompsons, they will beat any axis infantry squad in the game assuming everything else is equal. They are expensive to reinforce and their bazookas generally cannot penetrate heavy armor. Rangers can also throw pineapple grenades if you have researched them.

Paratroopers (Airborne Infantry)
Paratroopers cost 375 manpower to drop from the sky. They are able to be dropped anywhere that you can currently see, which includes areas that have been briefly revealed by a recon run. They come equipped with 6 M1 Carbine rifles. For 125 munitions they can be upgraded with recoiless rifles, giving them a pair of anti tank weapons to replace two of their M1 Carbines. You should also note that paratroopers can upgrade to recoiless rifles anywhere on the map, as opposed to normal upgrades which must be purchased in territory you control. 4 M1 Carbines and 2 Recoiless rifles means that airborne infantry is one of the weakest anti-infantry squads in the game. Rifles do significantly more damage than airborne squads in infantry battles. Paratroopers are also expensive to reinforce. However, they can reinforce anywhere on the map, assuming they are not retreating or inside a building. This means that they're able to stay on the field as long as you're not forced to retreat them, giving them much more time to a force to be reckoned with. Recoiless Rifles are generally superior to bazookas in every aspect, except when fighting pumas. Recoiless Rifles have somewhat poor accuracy, but very little scatter. What that means is that generally, a lot of missed shots actually hit their intended target anyhow. While this works wonders against tanks, pumas have no hitboxes, which means that you'll often see Recoiless Rifle shots travel through a puma and not damage them at all. Recoiless rifles, however, are generally better than bazookas in any situation not involving pumas. Paratroopers can also throw pineapple grenades if you have researched them. In addition, Paratroopers can also throw satchels, which explode after 4.5 seconds and do massive damage. The only targets you should use these on are targets which are completely unable to move. Bunkers, buildings (Not units in buildings), or immobilized tanks are your primary targets. Throwing these at mobile infantry is a waste of 50 munitions as the infantry can easily move out of the way.


Generally, I prefer paratroopers to rangers because they are more effective in the later game. Picking one is up to you, but remember that relying solely on Paratroopers to fight off pumas is generally a bad idea because you'll spend quite a bit of time shooting right through them and not hitting anything. If you're able to use other forms of anti-vehicle, such as mines, AT guns, or M8s, paratroopers make great support units, but if you're in a pinch and coming up short of AT, Rangers may be your best bet.

The Infantry Doctrine vs The Airborne Doctrine


If you do pursue some form of elite infantry, you're picking a doctrine. Its important to pick a doctrine based on the entire doctrine, not only for the Elite Infantry. Essentially it boils down to one thing: Are you going to need artillery? The infantry doctrine gives you access to forms of artillery early on and allows you to build a renewable source of firepower (the 105 howitzer). While both Airborne and Armor offer forms of delivering explosive firepower from afar, they generally come very late and cost an arm and a leg. Infantry is ultimately your best option for artillery.

But how will you know if you need artillery? If he's relying on a medic bunker, Artillery is generally a good option. But if you're fighting T3, generally he's relying on vehicles or tanks, which means the medic bunker may not be a problem or that big of an issue. Artillery doesn't have much of an impact on mobile units, and if you go infantry you may be wasting quite a few of your resources on artillery that doesn't hit anything.

When fighting T3, Airborne is generally a better doctrine if you have no use for artillery. While recoiless rifles have problems hitting pumas, the doctrine excels at pretty much everything else. The strafe is a monster anti-infantry tool, and the AT-gun paradrop can get an AT gun into battle almost instantly. Supply drops, which only cost 100 manpower, give you 100 munitions and 40 fuel a pop, and have the addition of supplying you with a mortar and a machine gun, which is absolutely amazing in the late game stages where a cheap machinegun can really put a wrench in your opponent's game plan.

Now the third option, which I haven't really talked about, is Armor. Generally, you should go armor is you can't utilize any of the options available in any of the other doctrines. If you have control of the game already, or if none of the infantry/airborne doctrines have any appealing abilities in that particular game, Armor is a great choice. The first few abilities are ok, but the true gems of the doctrine are the Pershing and the Calliope. Pershings can stand up to Tiger tanks, and lay waste to pretty much anything else except a king tiger. Calliopes are great artillery pieces that devastate an entire area within seconds. The problem with Calliopes is that they come in at 7 cps, which is far too late for mid game use, and you get no game changing abilities during the meantime. Sometimes, however, if you're fighting T3, a Pershing can win you the game. If your opponent doesn't have access to Paks, and is running around with Pumas/stormtroopers/StuGs, a Pershing is often a game-ender. Gwagons, the StuG replacement, can damage/kill your Pershing fairly quickly if you're not on your toes, so if your opponent is using Gwagons you need to watch out.


Fighting T3

Alright, this section is going to contain the more important ideas for fighting off T3. Everything listed above is an 'oh shit' solution where you find yourself with no counters up to fight an early puma. If you know its coming, however, you're in great shape and if you field the appropriate counters your opponent is in trouble. The best, timely, counter to a T3 push by your opponent is the motor pool. If you have both a ton of manpower and fuel to spare (in other words, you're winning by a large margin), you can opt out of the motor pool and tech directly to a tank depot. I'd only recommend this if you're playing airborne, however, as you'll need AT guns at some point in the game. Airborne doctrinal abilities allow you to drop AT guns you would otherwise need a motor pool for.

The M8
The M8 is a great counter to Pumas. Before I go on any further, I wan't to make something abundantly clear. Armor skirts are absolutely necessary if you're going to attempt to use your M8. It doubles the lifebar of your M8, which means it can actually survive long enough to actually do something. Ideally, you want both upgrades, armor skirts and the .50 cal gunner, but the gunner doesn't have to be there, the Armor skirts do. ALWAYS upgrade armor skirts as soon as the M8 comes out of the motor pool. Alright, anyways, back on track..the M8 is a great counter to pumas. It doesn't deal enough burst damage to kill one before it can retreat, but M8s damage pumas, pumas don't damage M8s. If the Wehrmacht player chooses to upgun his puma, upgrading it to the 75mm cannon on top, it can now damage the M8 but loses quite a bit of its anti-infantry power. In a straight up fight between M8 and upgunned Puma, it generally comes down to which vehicle dodges the most shots. A moving M8 or Puma can dodge shots, so always keep your m8 moving when its taking incoming fire, even if its just moving it back and forth in the same 15 feet line. Always remember to get your M8 out of harms way if its lifebar drops too low, and remember to reverse your M8 away to avoid having to turn around and reveal your rear armor.

The best part about M8s vs T3 is that he doesn't have a reliable counter like the pak38. If he has Tales of Valor and is using the Gwagon, they can kill your M8 from a range, but if he's using the StuG, the StuG is horrible at everything and has trouble killing moving M8s. If you park your M8 and let it get torn to shreds, StuGs can kill them, but if you keep them moving, particularly along the horizontal axis of the StuG (side to side), StuG's can't aim at them fast enough to shoot them. A T3 player will frequently use Stormtroopers as his form of anti-armor, opting for Schrecks instead of a tank or vehicle base AT. While these can be dangerous due to their camo ability, if you ALWAYS keep your M8s moving, using stormtroopers to kill them can turn into a frustrating headache for your opponent.

Moral of the story: The only time your M8 should be standing still is when you know its not in danger.


The M3 halftrack
The only thing I'm going to say about the m3 halftrack is not to build one against T3. It can't penetrate the Puma armor and doesn't do jack against anything you'll be fighting.

The T17
This thing used to rape everything, but now it falls into the same category as the M3. If you've replaced your M8 with the T17, you can build one, but don't expect it to be able to damage any vehicles. The one thing it can be used for is to stun a puma/tank while its in range of your AT gun, but overall, the M8 is a much much much better selection.

The 57mm AT-Gun
The 57mm AT gun is a great counter to Wehrmacht T3. It can kill a puma easily in three hits, and is a great counter to any armor your opponent can field later. The key to using them is to set them up before the action starts. They have to be faced beforehand, so make sure they're not looking backwards or to the side. Obviously, AT guns can easily be overrun by enemy infantry, so you have to make sure you support them with troops of your own. BARs work, M8s work, or machine guns if you've made a WSC. I wouldn't go out of your way to build support troops, but rather use the existing infantry you have.

If you're using multiple AT guns, you need to spread them out and have them 'cover each other.' If a puma gets behind one of your AT guns, it can quickly kill the crew and you're suddenly left without your AT punch. Keep them about half a screen away from each other. If you clump them up together, you risk getting hit by a nebel strike that can clean out your AT gun crews very quickly. Losing the crew of 1 AT gun hurts. Losing the crew of 3 can lose you the game.

Also, remember to re-man AT guns! If you lose the crew of a gun, the gun is still on the field! If you recrew it with a riflemen squad (a squad that has 4 or more men in it!), you can retreat the squad and reinforce, which is far cheaper than building a new AT gun. When you recrew, you'll lose 3 members of the squad you give the order to, so don't recrew with any squads smaller than 4 people unless its an emergency. That includes engineers! Generally you want to recrew with riflemen, because if you recrew with airborne troops or rangers, the reinforcement is much more expensive.

AT guns have pretty good range, and you should take advantage of that. Keeping them on the very front lines means they'll be picked off by infantry. Keep them in the back and have them 'crawl' up towards enemy tanks or vehicles if they're out of range. Also, if you're being bombarded by mortar, nebel, or stuka fire, you need to move your AT gun quite frequently in order to avoid getting hit by too many pieces of indirect fire. If you are consistently losing your crews to your AT guns, you leave yourself vulnerable to enemy tanks/pumas.

Sticky Bombs
Upgrading sticky bombs should always be done AFTER the motor pool. If you're relying on sticky bombs as your only source of AT, you're going to get screwed over pretty quickly. An experienced player will be able to back his vehicles away from sticky bombs while picking your riflemen off. Sticky bombs are a great support abilities that fend off flanking pumas/tanks or can be used to kill a wounded vehicle already but they should NOT be your main source of anti-tank.

The plan of attack
Your general focus should still be on harassment and taking ground. Inching your AT guns up little by little as you use a combined effort of M8s and infantry to take ground is your ideal situation. Some players like to limit their M8s to one, but if I can afford it, I will build up to three M8s and use them all together in one force. If you can catch one puma unsupported, three m8s can quickly dart across the map and kill it. You should also consider a form of elite infantry even if you have the appropriate counters up. The reason I say this is that combined forces generally work better than relying on one single unit alone. AT guns can be flanked, but if they're supported by Airborne troops, that single unit can't get in and mess up your AT gun because its forces to go toe to toe with the support units which can generally fend it off until help arrives. Riflemen with sticky bombs also work well. A puma has to get in close to the crew to kill it, and if you're guarding your AT gun with a rifle squad, it can't come in out of fear of being hit with a stickybomb.

Combined arms is going to win you this game. AT guns, M8s, and one squad of Rangers/Airborne Infantry can be used to counter just about everything he has.

Stormtroopers
Blitz players often choose blitzkrieg for the option of calling in stormtroopers. Since they don't build a kriegs barracks, T3 doesn't offer any decent mid-to-late game infantry, and blitzkrieg can fill this gap. Stormtroopers can camo, which means that if you're not paying attention, you can lose any of your units before you know whats going on. The key to fighting stormtroopers is just to keep your head up and be aware that there might be invisible units anywhere on the field. They have great potential for burst damage with their bundled grenades and panzerschrecks, so you always have to keep an eye out for little red dots on the minimap. Laying mines to protect some of your more vulnerable units is also a pretty good idea, as a stormtrooper squad that steps on a mine is going to have to retreat. BAR'd riflemen make good counters to Stormtroopers. Keep your rifles stationary and let the the Storms come to you. Keep in mind that stomtroopers may be wielding MP44s, which can chew up riflemen at close range, so if your squad gets low don't be afraid to retreat. Also, watch out for bundled nades, they do immense damage and you can easily lose a rifle squad to one nade if you're not paying attention.

Stormtroopers can also equip multiple schrecks in an attempt to ambush an M8. The idea behind it is to essentially get invisible units close to your M8 so their accuracy goes up to the point that they're almost certain to destroy your M8 in one volley. The key to countering this is to always keep your M8 moving. If its not moving, its a sitting duck, and will get turned into a heap of wreckage. Keep it moving and chances are those schreck shots won't touch it.

Nebels
Nebels are somewhat weak artillery that a T3 player has access too. They shoot rockets up in the air, they come down, hit stuff, and burn for a little while. Its not rocket science. ....Wait a second. Anyways, Unless he does something stupid with his nebels, like let them wander into the middle of the field, they're actually somewhat hard to kill. Unless you're playing the infantry doctrine, you don't have any mid game artillery that can knock them out, and sending an M8 to knock them out is often a suicide mission, not to mention it takes all damn day to kill a nebel with an M8. I generally just let the nebels be, and avoid their rockets. You can minimize the damage you take by not clumping your units up and moving your AT guns whenever you hear the distinct sound of a nebel firing. Also, don't forget to move and of your units off of the 'burning embers' they leave behind, because it does have a damage over time effect and anything you leave on those burning spots is going to die pretty quickly.

Fighting T3 in a nutshell

You want to use combined arms to battle anything he throws against you. Things like AT guns, M8s, and one squad of Rangers or Airborne infantry should be the bulk of your army, along with all of your units from the early game (rifles and engineers). Artillery generally isn't that useful, and purchasing artillery instead of impact units like M8s can often cost you the game.
Good
  • Utilizing the motor pool to combat his arsenal of vehicles and tanks.
  • Keeping your M8s alive by constantly keeping them moving, and retreating them for repairs when they get low on health.
  • Being prepared. A puma on the field without an answer to it is bad, very bad.
  • Mines. The more the better.
  • Combined arms. Six m8s can't win you the game. 2 AT guns, 2 M8s, and one squad of Airborne Infantry can.
Bad
  • Being unprepared. Don't get caught with your pants down.
  • Chasing vehicles around with rifles trying to throw sticky bombs. Sticky bombs are for support, not your main source of AT.
  • Building 3 squads of elite infantry. It drains your manpower so much that its rarely worth it.
  • Unnecessary losses. Losing multiple M8s can cost you the game pretty quickly. Keep those things alive. Re-man AT guns. Don't fail.
T1 - T4


Fighting T1-T4 is fairly uncommon so I'm going to be brief. Generally, when your opponent attempts to go T1-T4, he uses for the fatherland as a replacement for defensive veterency and stalls the game out until he can build an ostwind or a panzer 4. In order for this to happen, he has to be winning the early game by a significant margin or else he'll be pushed off the map with just T1 units. Things like mortars and M8s work wonders because he doesn't have a counter to them, all he has is volksgrenadiers, machineguns, and a sniper. The important part of fighting T1-T4, however, is setting up for the eventual early tank that hits the field. If you're completely unprepared, you're going to lose the game quite easily. Its important to get a motor pool up early to have access to AT guns. However, if your opponent is able to pull off T1-T4, you've generally done something wrong to begin with and you may have already lost the game.


Late Game

The late game American vs Wehrmacht meta game is, sadly, not in your favor. The Wehrmacht has access to some of the best tanks and best call in units. Generally, the longer the game goes on, the more of an advantage the Wehrmacht has. If you don't have an advantage in the late game, you're simply going to have to outplay your opponent and not get out-muscled by German armor.

The late game setup
I'm going to put this fairly simply: You need either a Motor Pool or a Tank depot (or both). rarely, and I mean rarely, you can get away with skipping both of those and using the Airborne doctrine as your source of AT, but that gets extremely expensive and if you don't have a significant advantage beforehand you might not be able to compete with your opponent in the manpower department.

You have 4 'tools of the trade' for dealing with German Armor.

The first, and most important, is the 57mm Anti-Tank gun. AT guns have great range, great penetration, and do great damage, but they have to be set up beforehand, and are very vulnerable to infantry.

The second tool is mine usage. Nothing aggravates a Wehrmacht player more than running his tank brigade over a minefield.

The third is Sticky support. Riflemen standing next to an AT gun is a great way to prevent your AT gun from getting flanked. If a tank gets into range, they'll be able to get a sticky bomb off and damage the engine, which generally means that tank is now a magnet for your other AT gun efforts.

The fourth is your own armor. Shermans and M10s/M18s perform differently, but both have their uses in the late game.

AT guns

AT guns are your main source of Anti-Tank damage. The most important part of using AT guns is preparation. An AT gun pointing the wrong way does nothing. They should be at the back of your front lines, but make sure they can reach the fight. Another thing to think about is 'clumping' AT guns. Clumping is a BAD idea and generally leads to your AT guns getting hit by artillery or overrun by infantry easier.
The RIGHT way:
IPB Image
The WRONG way:
IPB Image

The 57mm AT gun has a special ability to fire AP (armor piercing) rounds for the cost of 50 munitions. While there are a lot of variables and technical stats that apply to them, you only need to know a few things:
  • For the most part, AP rounds go through almost any frontal/side/rear armor.
  • They do more damage than normal rounds
  • You generally only get 2 shots per use of the ability.
That's right, you generally only get 2 shots with the AP ability. Its a timed ability, but with the reload/aim times, you can only get 2 shells off before the timer expires. Its generally not a good idea to use AP rounds unless its needed to kill a high priority target (King Tigers, Panthers, Tigers, etc), OR you have an excess of munitions (200+), OR you're not using them for anything else (for example, you've selected the Armor doctrine but aren't fielding any armor yourself).


Mines

Mines are great support anti-tank measures. Putting them on your flanks, or in front of your front lines can really slow down a Wehrmacht attack and often cause engine damage on their tanks, giving your AT guns a bunch of sitting ducks for targets. However, mines normally only work if your opponent is coming at you. If you're losing, or still on the attack, generally mines aren't going to do much because your opponent is sitting there waiting for you to come at them. However, if they're coming at you, you can lay them at the spots I mentioned earlier, or lay them in a protective measure around your AT guns.

Now, there is a thing as too many mines. If you spend 200 munitions on a minefield in one minute, your opponent is more likely to purchase a minesweeper and make a valiant attempt to clear out a big chunk of those mines. It just takes experience to learn the appropriate amount of mines to lay.


Stickies

Sticky bombs are another great support weapon you can use against tanks. The most important thing to remember about using sticky bombs is that you shouldn't go out chasing tanks. If the tanks are coming at you, throwing a sticky bomb is the best thing you can do, but letting your riflemen chase after a tank out in the open is just going to let the tank rip up your men and you're never going to get that sticky bomb off.

Now, there are exceptions to that rule. If you can get a sticky bomb off on a King Tiger, that may win you the game. The King Tiger takes a long time to repair and moves at an extremely slow speed when its engine has been damaged. However, you still can't sticky it by chasing it around. Its just going to keep backing up and shooting your guys while your guys can't catch up to it and throw anything on it. What you can do, however, is get a flank behind it and 'chase' it with two squads, one from the front and one from the back. Often times you can get at least one sticky off, and trigger that all important engine damage. The second exception to that rule is if you're up against a Tank that is trying to limp away with an Engine Destroyed status (or immobilized) and you won't be able to kill it with anything else.

While we're discussing the subject, keep in mind that a vet 2 rifle squad gets a bonus in the stick bomb range. Keep in mind that you should never just trying to sticky a vehicle moving away from your infantry, no matter how slow its moving. Move your rifles into range and then throw a sticky bomb. The reason for this is because if you just click on the vehicle first, your rifle squad will run up and start the animation for throwing the sticky, and the tank will move out of range just so slightly. So your infantry will stop the animation, move up, and attempt to throw another sticky. In this time, the tank will move up again, and so on and so on. However, if you move your rifles up in close and then sticky it, the tank won't be able to move out of range at all.

IPB Image
American Armor

American Armor, simply put, is sub par compared to German armor. Used effectively though, American Armor can make an impact. The M10 and the M18 play a similar role, but the M4 Sherman plays a completely different role.

First off, the M4 Sherman is the basic medium tank. It can kill an Ostwind very easily, and is about equal to a vet0 Panzer 4. It can barely scratch a Panther, a Tiger, or a King Tiger. It is, however, a decent infantry killer. With a gunner on top, it can easily handle late game german infantry as long as you keep an eye on it. Backing it out of danger if it gets low and repairing it is essential. Generally, late game Wehrmacht players don't have Pak38s because they've been destroyed by some sort of artillery or whatnot, and rebuilding a pak38 is unappealing when you can make a panzer 4 or a panther instead.

However, Shermans can do something M10s/M18s can't, they can soak up a medium amount of damage. If they're supported by AT guns, they can sit on the front lines and soak up a little bit of damage while the AT guns blast away from a far range. However, retreating and repairing is essential here, because you're purposely putting your Shermans in danger.

M10s and M18s serve a solely Anti-Tank/Anti-Vehicle role. Their man cannons very rarely are able to hit infantry, so don't expect them to be able to effectively handle anything with legs. They can, however, run over infantry if you're skilled enough to do it. Now, for a brief breakdown of the differences between the M10 and the M18. Their main gun and hit point totals are exactly the same. The M10 has better speed, but the M18 has the camo ability. The M18 also has the option to purchase a gunner on top, which is less appealing than it sounds. While it does give the M18 some sort of anti-infantry power, you should be using the M18s as an anti-tank force and not wasting them on infantry. The camo ability, however, allows you to ambush German tanks and often eliminate them before they can retreat.

M10s, on the other hand, are better at darting around the map and jumping from hotspot to hotspot. If you have access to both, its a hard decision, but don't feel 'gimped' if you don't have Tales of Valor and are forced to use the M10.

Both the M10 and the M18 are extremely vulnerable whenever attacking though. They have good penetration and good damage, but extremely low hitpoints. While some players go for the rear armor on tanks, its often a better idea to stay at a medium range at the side of the tank and let your M10/M18 fire at the side of the tank. While this has less opportunity for damage, you're not risking your M10/M18 very much. Going straight for the rear armor of a tank may put your tank at high risk to schrecks/other tanks/fausts, and you often end up losing your tank without killing his. Keep in mind that M10s/M18s are fairly cheap for tanks and losing one of them probably won't cost you the game, but unnecessary losses over and over again can easily lose you the game.


IPB Image
Using them all together

The strongest element the Americans have late game is synergy. Alone, none of the late game American units pose a huge threat, but when used together they can easily be a potent force that can drop more expensive units with ease. This depends greatly on whether you have tanks or not. Its certainly possible to play complete games without building a tank depot or never producing tanks, but first I'll cover battles that involve tank on tank action.

First off, your Shermans are decent tanks but can't really go face to face with Wehrmacht tanks. This means you shouldn't directly engage in head to head combat unless you have an advantage of some sort, like overwhelming numbers or the German tank is severely damaged to begin with. M10s are speed and lethal, but don't have many hitpoints, so they generally fall into the same category - don't go head to head unless you have an advantage. However, if you have multiple tanks, you can use one to soak up damage and one to flank.

Handling KCH
Knights Cross Holders are fairly easy to deal with if you have any sort of veterency built up on your rifles. Focus firing KCH squads with BARs is generally the best way to deal with them in an infantry on infantry matchup. If you have any sort of vehicle, obviously those are the best solution, but late game 1 squad on 1 squad battles are somewhat rare, so just remember: KCH sitting half a screen away aren't going to do any damage to your infantry. If they're charging, use all of your anti infantry units to focus fire them down before they can get close to your riflemen and chew them up. If they do manage to get up close, or "in your grill" as its said in the hood, be very careful of your units. KCH can do a lot of damage very quickly, so don't be shy with the retreat button.

Now, your sniper may be looking at a knights cross holder and get a funny sensation in his pants, but keep in mind that a sniper shot will not kill a full health member of a KCH squad, so snipers generally aren't the best choice. They're excellent support, if a rifle squad can damage a squad, the sniper can then start picking them off, but snipers are NOT a hard counter to a KCH squad.

Now, flamethrowers, on the other hand, kill them faster than you'd imagine. And since KCH are worth incredible amounts of veterency experience, you will often see a fresh engie squad level up in its first skirmish. If you have some munitions to burn, and your opponent is making KCH, it may be worth it to build new engineer squads for flamethrowers. But keep in mind that he can kill you almost as fast as you can kill him, retreat those engies if they get low!

Handling Blobs
Blobs are big masses of infantry that are poorly micromanaged yet deadly due to overwhelming numbers. With veterency, you can get overwhelmed easily and never be able to catch up. This is one of the reasons the 105mm howitzer is so popular. One Howitzer is a renewable source of blob control. If you're not too fond of playing the infantry doctrine, Strafing runs CAN work, but generally they're only effective if your opponent is not huddling around a medic bunker. The left hand side of the armor doctrine provides poor anti-blob power, but the righthand side gives you access to the Calliope, which is the best blob-smasher in the game.

One thing you have to remember is that the .30 cal is most definitely "meh" when it comes to blob control. Its suppressing power is sub par, and often a blob will just be able to run straight at a .30cal and overrun it because its not able to suppress every squad.

Another thing that is VERY important is to never ever ever try to flank behind a huge blob unless you're confident it will work. If you have to retreat, you run through their blob, giving a smart player a great opportunity to focus fire and completely kill a rifle squad.


Other things to watch out for:

Defensive artillery
Defensive Artillery is an ability a defensive player gets that lets him spend 125 munition to call down artillery on and building or point he controls. There is red smoke, a very brief pause, and then death. It comes down hard and fast. Never ever try to "move out of the way" of defensive artillery. ALWAYS use the retreat button if you have any dream of saving the squad. Mass retreat if you have to. The Defensive Artillery will kill almost everything around the point and certainly anything capping it.

To be honest, I rarely see the red flares. A skilled opponent will wait until your squad is halfway done capping before calling down the artillery. However, if you have your sound on, you'll often hear "Incoming Artillery!" or "get down!" or something to that effect, so if you're paying attention you're often able to catch it. If you hear any of those audio sounds, immediately start checking all of your capping squads for red smoke, or artillery.

Firestorm
Firestorm is pretty weak when compared to most other artillery forms in the game. There are multiple red flares, a massive delay, and then an artillery strike on the selected area. You have ample time to move anything out of the way if you're paying the slightest attention. The only thing that MIGHT get hit are weapons teams like mortars and AT gun crews, and thats if the first artillery shell hits them as they're moving. Don't get me wrong - everything in the area gets destroyed. Obliterated. Its just so slow that even newer players can avoid it without much problems.

It does leave burning craters which do damage over time, so don't move into the area right after the artillery is done.


Late game snipers
Often, an axis player will make a new sniper in the late game to try to pick off your AT guns, or just annoy the hell out of you. There are a few ways to deal with this. The first, and easiest, way is only available if you've gone Airborne and have access to the strafe. Some of you may be thinking its a "cheap" strategy, but if your opponent willingly produces a sniper after you've established that you're going airborne, he deserves to be strafed.

If you haven't gone airborne, your other available doctrinal choices still can play a role in sniper killing. Both the 105mm Howitzer and the Calliope both can kill snipers, although this relies more on luck than on planing and execution. Don't be afraid to fire at snipers though, as killing a sniper with an artillery barrage isn't unheard of.

However, the most reliable way is to fall back on flanks. At this point in the game, jeeps dont live long enough to make an impact, and counter sniping is marginally effective. The reason being is that there is generally so much going on that its a strain on your micromanaging and you often end up losing other units due to sitting there and watching for his sniper. After about 6 months of practicing, I can finally do it, but it took me a long time and I generally preferred flanking.


Ending the game
Its important to remember that the Wehrmacht faction can almost always go into turtle mode and extend the game to lengths that most people would consider unnecessary. Its important to remember that your units are still vulnerable, and not to make any crazy, unnecessary attacks. Controlling more territory is good, losing half your army is not. However, don't spend manpower on excessive defenses either. There is a happy medium that you need to fall into. For example, you can build sandbags in key locations in order to give your rifles an edge on your opponent infantry, but do NOT build an MG nest on points. These are wastes of manpower and fuel. The only situation where you should even consider an MG nest is if you are ridiculously low on victory points (under 10) and you absolutely need to be positive your opponent can't ninja cap a victory point.


Common build orders

Standard Opening, BARs, Triage, Supply depot, motor pool, M8
Concept: This is the standard opening that has been tried and true for years. It involves making 4 riflemen, upgrading to BARs, and using your BAR riflemen with 2 flamer engineers to flank your opponent off of the map. The triage center is built right after due to your main source of attack being rifles, and often a 5 or 6 man rifle group will fall to half health, extremely limiting how much you can do with them on the field before they're forced to retreat. If you don't have any low health squads, or feel you can get away with it, you can skip the triage center and jump to the next step (supply depot, motor pool, then M8). This build order is an extremely straight forward attack and uses flanking/harassment to gain a small edge, the power of the BAR to overpower and push back Wehrmacht T1, then an often game-ending M8 to slam a Wehrmacht player that is often unprepared for vehicles because he's too busy panicking over the infantry.
pros:
  • Effective!
  • Low Risk
  • Has the ability to end the game early.
cons:
  • The strategy is only as good as its commander. Fail with riflespam and fail with this strategy
  • Medic bunkers can often stop you dead in your tracks
  • Unnecessary losses early on can set you back to the point of losing the game
Standard Opening, Supply Depot, Motor Pool, M8/T17, BARs
Concept: This is a quick jump to an M8 with the attempt to catch your opponent unprepared for vehicles. If you've been able to drive your opponent off the map early on (before you first tech), you may want to pursue this strategy. This relies on 4 riflemen and 2 flamer engies to harass your opponent to the point where he's unable to create a solid defensive line, thus forcing him to spend more manpower on T1 units (volks, mgs, etc) and delaying the creation of a Kreigs Barracks, which delays the production of his first Pak38. The following tech of BARs is to give your riflemen a step up on his infantry in attempt to get your opponent to spend massive amounts of manpower on countering vehicles whilst ignoring his anti-infantry power. A pak doesn't do any good if it's crew is dead. Keep in mind though that this strategy relies heavily on M8/T17 micro. If you're bad with vehicles you may end up hating this build order.
pros:
  • Great way to end the game early
  • Changes the game dynamic greatly, as flanking is no longer your only option for fighting machine guns
  • If your opponent is pursing a T3 strategy, you have a huge advantage, assuming you're producing M8s and not T17s.
  • If your opponent is pursuing a wire-heavy strategy, this will be able to create holes in his defenses and ultimately give paths to your flamers/rifles where they weren't before.
cons:
  • All of your eggs are in one basket. If your opponent is able to kill your vehicle with mines/fausts/whatever, you've set yourself back quite a bit and you may not be able to get anther one out before the Paks hit the field.
  • It comes later than BARs. A BAR-first tech will have an impact earlier.
2Engies Jeep 3Rifles, Grenades, 1Rifle, BARs
Concept: This is a very aggressive strategy that revolves around early jeep harassment and early rifle upgrades to force your opponent off the map and prevent him from holding any real territory for any significant amount of time. This is Zerocrack's strategy, and although it can work, if you're unable to handily win the early game, you'll get punished severely by pumas and end up losing the game most of the time.
pros:
  • Extremely aggressive build gives you early game superiority
  • Incredible early game power
cons:
  • Very high risk. If you're unable to deny your opponent fuel, you're going to be fighting pumas.
  • Medic bunkers can often equalize the game if you allow your opponent the opportunity to set up
  • Unnecessary losses early on can set you back to the point of losing the game
2Engies, 3 Rifles, WSC, Sniper, Motor Pool, M8
Concept: This build differs from most and gives you access to a variety of different units, but severely hinders you combat power early on. The whole idea of this strategy is to get the early sniper out, forcing your opponent to deal with that, lulling him into a sense of security that a light vehicle isn't an early threat. Unfortunately, if you face an aggressive Wehrmacht player, you'll be pushed off the map and there's really not much you can do. 3 Rifles and 1 sniper cannot fight off 4 volks and an MG team, so you may get bottle necked, especially on maps like Semois, where you're unable to get back onto the field at all. After the M8, you have the option of pursuing more rifles, more weapons teams, or even another M8, so the door is wide open.
pros:
  • Variety of units gives you options.
  • Decent against 'campers'
cons:
  • High Risk
  • An aggressive Wehrmacht player will easily kill this
  • You have two high-risk units on the field fairly early. Losing your M8 or your sniper put you in a hole.
Standard Opening, Armor Depot
Concept: If you're fortunate enough to be dominating the entire game with just 4 rifles and 2 flamethrowers, sometimes you can just make the jump to the Armor Depot and end the game. This strategy is generally the 'I'm winning pretty easily' strategy. Most games against an equal opponent won't give you the opportunity to do this. If your opponent has T2 up already, it's probably best to make a normal Sherman (or a Croc if you feel you can keep it alive), but if he has pumas up you should produce an M10/M18 first just to chase it away. I would NOT recommend doing this strategy unless you're already winning in manpower, territory, and resources.
pros:
  • Tanks. What else can you ask for.
  • It gives you an excuse to pick the armored doctrine.
cons:
  • You have to be winning by a large margin beforehand.
  • If your opponent is waiting (perhaps with multiple cloaked paks) for you, your whole strategy can actually turn against you and put you behind.
  • You have almost no mid game options, and if you're in the middle of your tech order and you start losing battles, sometimes its hard to backtrack.
Standard Opening, BARs, Triage, Armor Depot
Concept: This strategy sometimes finds its way into the gameplan because if you get off to a good start, you can use vetted rifles to fight just about anything T2 related, and late game, you find yourself with an excess of fuel and need to spend it on something. Its generally a strategy you use when you've elected to go with early BARs and you've been pushing your opponent back all game, but you've been unable to kill him. Generally its best to make a normal Sherman, but if you have access to Crew Repairs (from the Armor Doctrine), sometimes a Croc can rape an unprepared opponent.
pros:
  • Somewhat effective
  • The strategy seems to present itself if you're doing things right
  • Often can end the game if your opponent is unprepared.
cons:
  • Has a big gap where you're not getting any new units or upgrades
  • Unable to produce AT guns unless you've selected the airborne doctrine
  • The Armor Depot comes later than a Motor Pool and generally does not provide the same shock-for-the-time units.
4ES
The 4ES is a strategy developed my Marinez and can be read here. Its a non-tradition American strategy that relies on Engineers, Mines, and Snipers. The only person I've ever seen thats able to pull it off with any efficiency is Marinez himself, and because the strategy involves drastically changing your gameplan from the moment the game starts, I'd think twice about attempting it.

WSC starts covered
Some newer players prefer to skip the barracks and go straight for a Weapon Support Center start, opting to get machine guns and snipers over riflemen. If you're going to learn anything from this guide, its simple: Don't start with a WSC. It completely hinders your early game and forces you into a defensive role. The Americans are best when utilizing riflemen, not sitting in a building with an HMG team as their first unit. Yes, you can win with WSC starts, but they're much less efficient and almost always a bad choice.

Responding to unusual Wehrmacht builds:


Forward HQ: Sometimes your opponent will forgo building a Wehrmacht Quarters and instead move up onto the field and make a Forward HQ for the purpose of making early combat units. There are easy ways to spot this and you'll easily be able to counter it if you do it right. Spotting it is easy. Generally you'll be able to see the Forward HQ just through normal exploration and unit movement. Its important that you remember two things: They can only produce Volksgrenadiers and Pioneers, and they can reinforce at their forward HQ. This means you don't have to worry about bikes, machine guns, or snipers. The second thing can be deadly if you don't know what you're doing. They can reinforce at their forward HQ, so if you sit there at medium range and try to slug it out, you're going to lose unless you have overwhelming numbers. If they get a medic bunker up and you continue to fight at a medium/long range, they can end up with multiple free squads and never have to retreat.

So how do you counter it? Its actually fairly simple. You use the 2 flamers, 4 rifles, BAR upgrade technique and use all 6 units together to rush his forward HQ right after your BAR upgrade finishes. Its essentially a game-ender if you do it right. If you sense your opponent has laid mines, you should produce a third engineer squad and make a minesweeper to send along with your 2flamer/4BAR attack. Simply the presence of the minesweeper will prevent any laid mines from exploding when you walk over them.

The 4BAR/2 Flamer combo should be able to overpower just about any combination they can come up with at that point. Since they have no machine guns, its just a straight up competition of firepower, and at close range, flames and BARs kill units so fast that the ability to reinforce is pretty much neutralized.

However, if they survive the early game and the game extends into the mid game, the battlefield becomes a little different. If they go with a T2 attack, a wise move is to generally produce at least 1 sniper, as they're unable to make either bikes or countersnipers. This means your sniper has free reign over the battlefield and is almost impossible to kill. If your opponent goes with a T3 strategy, you counter it like you would normally, ala motor pool, stickies, elite infantry, etc.

Early snipers
Early Wehrmacht snipers have grown in popularity lately. By early, I mean in the first 5 units or so. There are two paths you can take when your opponent produces an early sniper. The first is to upgrade to BARs after your 4th rifle and use the standard early BAR game tactics to flank, getting behind the sniper and killing him on the retreat. BARs are medium/close range will drop a sniper in less than a second. The hard part is getting to the sniper. The second approach involves quickly teching to an M8/T17 and nullifying his sniper by getting the M8 out before he has appropriate defenses. Both approaches work, so just play to what you feel comfortable with and don't panic if you see early snipers. Another alternative approach is to produce a sniper yourself and attempt to countersnipe, but I detest this approach because it costs so much manpower to set up, its difficult to do, and you leave yourself vulnerable to early pumas.

Posts: 5,540

Game: Company of Heroes


+
# 3SayNoToStim May 21 2010, 00:40 AM
Advanced Tactics:
I wouldn't try any of these until you have the basics down. Most of these come with experience and you shouldn't be forcing yourself to really go out of your way to incorporate any of these into your gameplan until you feel comfortable with any of them.

AT creep
AT creep is the process of slowly moving your AT guns up, little by little, to form a slow but sure attack on your enemies position. AT guns are by nature a defensive weapon, but by moving them up little by little, you're constantly giving them the advantage of being "defensive" while still moving them up. The risk comes as it does with any attack - you're moving your units into a vulnerable position in an attempt to damage your enemy. If you get chased off the field by a Grenadier blob you may lose all of your AT guns, which he will probably take and use against you.

Tank jamming
Tank jamming is the process of using a vehicle to "crash" into your opponents tank or vehicle from behind in order to prevent your opponent from retreating that vehicle. Its generally used when your opponent exposes one of his tanks, and your AT gun(s) has a clear shot at it. Your AT gun starts to shoot, but your opponent starts to reverse his vehicle. If you have an M8/T17 nearby, you can often drive your M8 or T17 into position to block the tank, forcing him to drive forward and do a U turn to get away from you vehicle, all while your AT gun shoots at it. Keep in mind that you might lose your vehicle in the process to enemy fire, so know the risks before you even attempt it.

Circle Strafing
Circle Strafing is the process of moving a tank or vehicle in a circle around an enemy tank or AT gun so that the enemy is constantly turning and unable to fire on your unit. Its less reliable than you'd think. Tanks with decent speed or turrets that have decent speed can prevent this easily. However, StuGs, StuHs, Paks, and King Tigers can be circle strafed easily. Keep in mind that your opponent is generally going to send support - you won't be able to do this all day.


Using Mortar smoke
Mortar smoke is a rarely used ability that comes from both the American and Wehrmacht mortar. It greatly decreases the accuracy of all small arms fire that passes into or through the smoke. This means that units like machine guns, volksgrenadiers, or grenadiers can't hit anything if they fire through smoke. However, your units are affected as well, so if you plop some smoke down on top of a rifle squad, your rifle squad won't be able to hit anything either. So what good is mortar smoke? Weapons like grenades and flamethrowers are unaffected, so if you're able to smoke and area and then run engineers in, your enemy won't be able to damage your engineers with volksgrenaders or machine guns, but your engineers can still roast things with their flamethrowers, and your riflemen will still be able to throw grenades if you've upgraded them.

While this may seem like a pretty sweet deal, its not as great as it sounds. Theres a reason its rarely used. For one, your mortar has to drop quite a few smoke rounds (about half of the barrage) to make it worthwhile, and during that time, the mortar team could be doing something else, like shelling your enemy with explosive rounds. Also, your smoke rounds can only cover 1 flank. If you're flanking from 3 directions, and your opponent isn't half-retarded, he's going to stop shooting at the guys under the smokescreen and shoot at someone else.

Mortar smoke has very selective uses and you might never have to use it. The only time I use it is when I'm attempting to run an engineer squad in to place a demo charge on a bunker in the midst of a firefight. Outside of that, there is almost never a case of using mortar smoke. Direct barraging works much better and you're often unable to capitalize on the narrow window that smoke provides you.

Riflemine spam
Sjceran has written a very specific strategy called Sjceran's Improtunate Strategy which revolves around laying mines with riflemen all over the map. If you'd like to read it, its a great read, but I find the particular build order a bit too constrictive.

By selecting defensive operations from the right hand side of the infantry doctrine, you give riflemen the ability to build defensive fortifications like barbed wire, sandbags, and mines. This means if you make this decision early enough, you can use your riflemen to lay mines to excess and whittle away the the early game expansion of your opponent. This strategy works well now because of a change that was made in 2.500 that now gives units experience points when mines they've laid kill things. Before, a mine exploding and killing soldiers would give nothing in the way of experience to anything, but now when a mine earns 'xp,' that experience is transferred over to the unit that laid the mine. This is particularly handy with the Americans, because their veterency system works so well. Normally, engineers would be the only ones laying mines, which might result in some vet engines, but if your riflemen are doing all the mine setting, that xp gets put into your rifles, helping your main attack force quite a bit.

I riflemine spam when I have an early advantage and I'm on a munitions-heavy map (Langres, for example). Keep in mind that every mine you lay is 25 munitions taken away from your artillery, your strafes, or your other munitions based abilities. There is also a thing as laying too many mines, like I mentioned before. If you lay so many that your opponent makes a conscious effort to get minesweepers and remove as many mines as he can, you're out quite a big of munitions.

Riflemine spamming can, however, completely deny your opponent free access to the field. If he's stepping on a mine every time he tries to break out and grab some more territory, he's not only losing manpower, but territory as well.

Hotkeying units
Its important to assign units to certain hotkeys. Some players hotkey every single unit they have, but thats not necessary. While you're certainly welcome to hotkey whatever key you want for whatever unit you want, I highly suggest you keep the same hoykeys for the same units throughout the game. Some players hotkey every rifle squad, whereas I only hotkey special units and impact units. I use the same setup every game, and after a while I didn't even think of what was what, my fingers just adapted to what I needed and when. This is the setup I personally use:
1 - Impact vehicles/tanks
2 - Impact vehicles/tank
3 - sniper
4 - second sniper (rarely used)
5 - jeep
6 - mortar
7 - mortar OR 105mm Howitzer
8 - second Howitzer (rarely used)
9 - airborne/ranger squad

These are just my assignments. Feel free to use whatever you want, just make sure its consistent from game to game.

There are also other hotkeys that you should have memorized. I rarely use hotkeys, and I seem to do alright, but "T" for retreat is crucial. There are others, like "D" for exiting houses and vehicles, that can also save your ass, but the gameplay in Company of Heroes is generally not at breakneck speed, so clicking is generally OK. If you're comfortable with using hotkeys, I encourage you to use as many as you can, but if you've limited yourself to the basic ones, I wouldn't worry about it.

Propaganda
I call it Propaganda because I lack a better word or phrase. Maybe Psychological warfare. Its getting into the head of your opponent. It generally doesn't work unless you've played a particular opponent before and you know him fairly decently. However, I use it quite a bit. Its fairly simple. If you know your opponent is a bit of a "rage" addict, its often beneficial to provoke him. This does NOT mean you should insult his mother and call him names. It means that certain players will fly off the handle whenever a particular ability is used against them, namely the Strafe. So if you know certain players will flip their shit over the strafe, incorporate that into your game plan. Sometimes it can cause them to fly into a fit of rage which completely ruins their game plan.

Closing words - MUST READ INFORMATION
Whew. Well, I hope you learned quite a bit. Keep in mind that there will always be better players out there than you, and that losing is just a part of the learning process. Don't be afraid to ask questions and don't be afraid to lose a game every now and then, learning comes naturally and the desire to get better will always be there. I personally have been enjoying the Americans for the last 6 months or so with almost no desire to play axis factions unless I'm setting up a private match. I used to love them, but I got in one little fight and my mom got scared, She said 'You're movin' with your auntie and uncle in Bel Air.' I whistled for a cab and when it came near, The license plate said fresh and it had dice in the mirror. If anything I can say this cab is rare, But I thought 'Now forget it' - 'Yo homes to Bel Air'

So have fun, good luck, and enjoy the American Faction.

-SayNoToStim

Posts: 5,540

Game: Company of Heroes


+
# 4Seb May 21 2010, 01:04 AM
Oh god I sadly understand you, I was more than very close to do the same until today.

About the guide, well I think the only way to not lie is to say tl; dr ohmy.gif , but every part I actually read were close to perfect, and well unless you filled some parts with fake text I didn't read, it covers pretty much everything. smile.gif

Awesome job. wink.gif

Posts: 10,560

Clan: Insane

Game: Company of Heroes


+
# 5Rizky May 21 2010, 03:34 AM
I don't know why I even used an hour to read it, but it was perfect in my opinion as well.

Makes me think that someone who has never played a CoH game before could win a decent opponent.

Posts: 2,610

Clan: Insane

Game: Heroes of Newerth


+
# 6Inverse May 21 2010, 03:55 AM
Even though I've read it twice already, I still

Posts: 5,579

Clan: Reign of Madness

Game: Company of Heroes


+
# 7rgrrrr May 21 2010, 05:30 AM
the bible for every us player. very well done.

Posts: 3,644

Clan: Suck it Trebek!

Game: Achron


+
# 813oomer May 21 2010, 05:36 AM
I LOVE YOU STIM.

Posts: 5,710

Clan: Suck it Trebek!

Game: Company of Heroes


+
# 9`numb May 21 2010, 08:56 AM
I've found one spelling mistake.

QUOTE
M10s and M18s serve a solely Anti-Tank/Anti-Vehicle role. Their man cannons very rarely are able to hit infantry, so don't expect them to be able to effectively handle anything with legs. They can, however, run over infantry if you're skilled enough to do it. Now, for a brief breakdown of the differences between the M10 and the M18. Their main gun and hit point totals are exactly the same. The M10 has better speed, but the M18 has the camo ability. The M18 also has the option to purchase a gunner on top, which is less appealing than it sounds. While it does give the M18 some sort of anti-infantry power, you should be using the M18s as an anti-tank force and not wasting them on infantry. The camo ability, however, allows you to ambush German tanks and often eliminate them before they can retreat.


It's in the American Armor part. Goodjob. =]

Posts: 360

Game: Company of Heroes


+
# 10Naeras May 21 2010, 09:05 AM
Every US player should read this. No questions asked.

Posts: 4,464

Game: Company of Heroes


+
# 11Chard May 21 2010, 15:58 PM
Holy Cow! Thank you. I can't wait to delve into this. Many thanks, Stim.

Posts: 125

Game: Company of Heroes


+
# 12ChicAgoHawk May 22 2010, 17:19 PM
As always, Stim, you are godlike.

QUOTE(Rizky @ May 20 2010, 20:34 PM) *

I don't know why I even used an hour to read it, but it was perfect in my opinion as well.

Makes me think that someone who has never played a CoH game before could win a decent opponent.


I can't believe it took me this many years to find a fellow Blackhawks fan on the forums. Good man.


Posts: 1,862

Clan: EPIC

Game: StarCraft 2


+
# 13SemInt May 22 2010, 17:32 PM
I think this warrants another badge, on top of the expert badge. biggrin.gif

This should be stickied, subdivided and whatnot, so that answer to every US strat problem in the future is simply a matter of finding the right paragraph. wink.gif

Posts: 5,638

Clan: Suck it Trebek!

Game: Company of Heroes


+
# 14Qubix May 22 2010, 18:03 PM
Thx alot for the guide. I have been playing ami for quite some time but still found alot of usefull things wink.gif

Posts: 15

Game: Company of Heroes


+
# 15Schmieds May 23 2010, 02:54 AM
Get ready, cause we're going to start releasing this in chunks again! Though everything will still be here, the new chunks will be edited. Just for all you grammar freaks out there! tongue.gif

Posts: 6,711

Game: Company of Heroes


+
# 16SayNoToStim May 23 2010, 03:40 AM
QUOTE(ChicAgoHawk @ May 22 2010, 13:19 PM) *

As always, Stim, you are godlike.
I can't believe it took me this many years to find a fellow Blackhawks fan on the forums. Good man.

Rizky is a bandwagoner!

Posts: 5,540

Game: Company of Heroes


+
# 17Rizky May 24 2010, 12:30 PM
QUOTE(SayNoToStim @ May 23 2010, 03:40 AM) *

Rizky is a bandwagoner!

Actually I was rooting up for both, Avs and Hawks. I only like the Avs franchise, but not many of the current players really. Hawks' on the other hand have my favorite player (Marian Hossa) and all the other fellas. smile.gif

Posts: 2,610

Clan: Insane

Game: Heroes of Newerth


+
# 18silvershield May 24 2010, 13:18 PM
Thanks awesome guide.

I also feel like drinking milk now, for some reason.

Powerful subliminal messages in the writing of the guide?

Posts: 362

Game: Dawn of War 2


+
# 19SemInt May 27 2010, 09:11 AM
Shouldn't this be pinned, by the way?

Posts: 5,638

Clan: Suck it Trebek!

Game: Company of Heroes


+
# 20Seb Jun 16 2010, 01:57 AM
Pinned until it's included into the guides index.

This post has been edited by Seb087: Jun 16 2010, 19:46 PM

Posts: 10,560

Clan: Insane

Game: Company of Heroes


+

1 User(s) are reading this topic (1 Guests and 0 Anonymous Users)