Wehrmacht versus Americans on South Angoville
This guide created by SemInt.Angoville is considered a very tricky map by a lot of Wehrmacht players, and many call it US favoured. This is caused primarely by the hedgerows in the center, which quite literally split the map in half. Rifleman squads have good mobility, which can be put to use very well on Angoville. The Wehrmacht is not nearly as mobile: volksgrenadiers are better at long range and more importantly, MG42's have to be set up to fire.
Splitting up and trying to go for both sides as Wehrmacht barely works. The US player simply has to amass his riflesquads and can push for one side, outnumber the Wehrmacht forces and push them off. Therefore, most Wehrmacht players pick one of the two sides and stick to it. Either side has assets and drawbacks.
Right side
Assets:- 2 out of 3 Victory Points;
- narrow corridors, easily defended by mines or barbed wire;
- relatively easy acces to opponent's cutoff strategic point;
- sturdy house on your cutoff strategic point.
Drawbacks:- extremely accessible cutoff strategic point;
- sturdy house on your cutoff strategic point;
- awkward hegderows, largely negating MG42's arc of fire, makes for excellent flanking;
- sturdy house near the 16+ munitions.
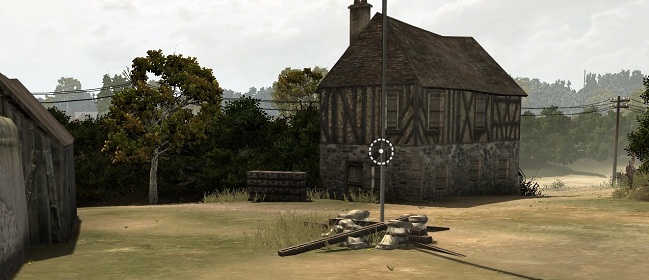
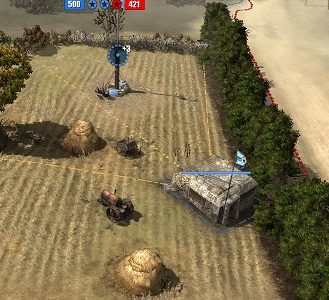
The house near your cutoff
can be used to defend it, but it is far more a burden than a blessing. Its close proximity to the hedgerow to the left makes it very easy to clear out for your opponent by bringing in a flamersquad from behind the hedge or simply by throwing a grenade over the hedge. Worse, the US player can sneak an intrusive riflesquad into the house very early, decap the cutoff and deny all resources on the right. The house makes defending the crucial cutoff strategic point a breeze for the US player, while its defensive potential for the Wehrmacht player is unimpressive.
The house near the +16 munitions is not useful for similar reasons.
Left side
Assets:- open, no shotblocking cover, MG42's arc of fire is never obstructed;
- cutoff strategic point further to the back;
- No house on your cutoff.
Drawbacks:- only 1 out of 3 Victory Points;
- open, spacious, lots of routes for flanking;
- leaves little options for aggression - the opponent's cutoff is not an easy grab.
Despite the Victory Points, the presence of the house and hedgerows are enough to scare most Wehrmacht players from the right side. Eventually, the Wehrmacht player will be forced by the victory points to grab a piece of the right. If he does this early game, he will be spread too thin. I he does this midgame, he already has a VP disadvantage and he will still end up spread too thin. The other option is trying to destroy the US player's base by creeping up with PaKs or getting a FlaK... but this is rather untrustworthy at best.
Having the right side instead would be convenient. This guide should provide the tools needed to succeed on the right side of Angoville.
Phase One
The key in succeeding on the right side of Angoville is perhaps surprising: the humble pioneer is crucial. While the pioneer's usual task is to cap early on and build defenses such as bunkers and mines, his damage at close range is extremely useful. Anyway, let's get down to business!
Build and Cap Order
First things first, an additional pioneersquad as prescribed by tradition.
Build the Wehrmacht Quarters on the north edge of your base, use the second pioneersquad to speed up building.
After the Wehrmacht Quarters are finished, send both pioneers to the right side to cap. The capping order is fairly straightforward. Mines are very useful, so the focus lies on munitions.
1st Pioneers2nd Pioneers1st VolksquadOne pioneersquad should capture the +16 munitions closest to your base and should continue capping the Victory Point, then the +16 munitions in the corner after.
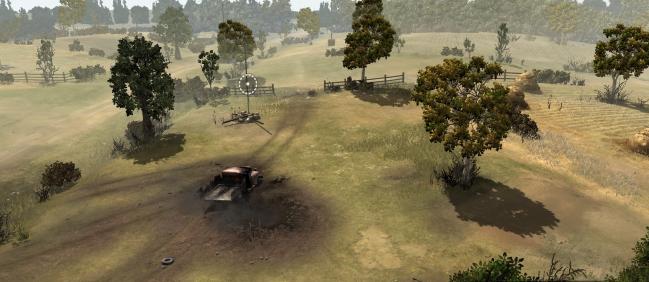
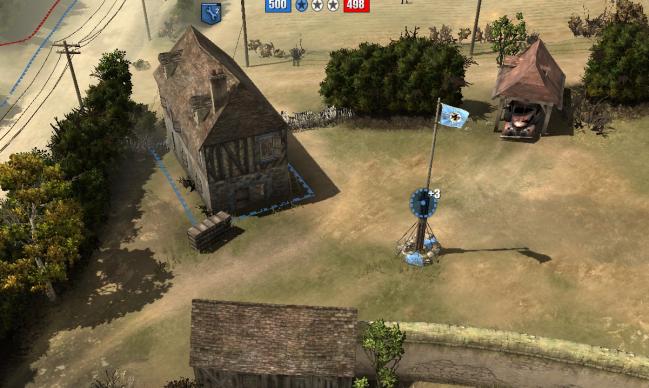
The other pioneersquad should cap the cutoff strategic point, then proceed to build barbed wire to block access to the house. There are a couple of flavours when it comes to wiring off the house, this is the preferred one:
You need to leave a gap because your mobility is important later on. Building the wire like this forces your opponent's riflesquad to take the long way around and it is the best for when you start building mines. The narrowness of the corridor ensures that the enemy squad will hit the mine and that the mine will do maximum damage, as the squad is clumped up.
After the wire is done, immediately garrison the house with the pioneersquad. Later on, when the coast is clear you can opt to build a tank trap to block the gap on the left of the house.
First unit out of the Wehrmacht Quarters should be a volksgrenadiersquad: it can cap and it is not bothered by the hedgerows. Set your rally point at the +16 fuel.
Second unit is the motorcycle. It is crucial in guarding you in the early moments of the game and it provides opportunity for reconnaissance. Build it immediately when you hit 180 manpower. Send it along the road, have it take a right turn to meet up with your volksgrenadiers at the +16 fuel.
The third unit is another volksgrenadier squad. It's not worth risking getting your MG42 tangled up around the hedges; the volksgrenadiers are far more reliable in this case. Send this one towards the +16 fuel as well to meet up with your other volksgrenadiers and the bike.
This build order is optimized to make sure you win the first engagement, no matter what. As mentioned before, the pioneers play a crucial role by giving some additional fire support, gently nudging the odds in your favour.
Early opposition
Depending on your opponent's build order and cap order, you can run into different sorts of opposition. The first engagement will nearly always take place near the +16 fuel: the wire protects the crucial house and with pioneer MP40's firing from the windows, your cut-off is not a pleasant place to be.
Against 2-engineer starts
The following engagements can take place against opponents who do the standard 2-engineer-barracks start. Remember that your opponent will (nearly) always send one of his engineers to cap on the left, so you don't have to fear multiple engineers on "your" right side.
Single engineer capping
Easily chased off by your volksgrenadiers.
Single Riflesquad
Clearly, a bigger threat. Your volks are probably capturing the 16+ fuel, the pioneers will have finished capturing the 16+ munitions and the VP. Position the volksgrenadiers in the light cover near the 16+ fuel, along with your pioneers.
The pioneers in the house must remain garrisoned, lest a second riflesquad sneaks into the house. If the riflesquad stays at range, the volksgrenadiers have the advantage and if the riflesquad gets into close range, the combined firepower of the volks and the pioneers gives you the advantage as well. When the bike arrives, the riflesquad is outgunned decisively. Focus on the engineers first, since they're frail and quickly disposed of. The same is true for your pioneers of course, keep an eye on their health!
Engy-Rifle A bit more dangerous, and a match for your volks-pioneer combo. Nevertheless, react the same as against the single riflesquad. A bit of a "stalemate" develops where neither combo kills the other, until your bike arrives giving you superior firepower.
Single Jeep
No real threat, use the volks-pioneer combo to damage it quickly, then continue capping. If you damage the Jeep enough and it gets a damaged engine, you can easily go after it with the bike. Block the jeep by jamming your bike into it for bonus points!
Engy-JeepDealt with in the same manner as the engy-rifle combo, except this one isn't as dangerous. Again, if possible, try to damage the jeep sufficiently to kill it with the bike.
Engy-Rifle-JeepYour opponent does not engage immediately, but waits for his jeep and his engineersquad to catch up with his riflesquad: This is arguably the most dangerous combo you can face, as it is as powerful (if not more powerful) than your volks-pio-bike combo. There's still a card for you to play:
the pioneersquad in the house overlooking your cutoff. Your opponent has his first two barracks units at your fuel, which means there is no risk of the second riflesquad sneaking into your house. Your bike should be slightly towards the front, so if you see the Engy-Rifle-Jeep combo going for your fuel, immediately get your pioneers out of the house and send them towards the fuel. With one volksquad, one bike and
two pioneers, you should be able to it take it on and emerge victorious.
If your opponent attempts to Jeep-push your volks, reducing their accuracy, try to use the bike to block the jeep while focus firing on the Jeep.
Rifle-RifleYour opponents waits for two riflesquads before he attacks: Your bike will arrive earlier then his second riflesquad, so you should see the two rifles coming. Use the volks-bike-pio combo to keep them at bay, until your second volksquad arrives to seal the deal. If you don't feel sure about it, you can always get the pioneers out of the house to assist.
Engy-Rifle-RifleIf your opponent really rushes and attacks
immediately when he has his Engy-Rifle-Rifle combo together, you will need to use the pioneers in the house for assistance. Most likely however, there will be a slight delay, meaning your second volks arrive on time to help you out.
Against 1-engineer starts
Your opponent sacrifices building an extra engineer for getting his second barracks unit out quicker. Unless he's fueled by bloodlust and despises capping, this effectively means you will not see any engineers fighting on the right. The combinations are therefore limited to rifle-rifle and rifle-jeep, except they arrive earlier. Your bike will effectively arrive at the same time as his second riflesquad. His Jeep will arrive earlier than your bike. Again, there is no threat of your house getting stolen, so you can and must use both your pioneers to fight.
Against 4-engineer/engyspam starts
A 4-engineer start in itself is not a particularly great threat. Engineers do not hold up that well against volks or bikes, so there are no early threats similar to the ones mentioned. Use the bike to bother the engineers, sapping their health and let your volks pick them off.
However, building multiple engineers allows your opponent to send his starting squad to the house on your cutoff, taking it before your pioneers can get in there. Don't fret: simply capture the cutoff with your squad as far away from the house as possible.
Read the "contingency plan" on losing the house how to get rid of a garrisoned squads in the early moments of the game.
In case your opponent does not attack, capture the sectors in the prescribed capping order; or continue the capping order after repelling the first attack.
Phase Two
Consolidation
If everything went as planned, you have won the first engagement(s) and finished capping the important resource points on the right. Alternatively, your opponent has not engaged yet and you have capped the points in peace. The right side should be firmly under your control.
As a fourth unit out of your Wehrmacht Quarters, always get an MG squad.
You have two volks already and you do not want more than one bike. A sniper as the fourth unit leaves you in a vulnerable position: your opponent has 4 riflesquads, while you will have 2 volks, 1 bike and 1 sniper. Neither a bike nor a sniper can stand up to a riflesquad.
As soon as you have the munitions and the opportunity, lay mines with your pioneers. Mines are absolutely crucial in defending the right side.

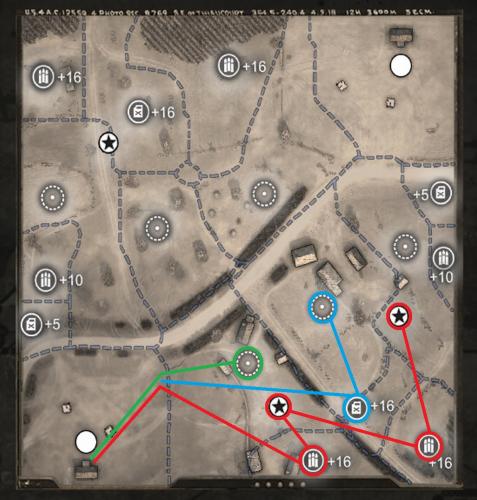
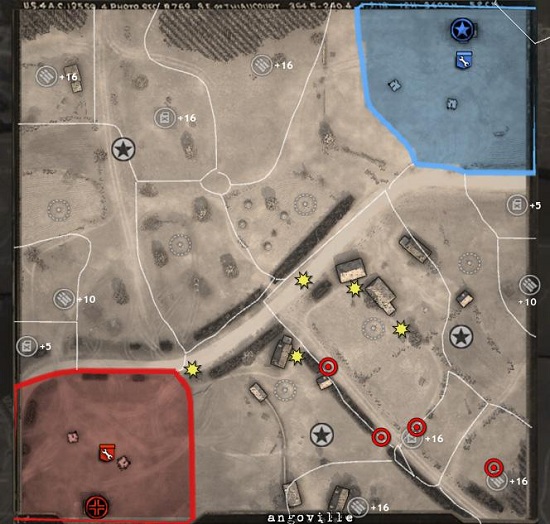
Primary mine

Secondary mine
Lay the primary mines first, they protect your important sectors and deny access to your cutoff strategic point. It is a matter of preference which primary mines you lay first. It comes down to whether you want to deny your opponent resources or whether you want to maintain your own resources. If you want to deny resources, lay the mines on the +16 munitions and +16 fuel first; if you want to maintain your own resources, mine the access to your cutoff first. Nota bene: with clever placement, the mine near the +16 fuel can guard both the fuel and the access, but neither particularly well. The secondary mines are insurance and extra nuisance for your opponent, but not crucial. Hence, the secondary mine positions are suggestions more than prescription.
Since your opponent can also read this, you might object against such rigid mine placement. However, even if your opponent knows the rough positions of your mines, he will still have to purchase to a minesweeper - a flamer less.
Alternatively he might know the position of your mine, but he does not know whether you actually constructed it yet. Especially if he is attempting a (tightly timed) flank, it is likely he will take his chances despite "knowing better".
I think the strict rigidity is well worth it, because it ensures you do not forget or skip any steps.
At this point, you can choose to settle down permanently, get a med bunker, keep constructing mines, wire, even tank traps. After all, you do have the side with 2 of 3 Victory Points...
Of course, that does mean it is going to be a long wait till the VP's tick down to zero while granting your opponent the opportunity to pester you for the duration of the game. It is the low risk-low reward method and it gets the job done, so it is definitely viable.
I certainly do not have the patience for it.
Aggression
This is where picking the right side really pays off, in my opinion. Contrary to the lenghty excursion that the left side requires, your opponent's cutoff strategic point is just a casual walk away.
Before you should attempt any aggression, make sure 2 out of your primary mines are in place.
A big disadvantage of the right side is the vulnerability of your cutoff. Thankfully, his cutoff is also only a short walk away. Provided you hold all the important 16+ sectors on the right, capturing your opponent's cutoff would leave him with only the 5+ fuel and the 10+ munitions right outside of his base. Therefore, it is by far the most attractive goal to push for.
However, holding the cutoff
and holding your side requires you to split up your forces, which is exactly what we want to avoid. In this case, the
MG bunker is preferable over an HMG-squad for holding the cutoff. While immobile, short-ranged and vulnerable during construction, it is extremely resilient. A single, unsupported MG squad on the left side would be very vulnerable, easily flanked and easily killed by your opponent. The MG bunker with its fixed arc of fire is even easier to flank, but this is not relevant because of its resilience. Small arms fire does not damage it and even a flamer or a mortar needs a fair amount of time to take it out. This allows you to build-and-forget, essentially abandoning it while focusing on holding the right. The plan remains to
not-split up and "camp" your side of the map, except for a small excursion to the left cutoff.
The biggest uncertainty is timing. If you repulsed an early attack, it is simple: you move for his cutoff while he is recovering at his base. For example, if I beat the first riflesquad near the 16+ fuel, I will often send my first MG almost directly towards the enemy cutoff. Having the possiblity of using the bike to scout is very useful in this case.
In case of such early aggression, get an MG as your fifth Wehrmacht Quarters unit for pushing power.
Alternatively, your opponent might not have engaged yet. Use the bike to find (single) riflesquads on the right and use the combination of 2 volks and a bike to chase them off quickly.
Always try to get a numerical advantage before pushing for the cutoff. If there are no riflesquads at all, you can make a move for the cutoff first, but always be extra wary when it comes to your mines because there could be a large push coming for your side! Again, especially before sending your MG, scout ahead with the bike.
Finally, your opponent might be stalling on the right, sticking to buildings, pedalling backwards when you try to attack, et cetera. In this case, a sniper as a fifth unit is suitable, although it is a matter of preference. Hopefully, the sniper coerces your opponent to attack or at least forces him to retreat a riflesquad.
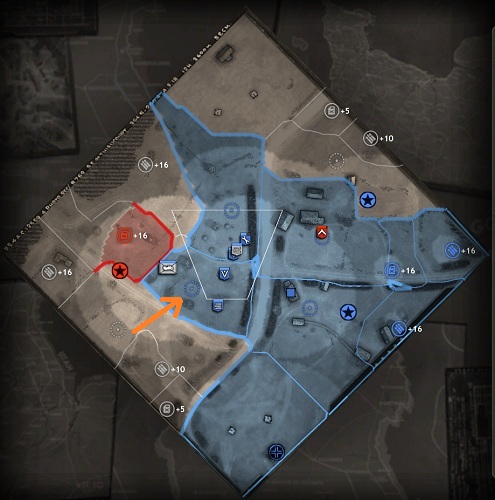
When attacking the cutoff, it is sensible to move all your forces there. This leaves the right side completely undefended, but this is less of a problem than you might think: the wire and mines should delay your opponent significantly in capturing the important sectors
or he simply does not realize the weakness because he is scrambling to defend his precious cutoff.
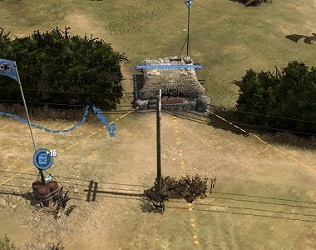
Be aware of the possibility of a flamer squad coming in from the south (as depicted by the arrow): typical US capping orders will often put the engineer squad in that position.
All of this does put you in a precarious position, because you quickly have to set up your MG's before your opponent starts his counterattack. Especially if your opponent upgrades to BARs during the counterattack, it can become a little hairy. Also keep an eye out for grenades - something you should always do anyway. I often have to rely on bike pushing to make things go smoothly. On the plus side, if your opponent is surprised and hastily mounts a sloppy counterattack, it will often result in bad timing (riflesquads coming in one by one) or in allowing your MG's to supress multiple squads.
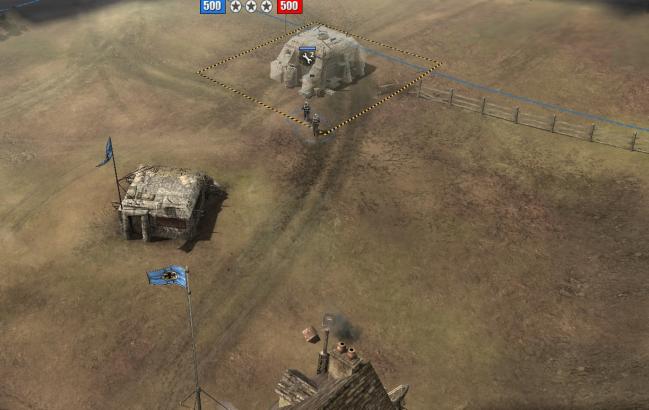
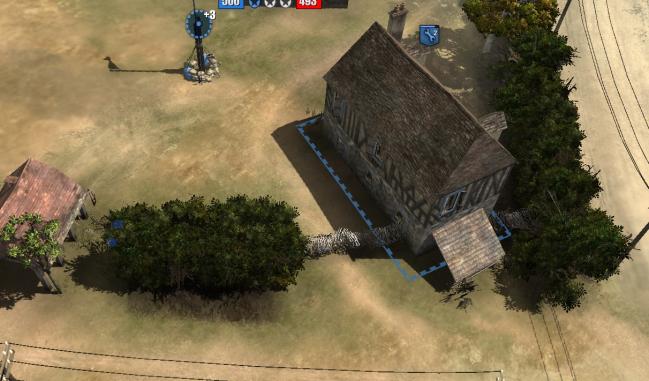
After you finish capturing the cutoff sector, place the MG bunker like this:
You want to make sure there is no gap between the hedge and the firing arc, so a flamer engineer squad cannot walk up to it from the front. The barbed wire is optionable, I generally put it there to hinder my opponent before the MG bunker is up, when I have the time. Obviously, the sector needs to be connected to construct the bunker: do not neglect the neighbouring strategic points!
After you have succeeded in building the MG bunker, move your forces back to the right. Recapture lost territory and chase off any riflesquads.
Splitting up is still not an option, the focus remains on the right side! Depending on how early you grabbed the cutoff and your opponent's teching, you can now get a sixth Wehrmacht Quarters unit or tech:
- Against BARs, grenades or a relatively late WSC (see below for early mortar), I like to get a sniper if I did not get one fifth, otherwise a second MG squad if the sniper was the fifth unit. Outtech him by getting Pumas.
- In absence of the above, there is almost always a fast M8 coming. In that case, skip the sixth Tier 1 unit and tech to Tier 2, build your Krieg Barracks and get a PaK. If you can afford a Panzerschreck, you can opt to get a grenadier squad first instead since the hedges on the right side do not favour PaKs much.
If you captured the cutoff early enough, your opponent might have to wait for fuel for his fast M8 or even for his BARs! In that case, I tech to Tier 3 immediately and build my Sturm Armory for Pumas. If your Puma hits the field at the same time as his M8, the upgun on your Puma with panzerfaust support will suffice in negating the M8, if not downright kill it.
Total Tier 1 build order
In summary:


optionable:
 or
or optionable:
Aggression against an early Mortar
Building the MG bunker on the cutoff while your opponent has a mortar squad on the field is not very useful. Even if you do manage to get the bunker up while being bombarded, the mortar will not need a lot of time to take it down. However, the early mortar creates opportunity for you: after 3 riflesquads, a mortar requires your opponent to first spend a 180 manpower on the Weapons Support Center, then another 280 manpower on the mortar squad itself, a weak unit in direct combat. For nearly the same amount of manpower, you can have 2 volks, 1 bike and 2 MG squads: a unit combination with more direct combat potential than 3 rifles and a mortar.
Instead of building the MG bunker at your opponent's cutoff, build it in the gap between the hedges covering your 16+ fuel on the right.
To flank it in this position, your opponent needs to take the long way around via the cutoff point and to mortar it he needs to put his mortar squad in a vulnerable forward position.
After finishing the MG bunker, it is time to make a push for the left side. Because of his weak tech, your opponent should not be able to stand up to your attack and you should be able to take the side relatively easily. Consider purchasing a minesweeper to avoid hiccups.
Once you succeeded in capturing the left 16+ fuel, while the MG bunker denies the other fuel, your opponent should soon starve out of fuel. Losing the cutoff momentarily on the right is not a big issue, as long as your opponent remains unable to get to the fuel. Skip the Kriegs Barracks and tech to Assault Phase and build your Sturm Armory. The combination of fuel starvation and the manpower investment into the WSC will ensure he cannot counter Pumas properly (or tanks, if you are feeling cheeky). Once you have Pumas, you should be able to overwhelm him and retake the cutoff and other sectors on the right (assuming you have lost any), leading to near 100% map control for you. As always, take care not to run into mines, especially so when ordering your Pumas from one side to the other.
Anecdotally, you can use the same methods against an opponent who is familiar with this strategy and builds a Machine Gun Nest on his cutoff to prevent you from decapping it.
A Few Words on Teching and Doctrine
As mentioned, the ideal teching is Tier 1 - Tier 3. The greatest advantage the MG bunker on your opponent's cut-off gives you is the fuel dominance. Your opponent will have a hard time countering Pumas, because effective anti-vehicle unit such as AT guns or M10's require (absent) fuel. Pumas also give you enough mobility to quickly zoom from one side of the map to the other, which can allow you to hold both 16+ fuels.
Generally speaking, a lot of players quit when they realize they cannot regain the left side nor crack the right side. An uncounterable Puma also seems to strongly motivate your opponent to surrender, but some people choose to keep on playing no matter the odds. In that case, I usually start baserushing, picking off retreated squads and dismantling base structures. Consider capping all 3 VPs when you have the opportunity to prevent things from dragging on too long.
Army compositionI prefer to get 2 Pumas for anti-infantry duties; when I need to counter an M8 with Tier 3, I will get an additional Puma to compensate for the Puma that I up-gun. The Puma is a crucial Tier 3 unit and Nebels can be very useful, but StuGs and the Officer are best left alone. After 2 or 3 Pumas, the safest option is to build the Kriegs Barracks and start producing grenadiers. Vetted Grenadiers are, simply put, the most cost-effective Wehrmacht unit and Pumas ensure your opponent has to invest in anti-tank instead of "anti-grenadier" (snipers).
Similarly, when you had to tech to Tier 2 to counter the fast M8, it is still advised to get a vehicle soon to make use of the fuel dominance. Once again, a main force consisting of grenadiers backed up by Pumas
or StuHs will serve you well.
Tier 4 for vehicles is a more expensive option, but I feel that whereas Pumas are more suitable in a support role, Panzer 4's can better fight battles on their own.
DoctrineAll three doctrines are useful, depending on what you need. Quickly summarized, the
main perks of the doctrines are:
- Defensive Doctrine: powerful early game bonuses in the form of For the Fatherland and Fortify the Perimeter;
- Terror Doctrine: enormous lategame power in the form of the King Tiger;
- Blitzkrieg Doctrine: early, fuel-less vehicles in the form of StuHs (excellent for baserushing!).
The Contingency Plans
Sooner or later, something will not go according to what you had envisioned. Hence, common setbacks and how to react:
Losing the house early
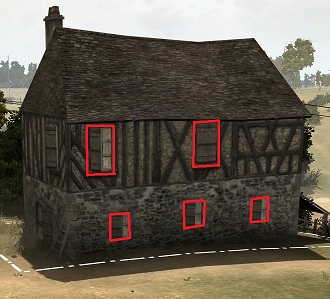
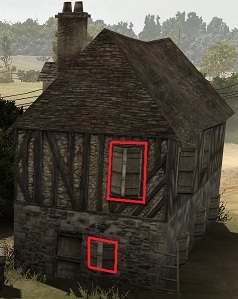
Despite the best of your efforts, your opponent might be able to get a riflemansquad into an important house. In the early moments of the game, you will not have tools such as flamers or snipers available to easily dislodge the garrisoned squad. Thankfully, with a bit of improvisation, volksgrenadiers will suffice. By positioning your squad on the narrow side of the building you limit the amount of damage the garrisoned squad can do, since the amount of firing rifles and therefore damage per second (DPS) is limited.
The wide side of the house has plenty of windows to fire through.
The narrow side has only two windows. With every enemy squadmember taking a window, only two rifles will be firing at your squad. To make up for the protection that the house provides, build some sandbags of your own facing the narrow side. I prefer to bring in a pioneersquad to build the sandbags, so to the volks can keep firing and won't suffer from the extra damage penalties during construction. With roughly equal cover, it is simply a matter of 5/5 rifles (100% of maximum DPS) against 2/6 rifles (only 33% of maximum DPS). After the squad is chased out off the house, quickly garrisson it with a squad of your own and finish or repair the wire.
Failing to capture the +16 fuel
While technically the whole early game plan is designed to make sure you succeed in winning the first engagement, every once in a while you do not fare as well. Generally, a stalemate develops, where you are stuck behind the hedge. Without a fuel sector under your control, you end up with a paltry +5 fuel income granted by your base sector. This income is not enough to get you to Tier 2 on time to counter a fast M8. Therefore, when it does not appear like you can capture the +16 early, send a pioneersquad to capture the +5 fuel to the left of your base. The resulting +10 fuel income is just enough to get a Kriegs Barracks up in time.
Losing the right side completely
If you somehow manage to lose your grip completely on the right side, it can be tough regaining your territory. As mentioned in the introduction, the houses are more useful for defending against attacks from the south than from the north. A sniper can be a great tool in forcing garrisoned squads out of the houses, but especially later in the game it might just not feel possible. In that case, you can always decide to try the good old left side again. It has only one VP, but it is a lot easier to (re)take from the south. Once the left side is back under your control and your resource income is flowing again, you can play your typical left side angoville: go for a basecreep or transition back to the right.
However, do
not try to maintain a presence on both sides: you will be constantly scrambling to react to your opponent's moves and you will lose all iniative.
Losing units
Bad unit preservation hurts more on the left side than on the right side: on the left side, there are no chokepoints to take advantage of (e.g. increasing effectiveness of mines or of a single MG). Therefore, the right side is favourable if you are outnumbered after losing a squad. A sniper is a great help, because you probably are not in a position to keep up map control wise. With the sniper you can still fight back quite effectively by draining manpower while playing conservatively.
Closing Words
M3allem is the one who originally came up with this plan. I personally used to go for the left side of Angoville, while he went for the right side in imitation of Seph's 2.600 play. Finetuning and the addition of the MG bunker on the cutoff from Magpies' forward HQ start lead to this final form, which I quickly adopted after being melodramatically driven to despair on the left side.
~SemInt
Feel free to discuss the guide or leave a comment
here!