The Quick Stuart strategy for British in 1v1 is one of my favorite strategies because it's all about playing British aggressively. The aim of this strategy is to grab your opponent by the throat early and suffocate them out of the game. If they manage to hold on and stay in the game, it hits them with a knock out blow from a Commando raid and a coordinated attack with all your forces simultaneously, and ends the game or gains you a decisive advantage.
This guide written by GreenDevil!At the start of the game, send the Recon Squad to cap the nearest fuel, low/medium or high depending on whats available. Here is an example of the capping order and truck placement to be used for the current maps in the 1v1 Auto Match rotation. These are examples only and it's what I do when using this strategy. I acknowledge sometimes you may have to change tactics or capping orders and objectives, but adapting on the fly is all part of this great game!
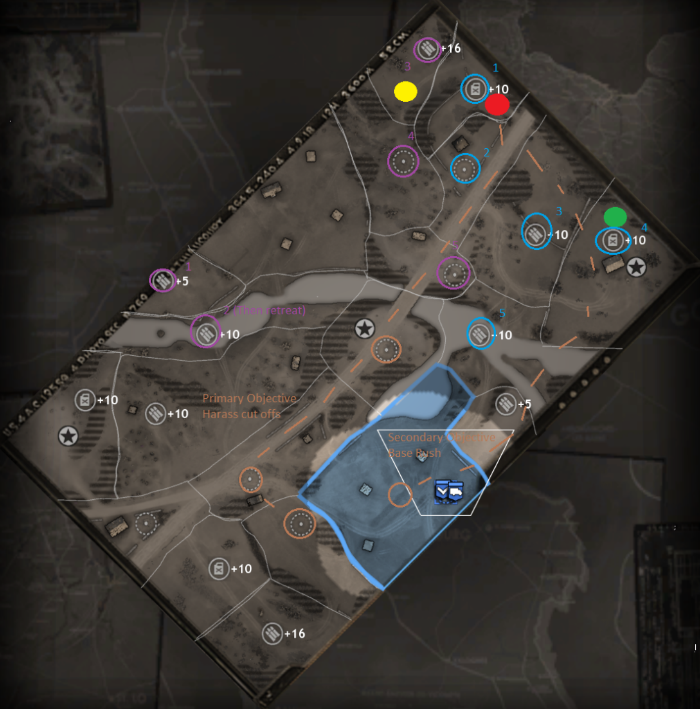
KeyRed Circle - HQ Truck
Yellow Circle - FST Truck
Green Circle - Armor Truck
Purple Circle - LT Capping Order
Blue Circle - Recon Section Capping Order
Brown lines - and Circles are Primary and Secondary Objectives
White Square - Mortar Pit
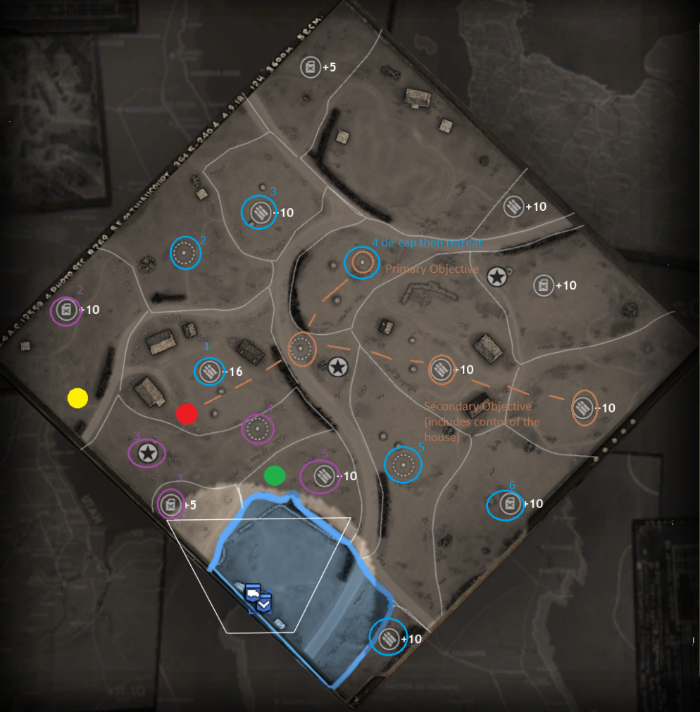
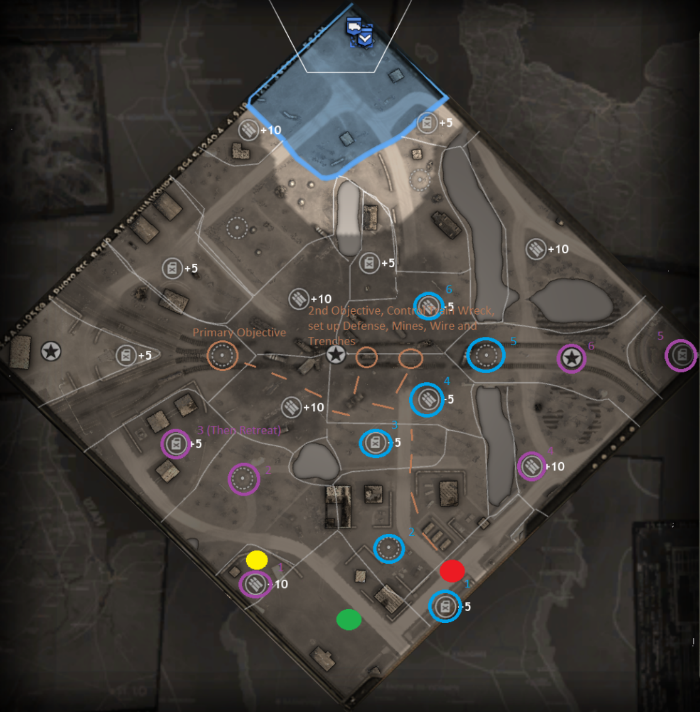
Angoville North Spawn
The choice for HQ placement is simple on Angoville North. The +16 fuel in the centre allows for a Quick Stuart in about 6 minutes and 30 seconds. Park your FST at the +5 fuel at the off map spawn point to save time and get the Stuart out faster. Harass and cap the cut off points as indicated and you will control the game, if that fails you can always go for a base rush through the middle of the two bunkers at the front of the Wehrmacht base. Against PE I recommend concentrating on going for the cut off points.
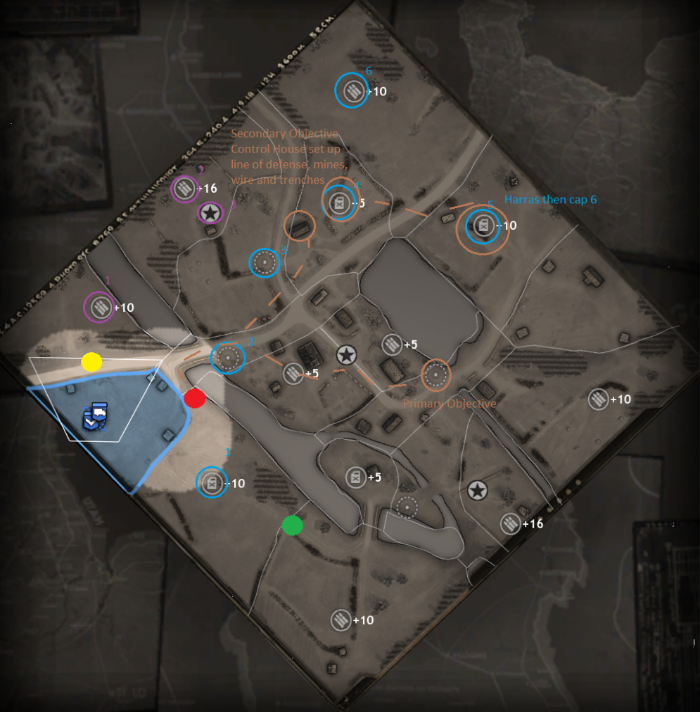
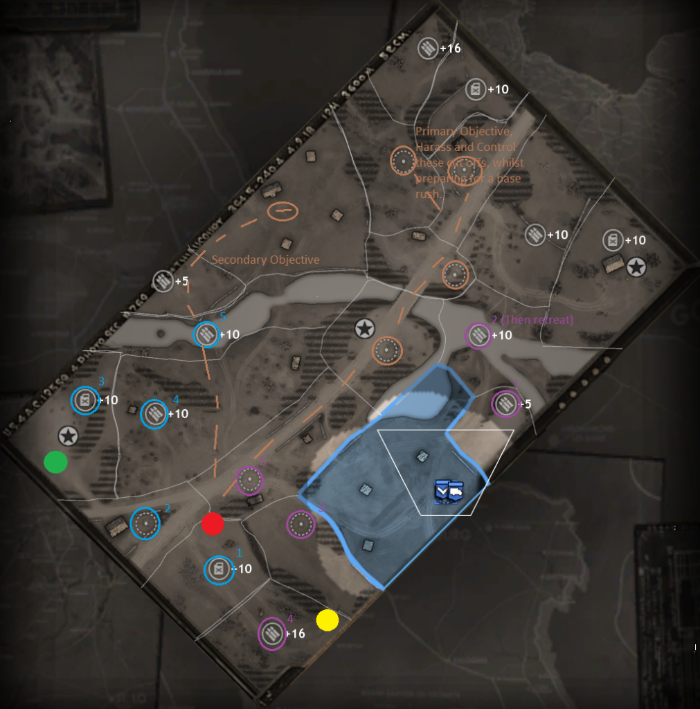
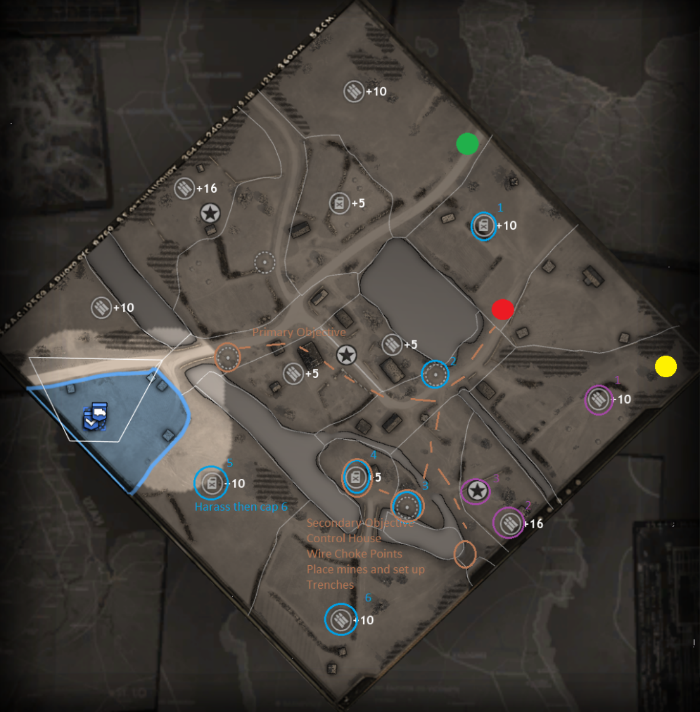
Angoville South Spawn
Angoville South is too risky to go for the +16 fuel on the right as it leaves you too vulnerable to a HQ pin from Wehrmacht MG's or PE Halftracks, so I recommend the +16 munitions, which provides the hedgerows and houses for cover if required. Again harassing and capping the cut off points as indicated will control the game for you, but if you can't quite get to the cut off, go one less then that and harass the high fuel and secondary cut off as indicated.
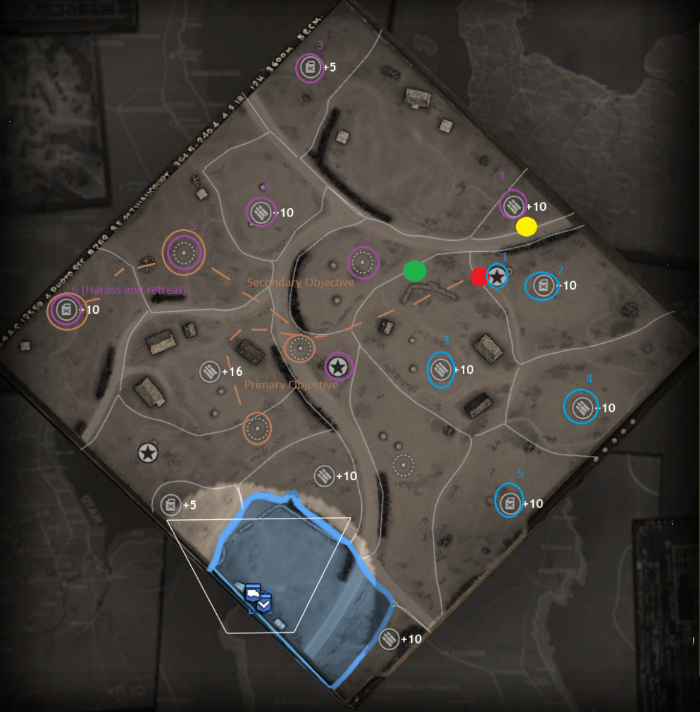
Beaux Low Lands North Spawn
Beaux Lowlands North is pretty easy to get a fast Stuart out, the +10 fuel I have indicated will allow for a Quick Stuart without any problems. The hedgerows and wooden mill also provide cover and blocking if needed. Look to finish the game early on this map because the longer it goes on the better it gets for Axis. Instead of trying to cap or de-cap the entire map, go for the cut offs as indicated, it's much quicker denies resources and pop caps your opponent late game.
Beaux Low Lands South Spawn
Beaux Lowlands South is pretty easy to get a fast Stuart out, the +10 fuel I have indicated will allow for Quick Stuart without any problems. The Treeline and wooden house also provide cover and blocking if needed. Look to finish the game early on this map because the longer it goes on the better it gets for Axis. Instead of trying to cap or de-cap the entire map, go for the cut offs as indicated, it's much quicker denies resources and pop caps your opponent late game.
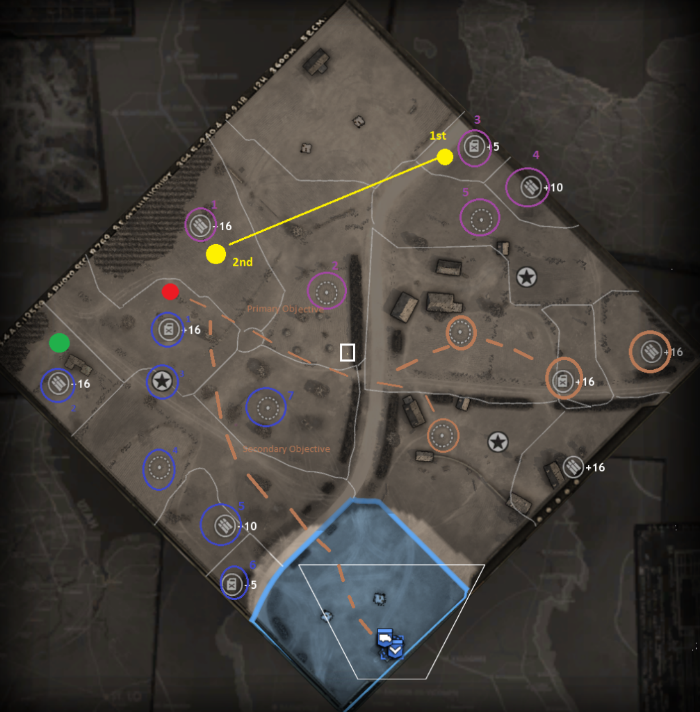
Langres North Spawn
Langres North Spawn provides a +10 fuel on the top right to park your HQ on to obtain a Quick Stuart. You can squeeze the HQ truck in on the western side of the top VP point (Refer to the attached replay pack for an example). This allows for expansion and control of the center region of the map. Push for the cut offs and areas indicated to control the game.
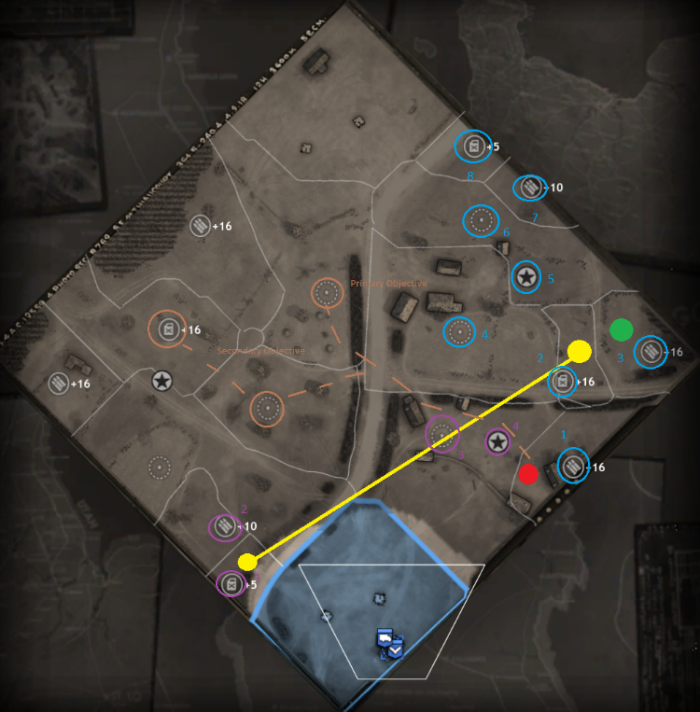
Langres South Spawn
Langres South Spawn is a little different then the north spawn as it has the +16 munitions on the left. I recommend parking your HQ on the +16 munitions because the +10 fuel on the right side is too open and vulnerable to an early rush. Secure the +10 fuel on left and hold it, and you will achieve a Quick Stuart. Push for the cut offs and areas indicated to control the game.
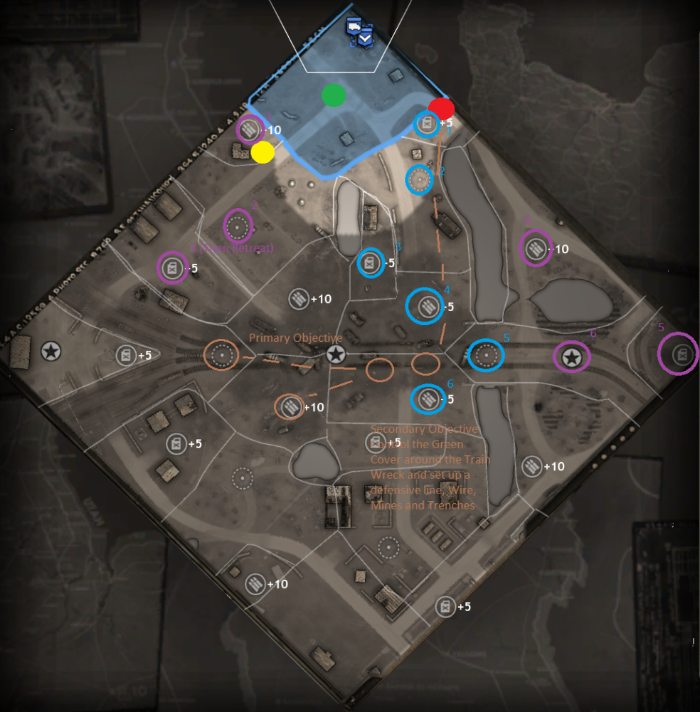
Wrecked Train North Spawn
Wrecked Train North Spawn requires a bit of hard work and early protecting of your fuel income to obtain a Quick Stuart. I recommend parking on the +5 fuel on the right as this allows for quick expansion up to the center and the main aim is to control the +10 fuel on the far right. The +5 fuel sacrifices central control for fuel income to get the early Stuart, make sure you defend the cut off to the +10 fuel and maintain a +28 fuel a minute income throughout the game. Possibly even look to upgrade secured resourcing on your HQ to gain that little bit extra of fuel income.
Wrecked Train South Spawn
Wrecked Train South Spawn requires a bit of hard work and early protecting of your fuel income to obtain a Quick Stuart. I recommend parking on the +5 fuel on the right as this allows for quick expansion up to the center and the main aim is to control the +10 fuel on the far right. The +5 fuel sacrifices central control for fuel income to get the early Stuart, make sure you defend the cut off to the +10 fuel and maintain a +28 fuel a minute income throughout the game. Possibly even look to upgrade secured resourcing on your HQ to gain that little bit extra of fuel income.
Semois North Spawn
Semois North Spawn is probably the easiest map to field a quick Stuart on. A 6 minute Stuart on this map is by no means out of the question if you control your HQ fuel sector and an additional +5 fuel. To win the game push for the cut off early and control the house and surrounding area at the +5 fuel in the lower centre of the map. If a Wehrmacht or PE player are camping in heavy cover in the center of the map, consider building a Mortar Pit outside the graveyard behind the hedges near the house. A few well placed mines will prevent it from being rushed.
Semois South Spawn
Semois South Spawn is also a very easy map to field a quick Stuart on. To win the game push for the cut off early and control the house and surrounding area at the +5 fuel in the top left area of the map. If a Wehrmacht or PE player are camping in heavy cover in the center of the map, consider building a Mortar Pit outside the graveyard behind the stonewall surrounding the graveyard. A few well placed mines will prevent it from being rushed.
The build Order for this strategy is as follows after you send the Recon Squad to cap the nearest fuel, low/medium or high depending on what's available.
After you have built the LT, send him to cap focusing on securing fuel, perhaps something easy for the poor blighter to cap like a low fuel or something. *Remember* LT's can take on a Pioneer squad (without a flamer or Vet), get him into cover and he will win the battle. Also if you think your micro is good, don't fear Bikes either, with a little bit of good micro and circling the bike with the LT, the LT will win.
Once the HMG Bren Carrier is out, start being aggressive. Push for your opponents cut off with the Tommy Squad, LT, and HMG Bren Carrier. Leave your Recon Section Capping or harrassing your opponents fuel/munitions if you can't get to the cut off.
If your opponent is Pio SpammingIf you sense Pioneer Spam at this stage, (i.e - You see multiple Pios 7-8 and support veterancy) then this strategy needs to be adjusted a little, but not much. If the smell of Pio spam is in the air, then you must focus on securing yourself as much munitions income as possible, as well as denying the enemy munitions, run for their cut off ASAP and cap it. You will require a second Bren Carrier either with HMG if you can afford it, if you can't afford it garrison one of your Tommy squads inside it until you can upgun it. Always keep two Tommy squads together at all times or support them with a Bren Carrier HMG. A Pio Spammer will either look to destroy all your Tommy's with Flamers or he will rush your HQ and try and burn it down. If you capture his cut off, two Bren Carriers and two Tommy Squads will allow you to hold the cut off whilst your Recon Section is off capturing and connecting territory to allow you to either a) Tech to a Stuart and then Cromwells or b) Place a MG nest at his cut off and protect it.
Still choose Commando Doctrine and place out some Radio Triangulation Beacons to detect any Storm Troopers trying to sneak around and create havoc. If you hold the cut off, you will win simple as that.
Build order for Pio Spam as follows:
What about 5 Pio T2?There is another variant to Pio Spam and that is the 5 Pioneers followed by a quick Kriegs Barracks and skipping the Wehrmacht Quarters, otherwise known as 5 Pio T2. This is, in my opinion, much more dangerous and widely used as it involves a Half Track rush and Vetted Grenadier Spam, combined with FTFL and bunkers. If you see 5 Pioneers and no support Vet, stick with the same build order as Pio Spam, but only build the one Bren Carrier HMG to counter the fast halftrack. You will need an additional LT to fight the Grenadiers though.
Very early in the game send your HMG Bren Carrier into his base and kill as many Pioneers as possible and delay the building of the Kriegs Barracks as long as you can. When doing this, garrison a Tommy squad inside the Bren Carrier and drive for the Wehrmacht base, start the upgrade on the HMG at the last possible moment, so the HMG will pop and unload your Tommy's inside the base and you can really do some damage to those Pios trying to build the Kriegs Barracks! This will buy you time to get your Stuart out, and then gang up on any Grenadier Squads as soon as you see them. Focus fire them with Bren Squads and Canister shot them with your Stuart. Don't let him get to the stage where he can blob 3-4 Gren Squads, be aggressive when you see the first one or two squads and maul them and bleed his manpower. If you get rushed by a Half Track before the Stuart arrives, use your Bren Carrier to bring it down, use anti armor rounds to send it to a quick death. A Bren Carrier will definitely be enough to hold off the half track if your micro is up to scratch.
Build Sappers only to repair your Stuart only, don't upgrade to PIAT off the bat, play it by ear and when you have a spare 75 muni consider Over Repair so you can keep using your Stuarts Canister Shot.
Focus on denying him munitions as much as you can, this will prevent him spamming Assault Nades or normal Gren nades, Shreks and LMG42's. Build Sappers and a Howitzer as soon as possible to bombard those bunkers and Gren blob. Park your Field Support Truck and Armor Command Truck on munitions to utilize Off Map Commando Artillery and for healing your Tommys and LT's. Keep an extra eye on your LT's, his veterancy is a game winner! Tommys backed by two Vet 3 LT's are more than a match for Vet 3 Grens, good Micro and avoidance of grenades is the key. Your opponent will realize fairly quickly that he will need Tanks, so be on the lookout and build at least Sapper PIAT's or a Cromwell, just in case.
The Quick Stuart ContinuedAs soon as the LT is out, pack up the HQ and park it on the low fuel. Your main focus early game is to secure at least one more medium fuel or two more low fuels. No matter what else happens, this will keep you on track for a "Quick Stuart". Building another Tommy Squad before you reach 30 Fuel income after the Bren Carrier is out will delay the arrival of the Stuart. Sometimes if you are under a lot of pressure from your opponent, you might have to build another Tommy before researching the FST, but if you do the Stuart will have lost some of its shock value. So with that said, as soon as your fuel income ticks over to 30, research the Field Support Truck. When it arrives, place it on the closest medium munitions you have available to minimize travel time. Once it's set up, use the following build order.
If you have achieved a "Quick Stuart" you will know you have by your opponents reaction. As soon as you show it to him, if he hard retreats MG's, Volks, PG's, IHT's, AC's back to his base you know you have surprised him. Use it your advantage and push for his cut off, trench up and wait for the inevitable battle, he will have no choice but to try and fight you.
If you been aggressive enough and cut the Wehrmacht player off early, or denied him fuel, the only viable counter at this Stage to an early Stuart is:

Never fear the Pak 38, let your Stuart take one Pak shot to scout its position, then call in these fellows in the picture below, they are your one stop anti-pak specialists. At this stage you should have been aggressive enough to easily have accumulated 3 CP's. If you haven't quite got 3 CP's, you haven't been aggressive enough. However not all is lost, hold the Stuart back and send your infantry in first to scout the Paks position. Fight around the Pak until you have 3 CP's for Commandos. Send the Stuart to his base and shoot up the Kriegs Barracks or MG Bunkers to distract him as much as you can. Build PIAT Sappers to repair the Stuart in case it hits a mine or comes across cloaked Storms or an ATHT. Build your second Tommy squad as per the build order and a casualty clearing station. By this time, you should have 3 CP's at least for a coordinated Commando raid and an attack to knock your opponent to the floor!
Find that Pak!
If you don't want to let your Stuart take a shot from a Pak38, try hovering your mouse over some possible Pak38 locations in the FoW. If your cursor detects any green/heavy cover where it shouldn't be, there's a very good chance a Pak38 will be there.
Drop Commandos behind the Pak and wipe it out. Usually there will be a Med Bunker around near the Pak and MG's as well, wipe all them out if you can and blow up the bunker with Demolitions. Coordinate your attack, use everything you have and try to knock the Wehrmacht player out of the game right there and then. Push for the cut off as soon as possible after this battle. If the Commandos hit a mine or get pinned by a MG, don't hang around, just retreat them and reinforce. Once they are all healed up they can be used to attack from a flank with their smoke ability and run right up to MG's or enemy infantry.
But what if a StuG IV arrives or a StuH? If a Wehrmacht player responds to your Stuart with a StuG IV, it means you probably haven't denied him enough fuel early. That's okay, you can't always dominate early. The best response to a Stug or a StuH is Armored Command Truck and a Firefly, but you will probably have to use "Stop Gap" AT in the meantime until in Arrives. Build another PIAT Sapper squad so you have two in total. When you have a StuG or StuH buttoned with a Bren Squad, fire up your LT, this gives your PIATs a tremendous buff in firing speed for 15 secs! Get around behind them and hit their rear armour with PIAT's and they will go down in a few salvos. Sometimes if my oppoent has good micro and kites with his vehicles, I build a 17 Pounder as a delaying tactic only until the FireFly arrives, otherwise your Sappers will need constant reinforcing. Build order as follows.
But what if the Wehrmacht player bunkers up and builds an 88mm Flak?If you Wehrmacht opponent uses this fairly common tactic, don't worry. Commando Doctrine still has all the tools available to you to be able to deal with it quite effectively. I approach the situation with a "chipping away" attitude. Go LHS Commando Doctrine and call in a HQ Glider. PIAT Commandos and Mortar Commandos are very effective against bunkers, use their concealing smoke to get in behind the bunker and plant demo charges, then a few shots from the PIATs and Mortar Crew and it will be gone.
Use Commando Off Map Artillery on the 88's themselves and send in normal Commandos under concealment to get in behind the bunker protecting it and plant Demo charges. Consider also building a 25 Pounder as additional help to clear the bunkers.
Keep and eye on your fuel after the Stuart is out. As soon as you have hit 65 fuel, you need to research the Armor Command Truck and place it on the nearest medium or low fuel you have available. Against Wehrmacht, if I have the initiative I build the casualty clearing station whilst the armor command truck is researching, unless my opponent is Pio Spamning or Gren Spamming, then I build it at the time I have indicated earlier. When playing as British, I recommed always researching your Trucks and setting them down as early as you can you a) Have the high resources and b) Have the tech available if you need it.
If your opponent manages to survive until the late game and calls in a big unit like a King Tiger, Vet 3 Tiger, Jagdpanther or Panther Battle Group, then your best Tank Killing units in support with Bren Squads and PIAT Sappers are these big boys below:
Fireflies are the best Tank killing unit in the game. Supported by a Cromwell Command Tank at Vet 2, it provides extra LoS for the Fireflies and almost doubles there firing rate. Make sure you give the Fireflies the commander upgrade as well as the Cromwell Command Tank.
Some PE player response to a Quick StuartAgainst PE, unless you are confident that you can outplay your opponent, I recommend after your Bren Carrier is out to build two 95% Trenches outside your HQ.
If a PE Player IHT RushesIf you see Infantry Half Tracks from PE, then you must build a Casualty Clearing Station. This means the PE Player is taking a huge gamble, high risk, high reward strategy. He will attempt to get at least two IHT's and pin you at your HQ whilst G43 PG's kill all your Tommy's and win the game for him. Build a Casualty Clearing Station ASAP and build an additional Tommy Squad. Save your munitions for Armor Piercing bursts for your Bren Carrier. Somehow you need to be able to keep your Recon Section out of the Action so he can cap and keep resources flowing, so you can field a Stuart. Finish the trenches at your HQ jump in them and hold off the attack.
So if you see one or mutliple IHT's, use the build order as follows:
If a PE player builds a Marder or rushes a PIV ISTA PE player will respond with a Marder, because at this stage of the game he shouldnt have had enough fuel income or time to have teched to T4 for a Pz IV IST, but if he has rushed a Pz IV IST, then follow the same response as for the StuH of StuG IV. So against a fast Pz IV IST or Stuh or StuG IV, field 2 x Sapper PIAT squads, build a 17 Pounder and stall for your armor command truck and get a Firefly.
Never fear the Marder III Tank Hunter! Button it with a Bren Squad and then Kill it with PIATs. Get behind it with your Stuart and it will die in a matter of seconds. Canister shot any PGrens that come to support buttoned Marder with your Stuart. As soon as the Marder is dispatched, you are in a great position, race for the PE players cut off and de cap it, trench up and wait for a counter attack. This buys you valuable time to tech to a Cromwell and end the game for certain.
Check out
IplayforKeeps Replay Pack using the Quick Stuart Strategy.

 >
> >
> >
> >
>

 >
> >
> >
> >
>
 >
>


 >
> >
> x2 >
x2 >